
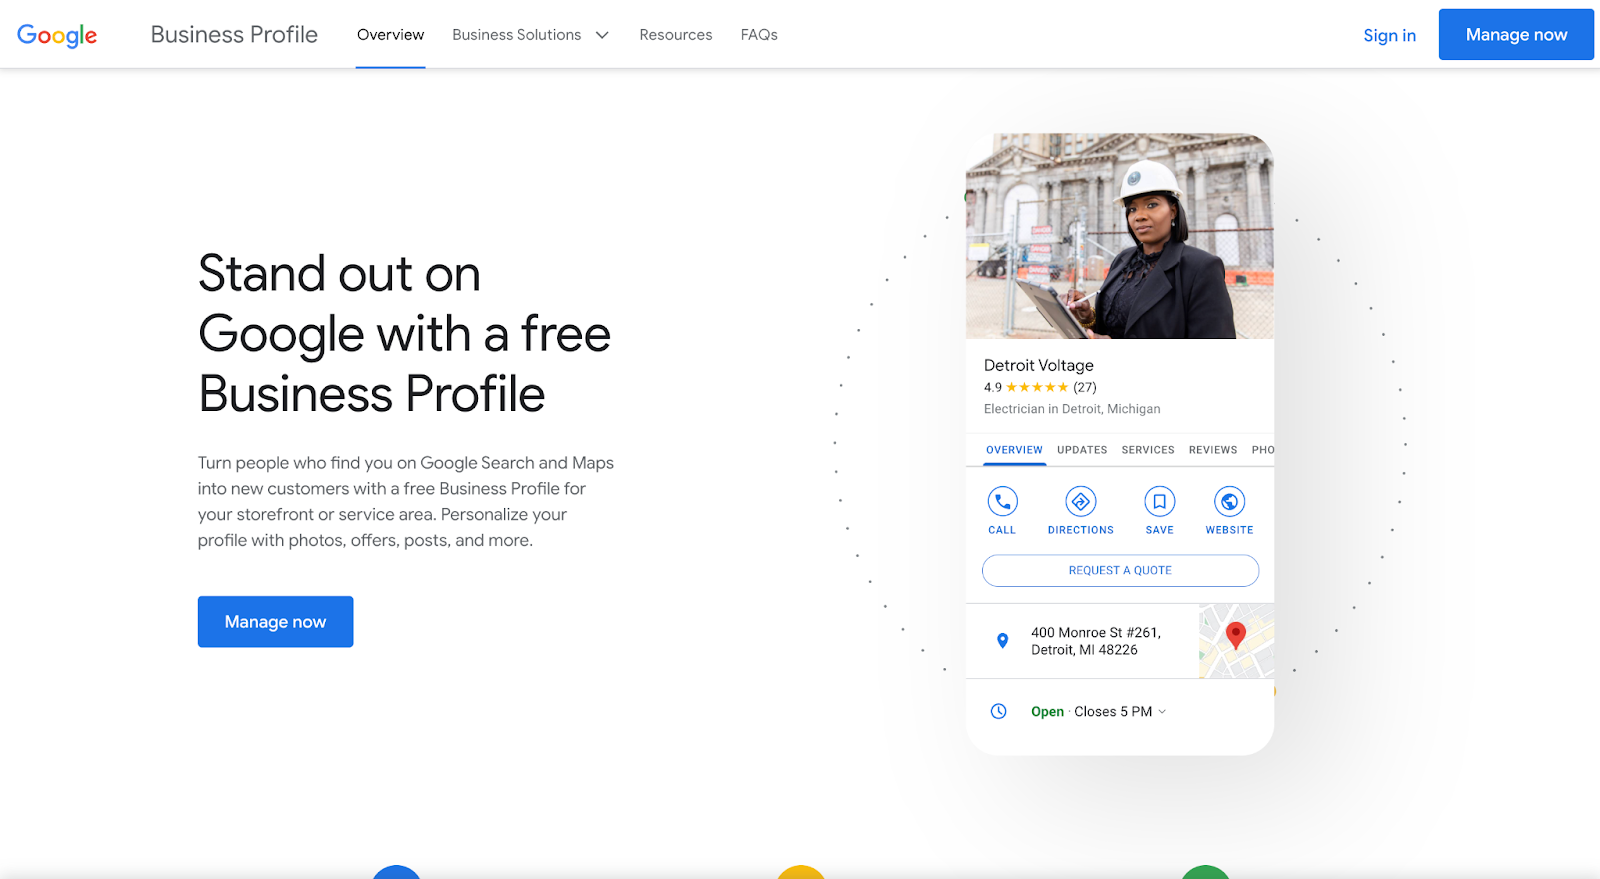
If you want your business to show up at the top of a Google search, getting your Google Business Profile right is a must.
The ranking factors associated with your Google Business Profile account for as much as 36% of the factors that determine where Google positions you in the search results.
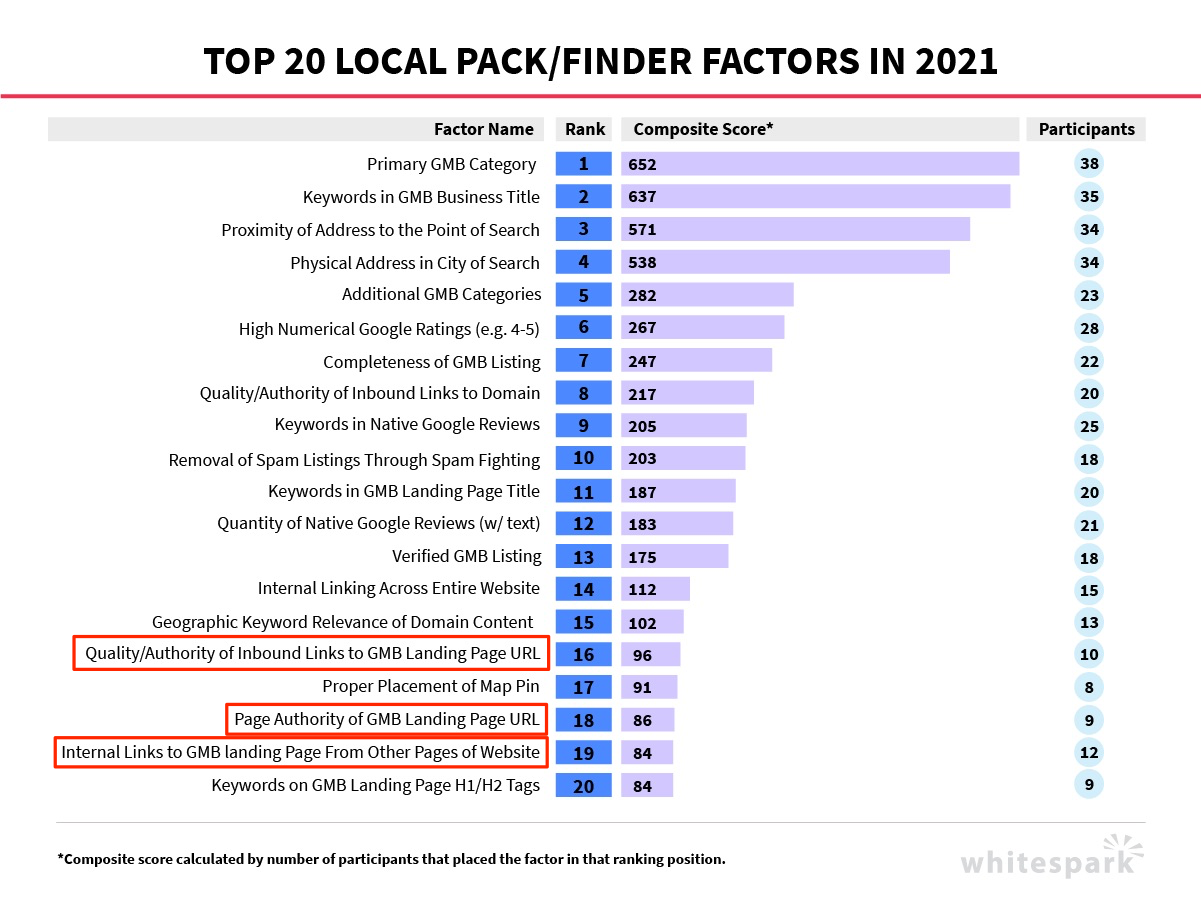
Nobody really knows what Google uses to rank websites, but there have been many studies and discussions among SEO professionals about this subject.
Google Business Profile ranking factors
In plain English, the positive and negative factors associated with your Google Business Profile (formerly Google Business Profile) that SEO professionals believe drive rankings are:
- Listing verification.
- Your business title.
- Your primary and secondary categories.
- Your website URL.
- The domain authority and number of links pointing to your Google Business Profile.
- The completeness of your Google Business Profile.
- Map pin placement.
- Spam from competitors.
- How close the address on your Google Business Profile is to the location of the searcher.
- Review quantity, quality, engagement, and keywords usage.
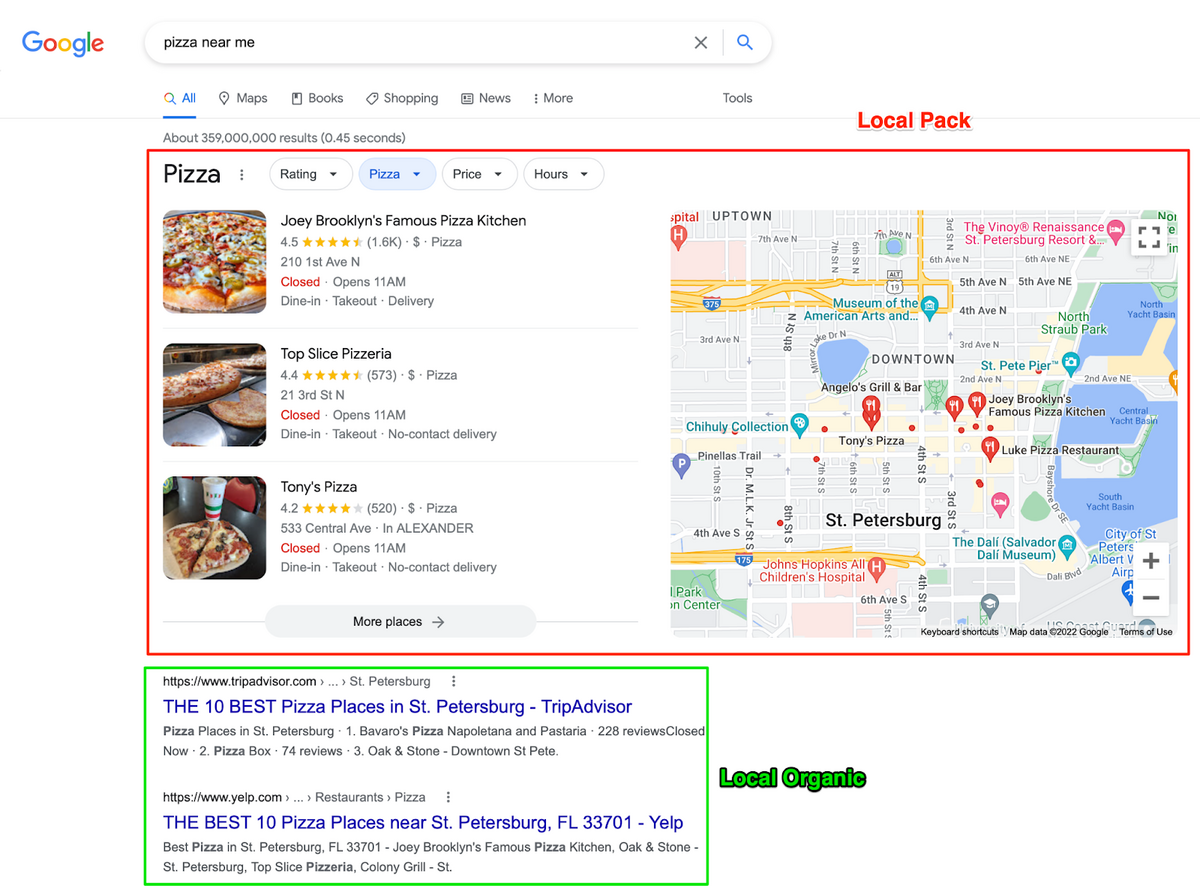
Ultimately, if you want to rank in the local pack, you’ll need to have a Google Business Profile.
In this article, I’ll walk you through how to set up your Google Business Profile so you nail all of these factors.
After that, we’ll dive into a list of weekly profile management action items.
Google Business Profile guidelines for practitioners
A practitioner listing is one that’s for a person instead of a place.
If you’re a doctor, dentist, lawyer, financial planner, or insurance or real estate agent, you’re an individual practitioner. In these cases, Google has some separate guidelines for you to consider before creating your Google Business Profile.
As an individual practitioner, you can create a Google Business Profile if:
- You operate in a public-facing role.
- You can be contacted directly at the verified location during listed hours.
- You don’t have multiple listings to cover all of their specializations.
If you’re a practitioner that is one of several at the same location:
- The business itself should create a Google Business Profile for this location, separate from that of the practitioner.
- The title of the Google Business Profile for the practitioner should include only the name of the practitioner, and it shouldn’t include the name of the business.
For example, this doctor’s office has their own Google Business Profile.
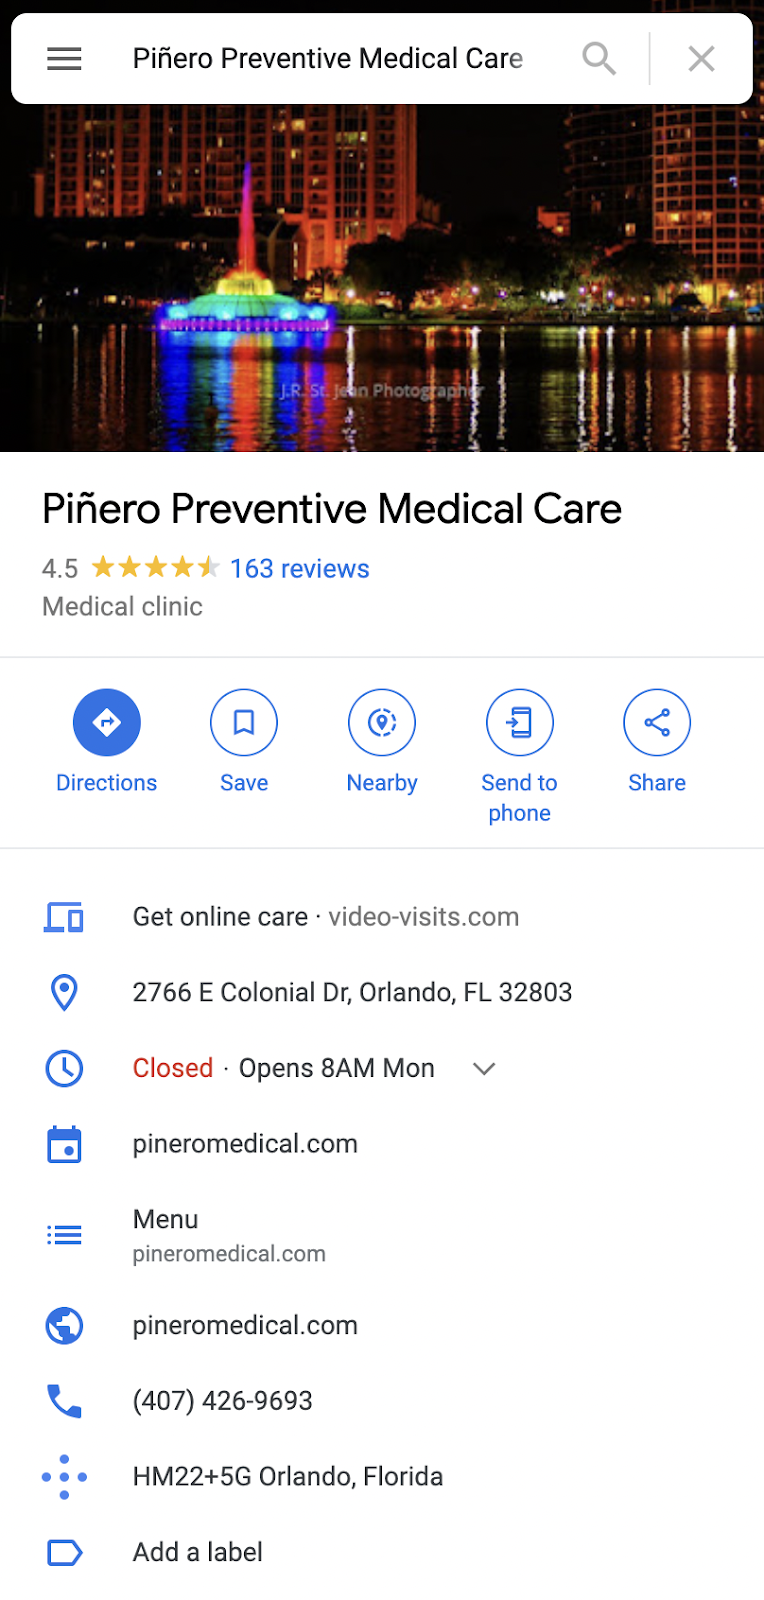
And so do the doctors that work there.

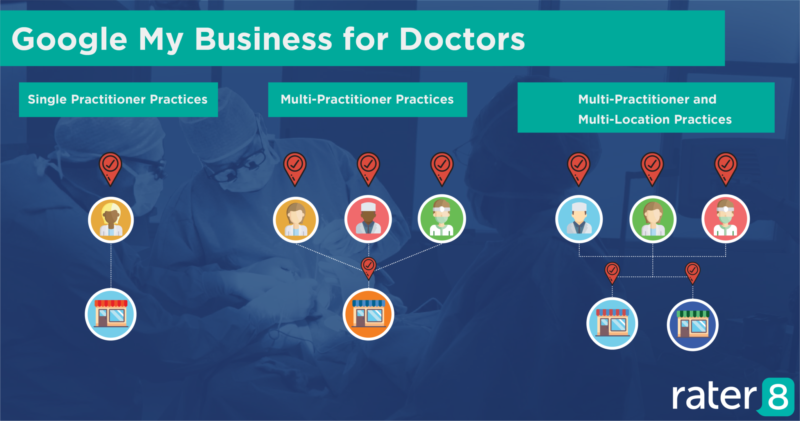
For larger medical businesses, the setup could look like this:
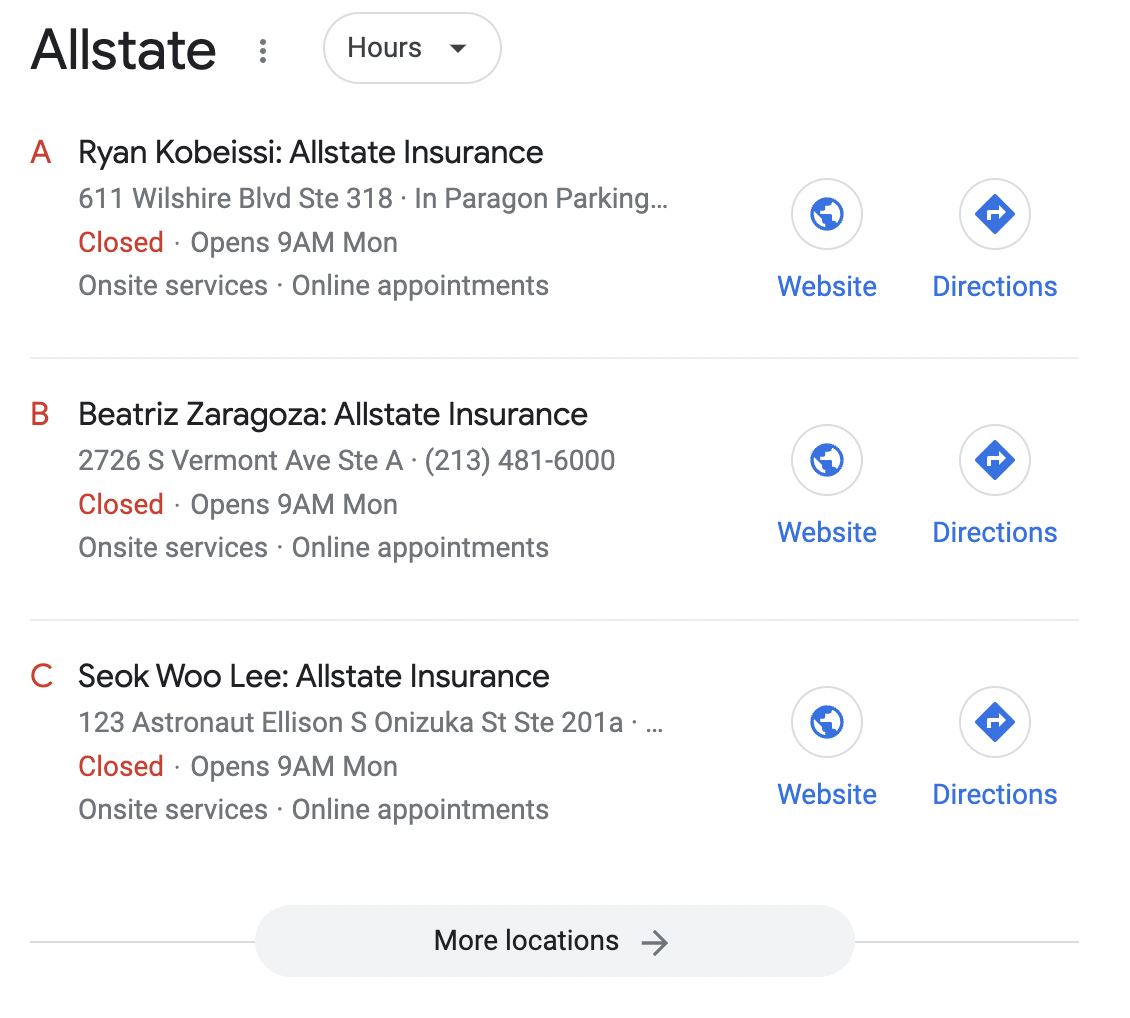
If you’re the only practitioner at the location, it’s best for you to share the Google Business Profile with the organization. In this situation, you’ll want to create a single Google Business Profile with this naming format: [practitioner name]: [brand/company].
For example, if I was the sole public-facing practitioner at this Allstate-branded location, “Nick Rubright: Allstate Insurance.”
If you’re setting up a practitioner listing, Whitespark created a nice little spreadsheet in their guide on how to handle practitioner listings. This will show you some things to make note of as you create and optimize each of your Google Business Profile listings as a practitioner. This way, your location and practitioner listings don’t conflict with each other in the search results.

This topic can easily become complicated, but this video, also from Whitespark, covers it well.
Google Business Profile guidelines for chains and brands
If you’re a chain or brand building a Google Business Profile for a new location, make sure your name and category are consistent across all locations.
For brands that share a single location, like KFC and Taco Bell do at times, then don’t combine them into a single Business Profile.
Instead, for the Google Business Profile, choose one name. If the brands are independent from each other, you can use a separate profile for each brand at the shared location.
For franchisees or authorized sellers that are allowed to use the brand of a larger organization, you can use their brand in your name. Google lists “TCC Verizon Wireless Premium Retailer” and “U-Haul Neighborhood Dealer” as acceptable examples in this case.
Google Business Profile guidelines for departments
Departments that operate businesses, universities, hospitals, and government institutions that operate as distinct entities, such as the Walmart Vision Center or Sears Auto Center, have their own Google Business Profile.
The category for these Google Business Profiles should differ from that of the main business or organization and any other department listings associated with the same main business or organization.
How to set up a Google Business Profile for your small business
In this section, I’ll walk you through the exact steps we take to set up and optimize a client’s Google Business Profile.
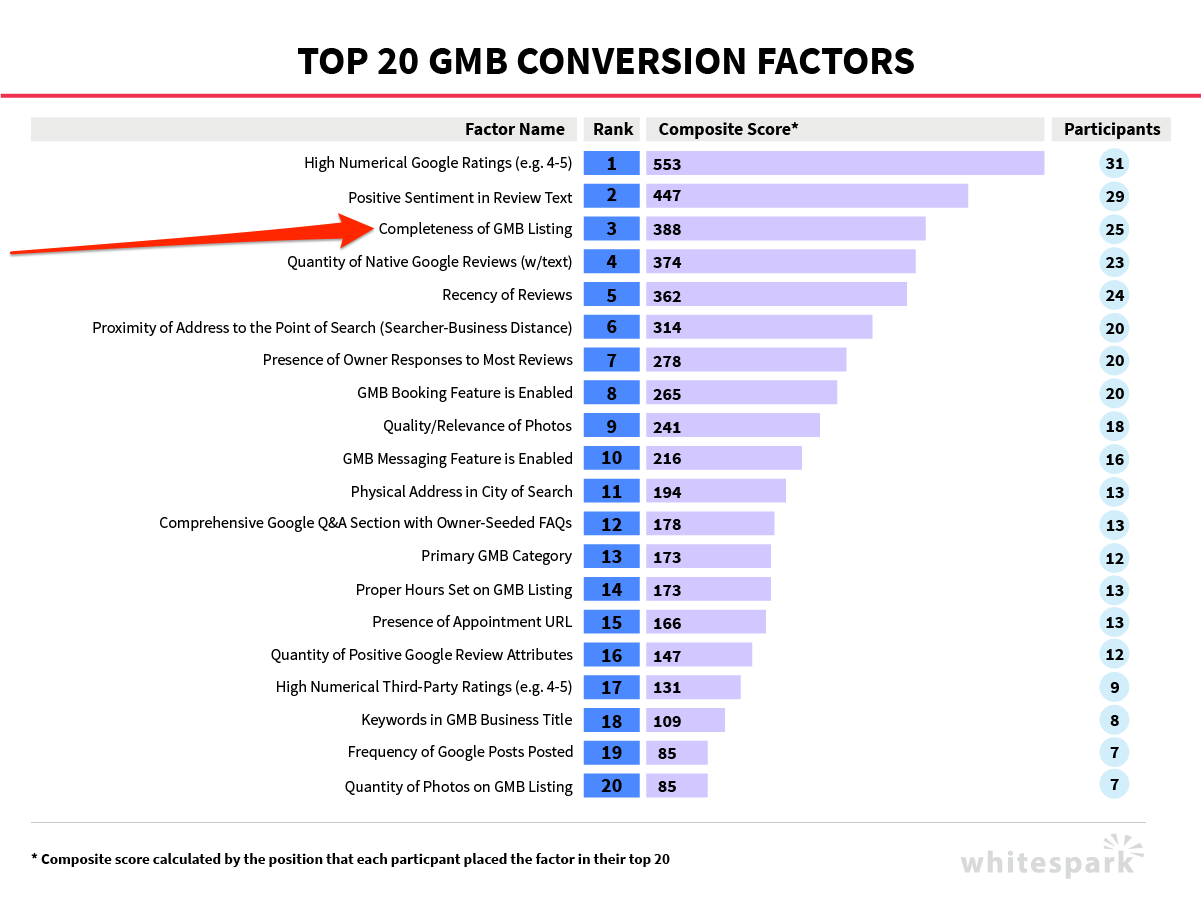
Take your time here. Rankings are cool, but according to a survey from Whitespark, the completeness of your Google Business Profile is one of the top drivers of conversions like website clicks, click-to-call conversions, and direction requests.
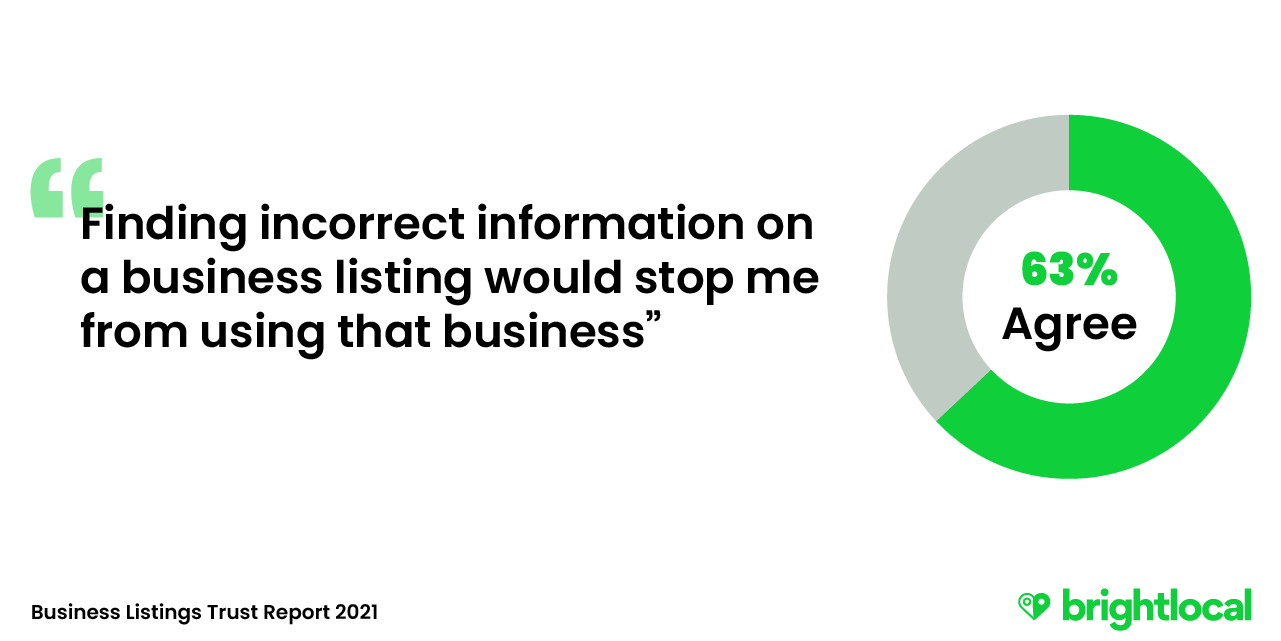
And if the information is incorrect, many of your potential customers will blame you, not Google.
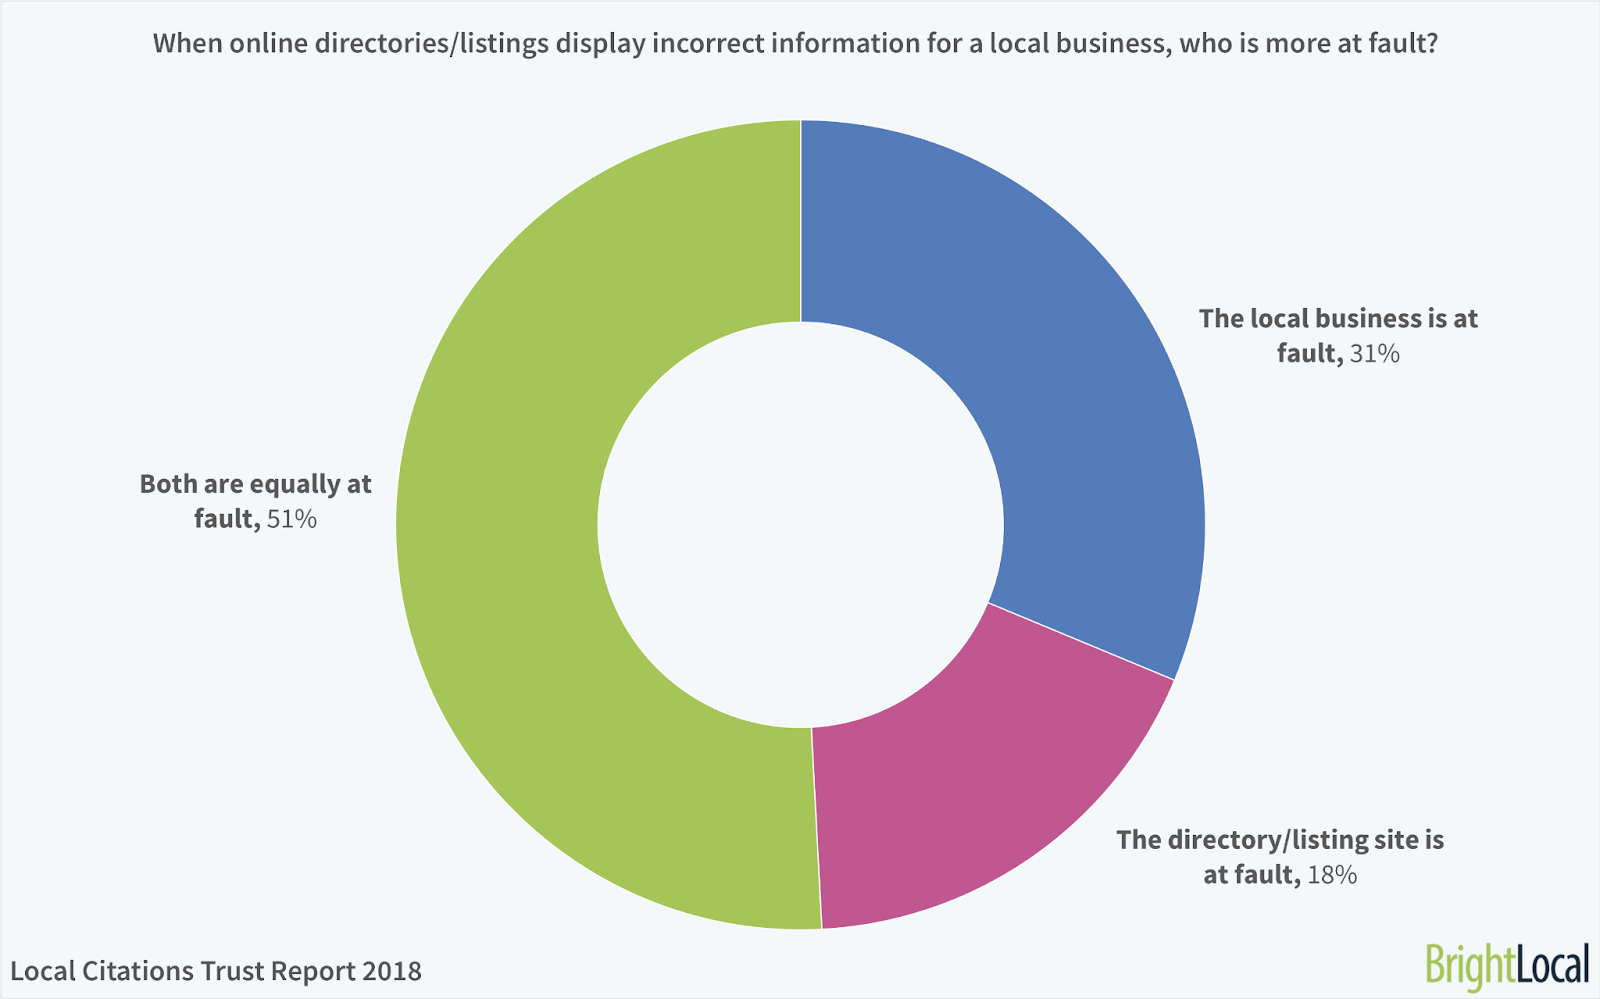
Which may lead to them not doing business with you.
All of the other top 20 conversion factors listed are a byproduct of proper setup and maintenance of your Google Business Profile to make sure it always has accurate, detailed, helpful information.
With this in mind, we’re going to be focusing on what our team believes are best practices based on our research and expertise. This is written for entrepreneurs who are serious about local SEO success.
If you want more general information about Google Business Profile setup, check out our local SEO guide.
Later, we’ll go into weekly maintenance steps to make sure your Google Business Profile is always kept up to date and stays competitive.
Step 1. Create a Google Workspace account
While you can set up a Google Business Profile with any Google account, we recommend signing up for Google Workspace and using that account.
We use it for our agency for nearly everything. In addition to keeping all of our Google-related stuff organized, here’s why we love it:
- Gmail: It’s our favorite email provider because it’s fast, it has awesome spam filtering, and it integrates seamlessly with even the most niche software that we use.
- Google Sheets and Google Docs: We just need this. We use it to track campaigns, create and share content, and automate email workflows with weird plugins and tools. We can also connect our spreadsheet data to anything with Zapier to build productive workflows. Yeah, these are free anyway, but the additional storage is nice.
- You can record video calls in Google Meet: This is great. We don’t have to take notes and it makes remote training so much easier for all parties involved.
You can create your account here.
Once you create your account, you’ll need to connect it to your domain. This gives you an @yourdomain.com email address that also works as a Google account.
The actual process of setting up Google Workspace with your domain is beyond the scope of this article, but this guide from ThemeIsle details the exact steps.
Step 2. Sign in and find your business
Go to google.com/business and sign in with the Google account that you want to use to claim your business and click “Manage Now.”
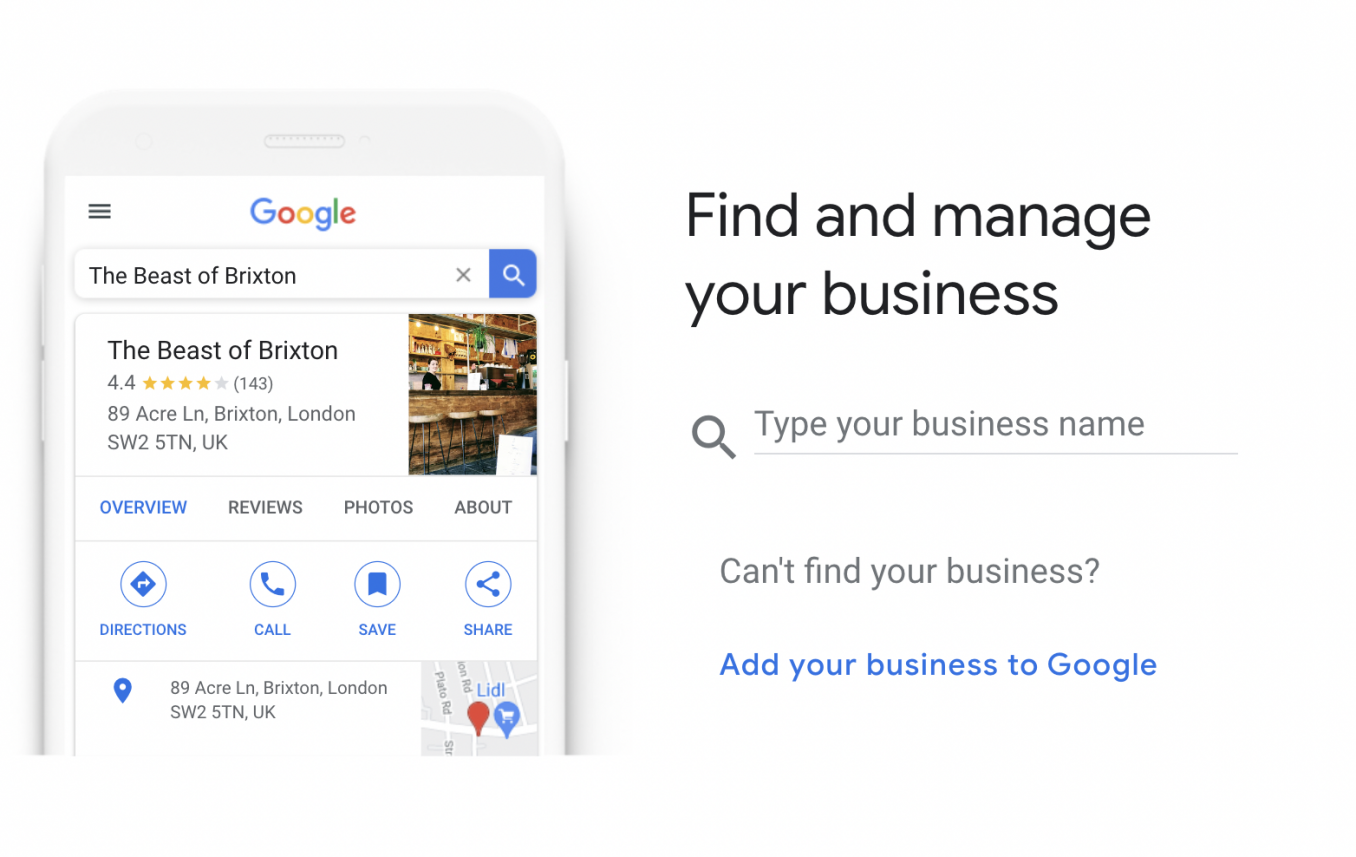
Step 3. Search for your business
Type your business name into the search box to see if a profile with your company name already exists.
If it does, it’ll appear as you type and you can click on it.
Otherwise, then go ahead and click “Add your business to Google.”
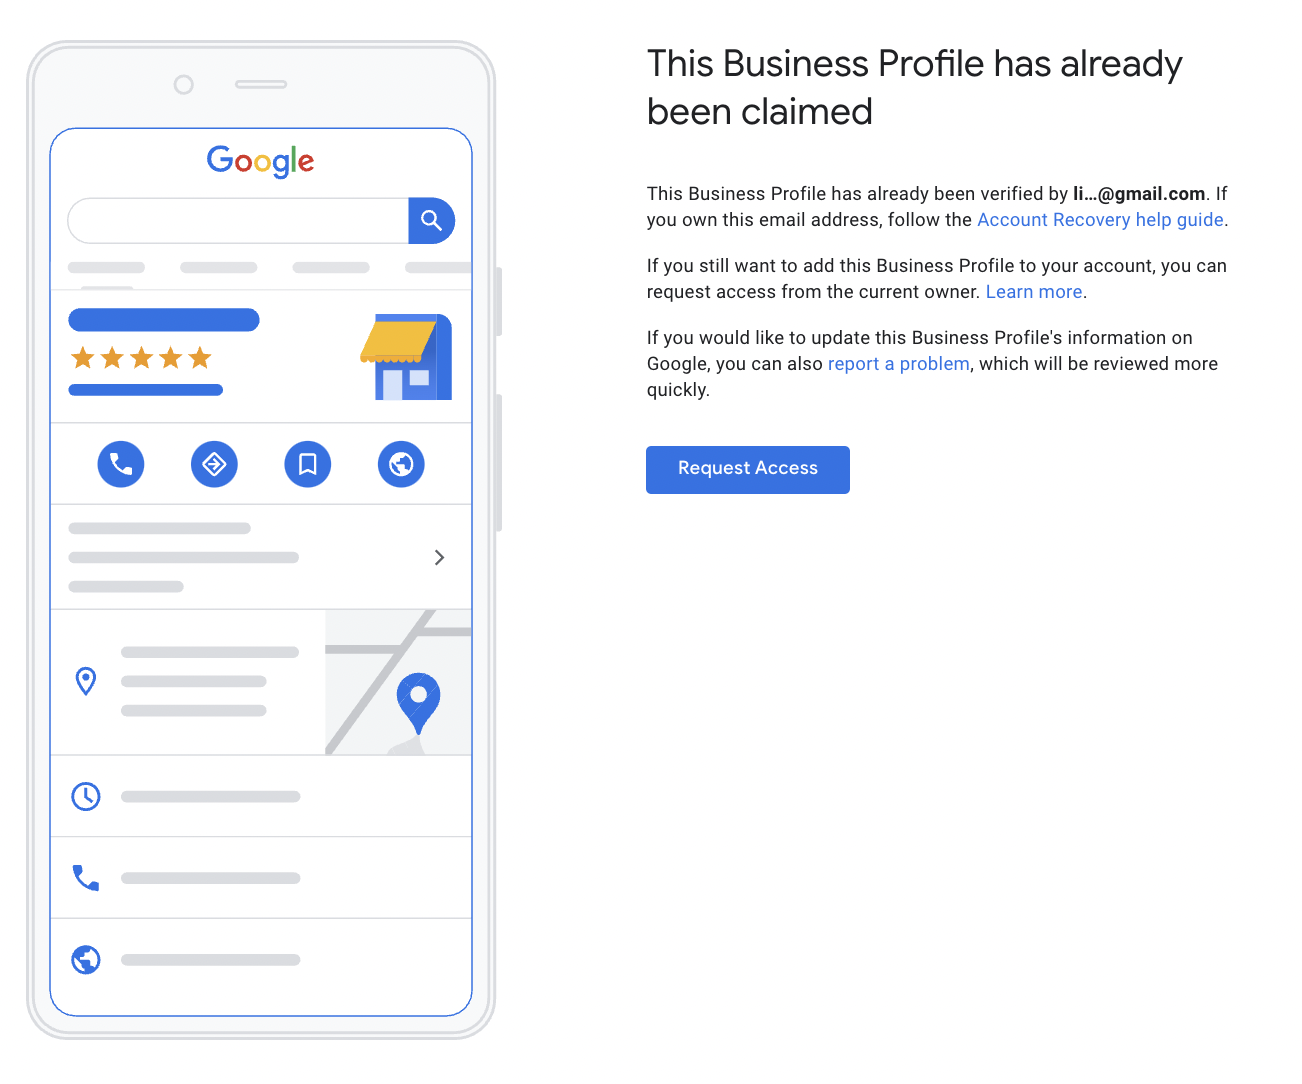
If that’s the case, simply click “Request Access” and you’ll be guided through the process of getting management access to the profile.
Step 4. Add your business name and primary category
Here, you’ll need to enter the business name and choose a category for your profile.
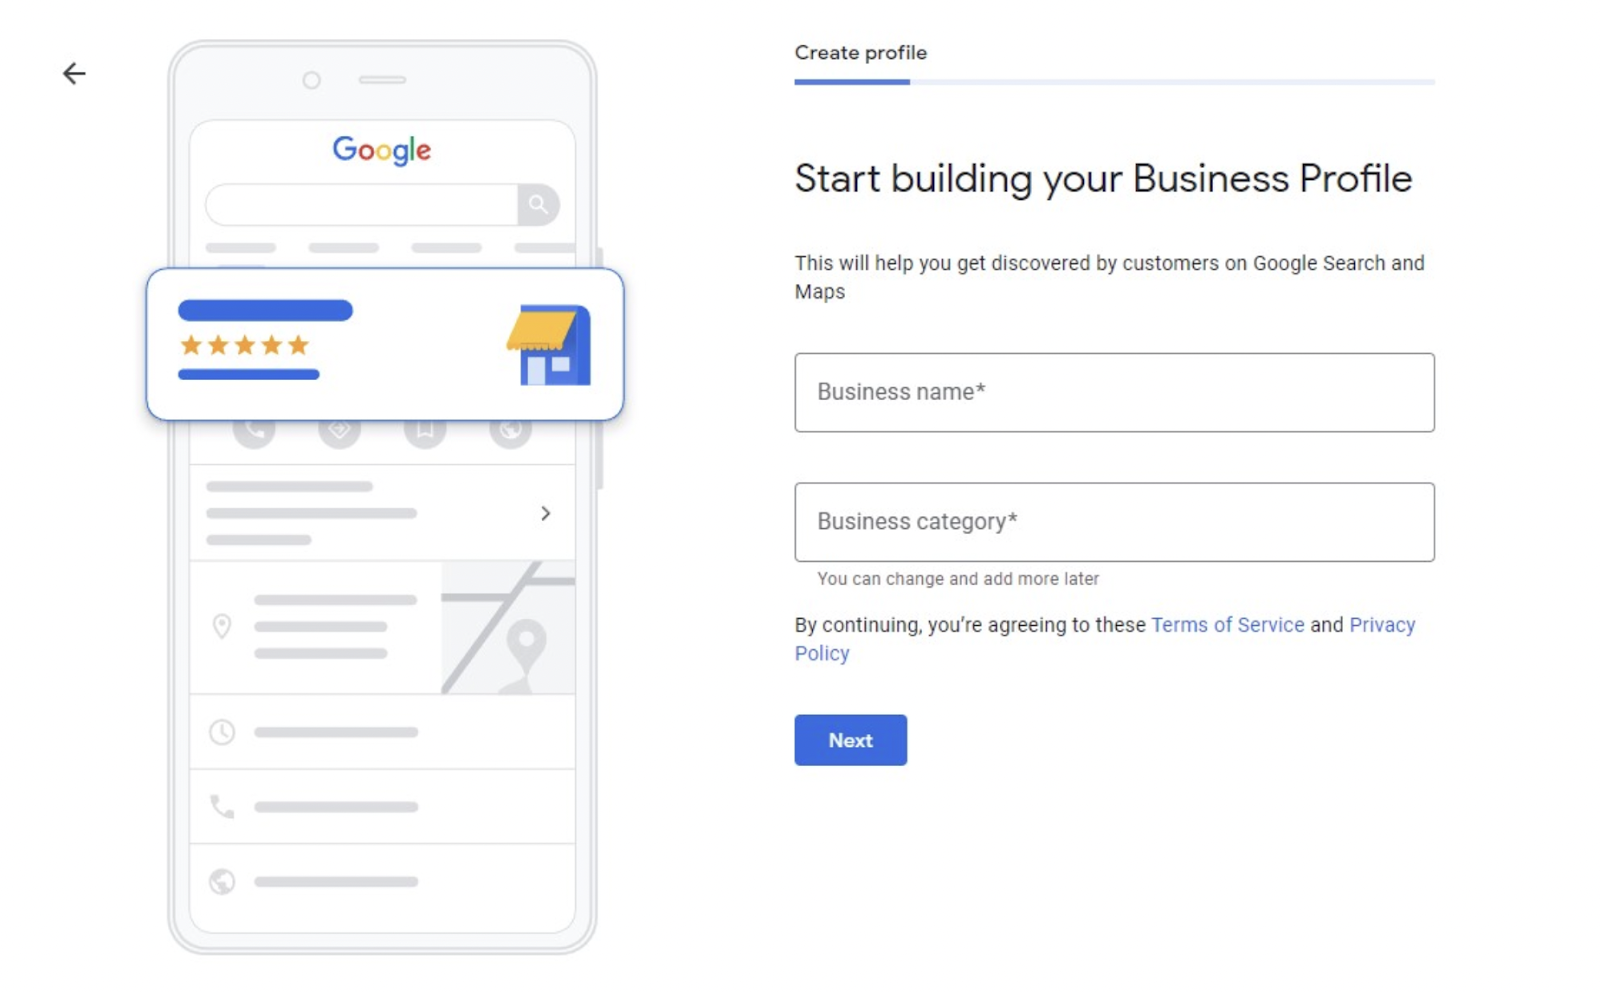
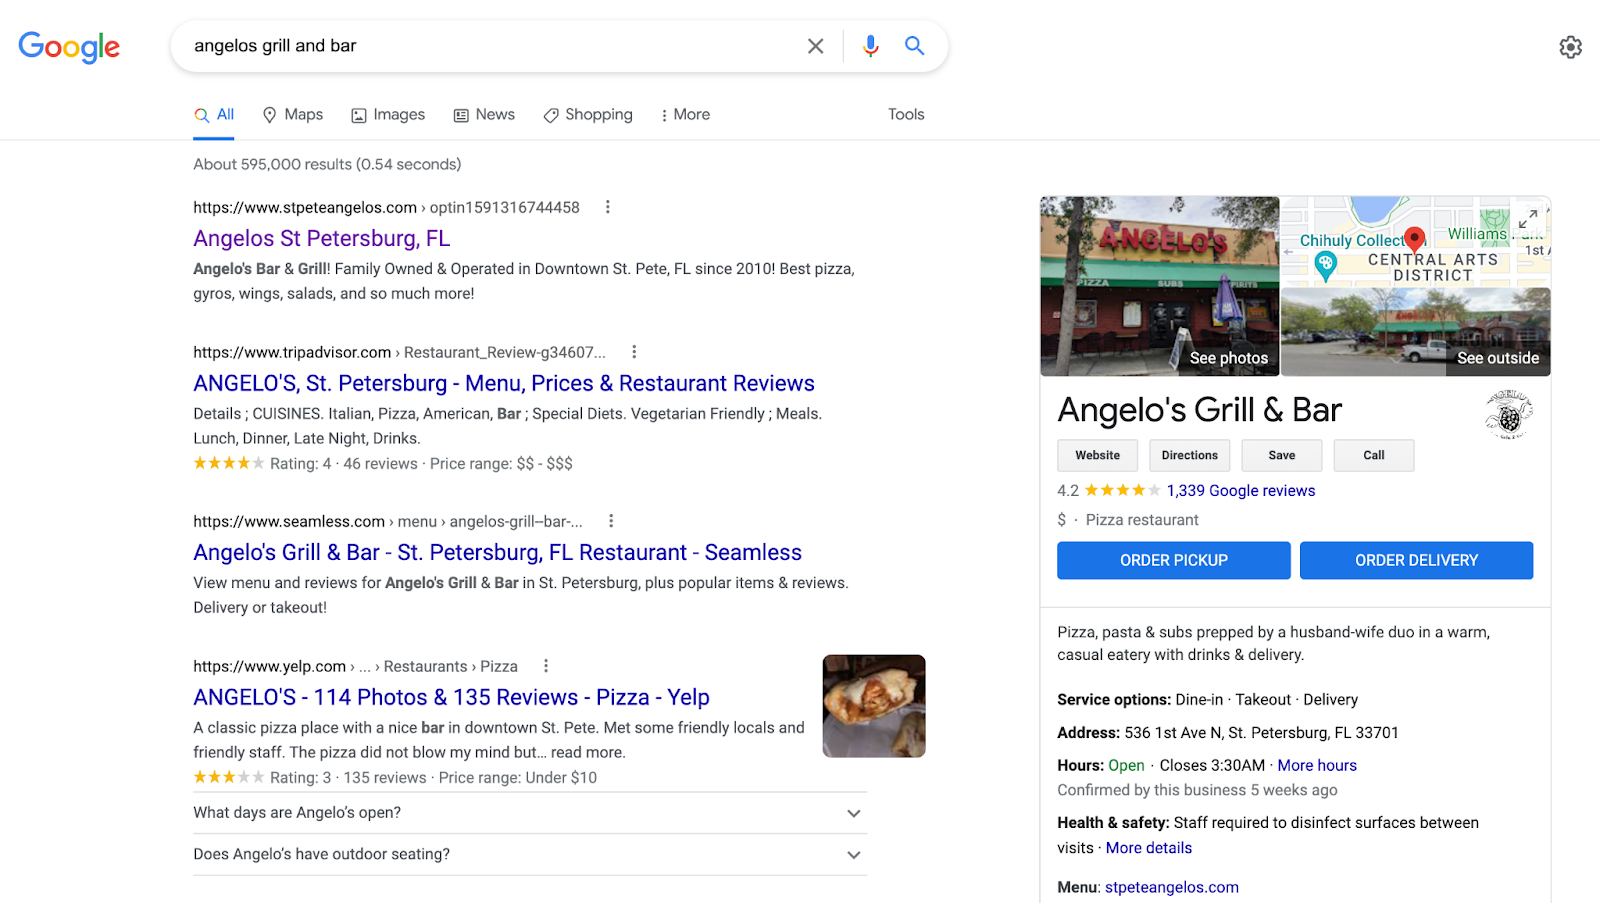
The name that you use here should exactly match the official business name. Don’t add any meaningless keywords into the name. While this does help with rankings, it violates Google’s guidelines.
Having the keyword in the business name can be accomplished by adapting your name slightly. For example, if I wanted to open a pizza shop in St. Petersburg, Florida, I might name my business “St. Pete Pizza” if I wanted to invest that much into the name of my business.
I don’t recommend that in most cases as Google updates their algorithm daily and the keyword in the title will likely be less of a factor in the future.
Next, choose the category that most closely matches the business.
This isn’t always as straightforward as it seems. Google has over 4,000 categories, so it’s easy to feel overwhelmed here.
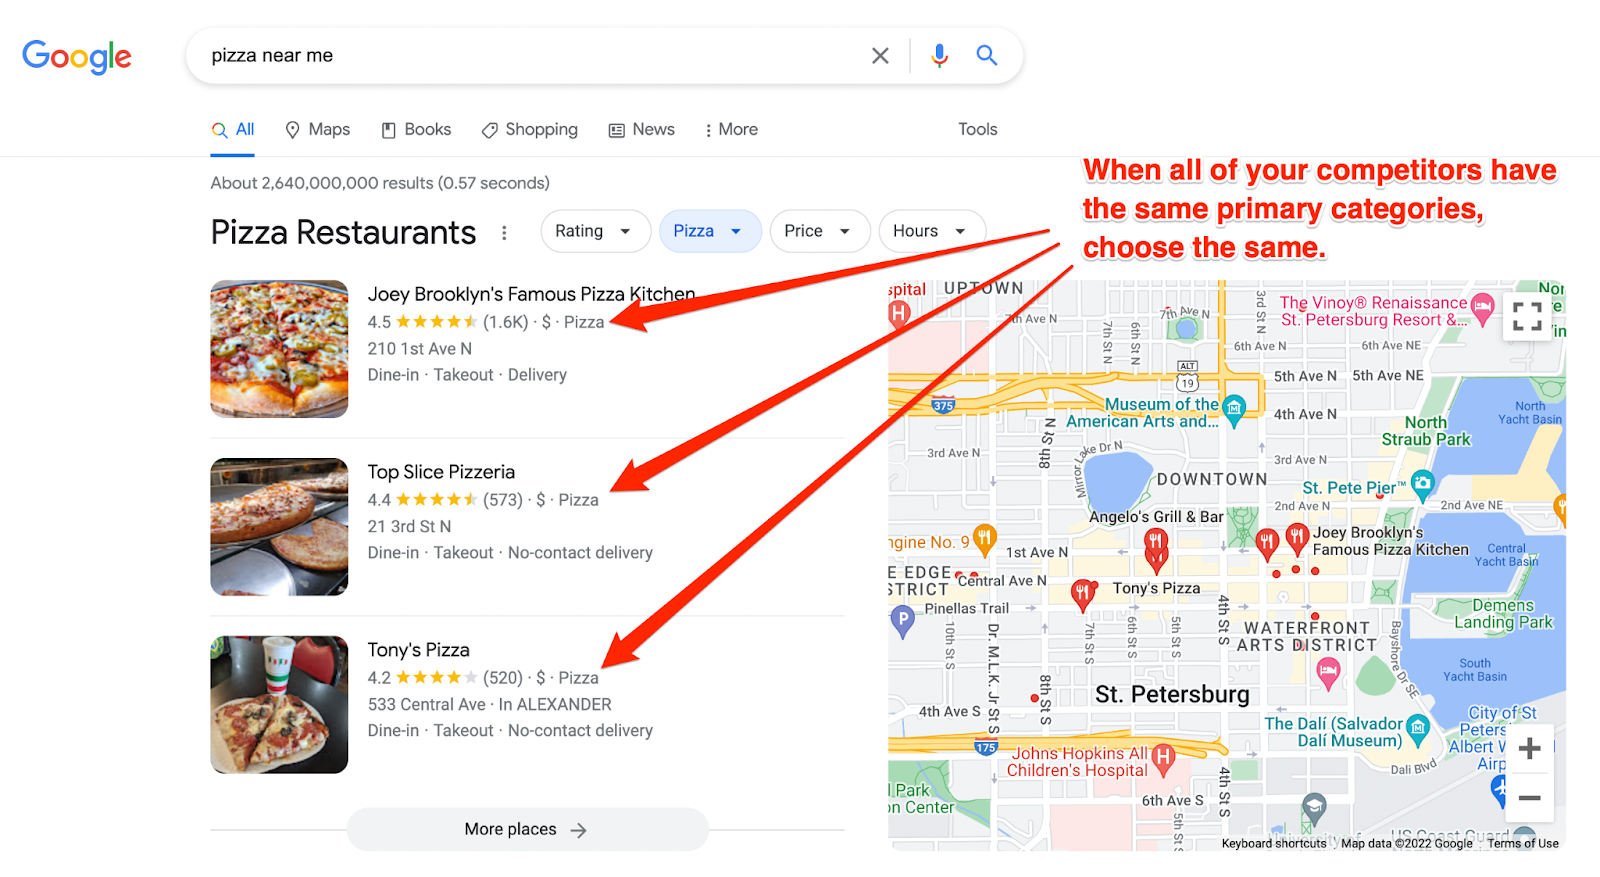
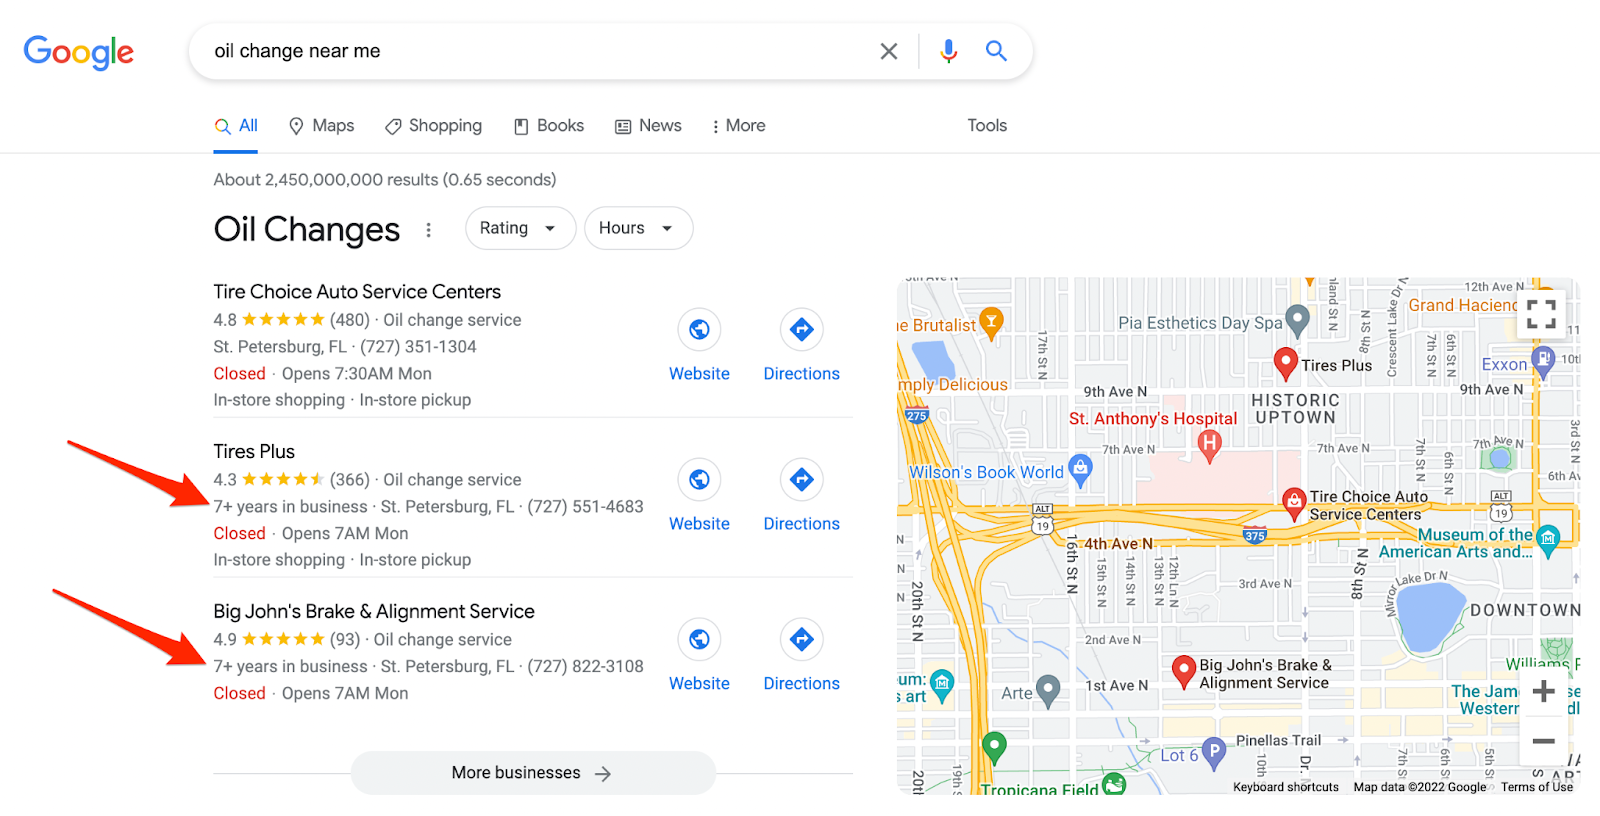
We choose categories for our clients based on their competitors. To do this, you can type a related “near me” search in Google.
In some cases, like with pizza shops, it’s easy because all of the competing places have the same category. We can just choose the same category as our competitors because that’s all Google sees as relevant to this type of search in our market.
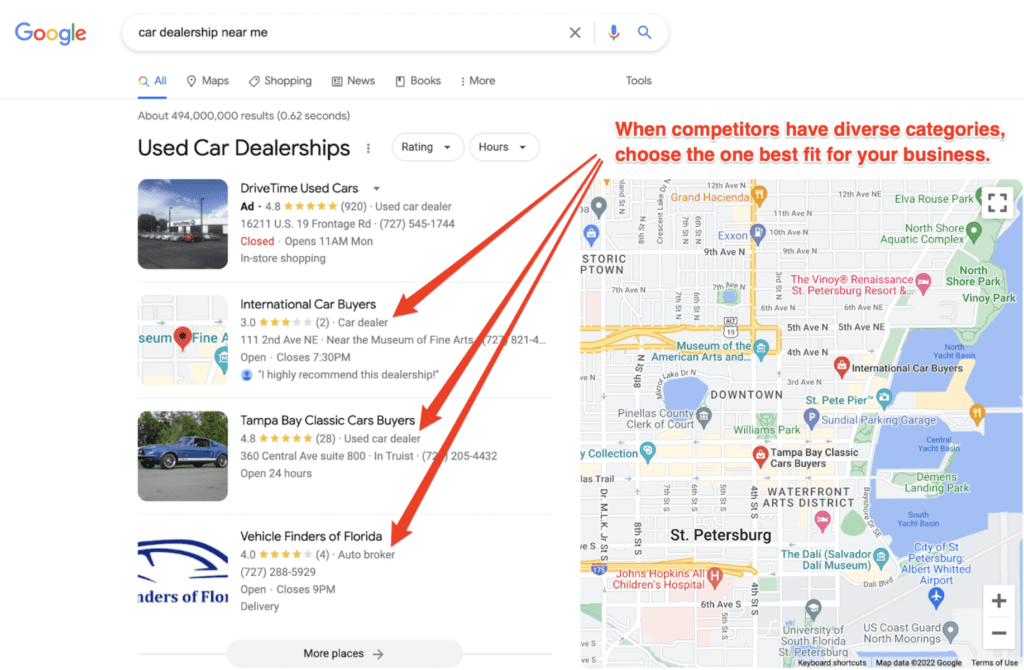
Other times, the categories of the ranking businesses are more diverse, and we have to dive deeper. In this case, you’ll want to make a judgment call and choose the one that’s best fit for your businesses specific offerings.
While you can change this later, it’s best to get it right the first time so you can establish your presence in the search results.
Ultimately, you want to choose a primary category that describes your business as a whole. Be specific.
Step 5. If applicable, enter the business location
If your business has a physical location, then this is where you enter the address.
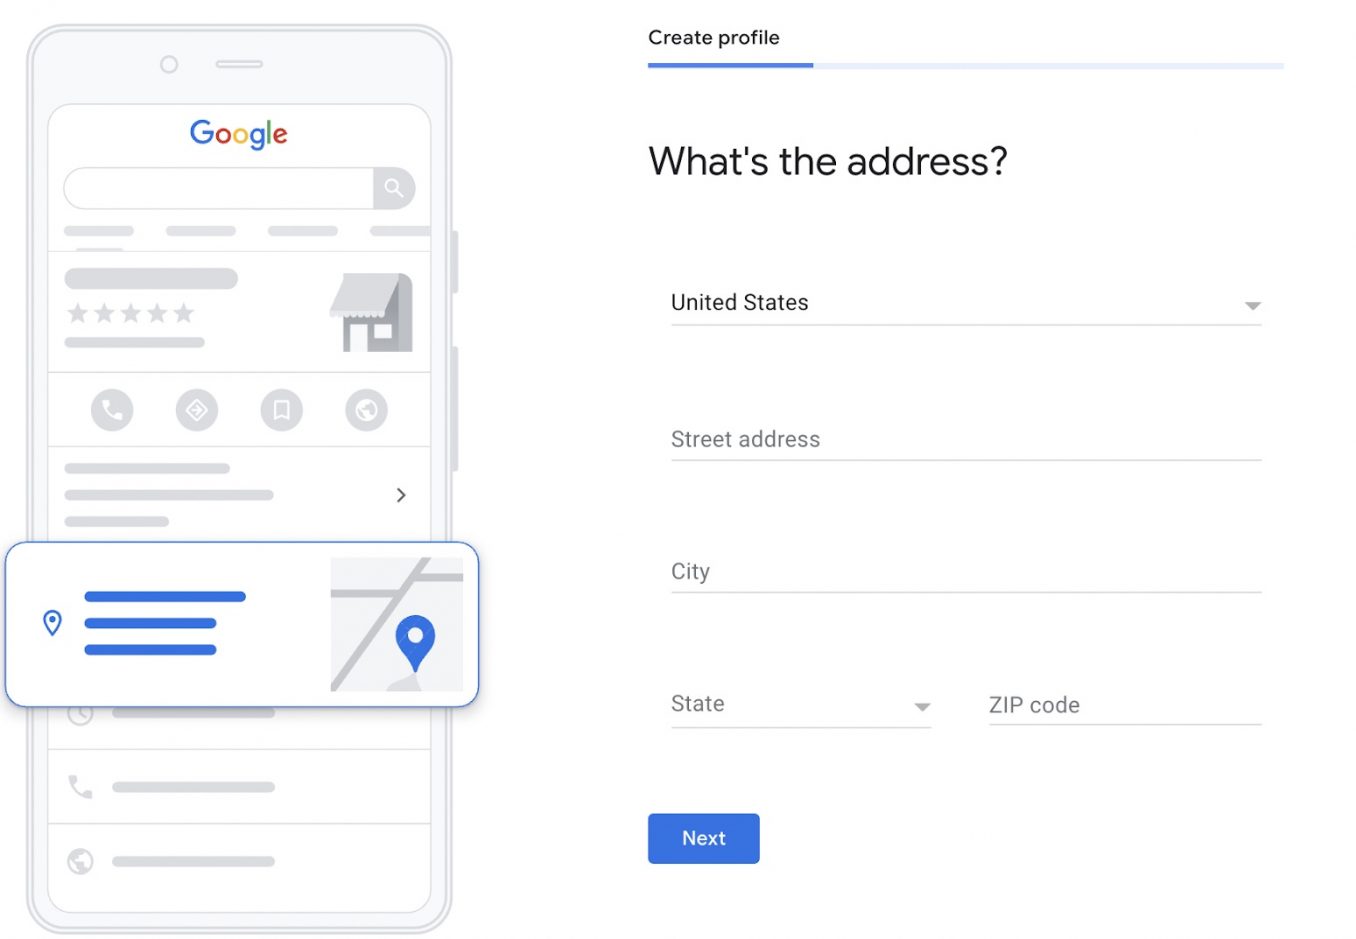
It’s important that the address you give is accurate and complete to prevent any customer confusion or profile verification issues.
Important note: If you don’t serve customers at your business address, do not enter an address under the “Info” tab in Business Profile Manager. Leave the “business location” field blank.
Step 6. If applicable, drop your pin
Dropping the pin gives your customers a good experience because it makes it easier for them to find you. This is especially true if you’re in a confusing shopping center.
When you’re presented with the option to place your pin, take special care to make sure it’s dropped at the exact location of your business.
Here’s a video showing how this works.
Step 7. For service area or hybrid businesses, enter your service area
If you’re a service area or hybrid business, enter the areas that the business serves or delivers to.

When adding your service areas, keep in mind that:
- You can have up to 20 service areas.
- Within your service area, you should be able to reach your customers within 2 hours of driving time.
You can come back and edit this information later.
Step 8. Add contact details
For this step, you’ll need to enter the phone number and your website.
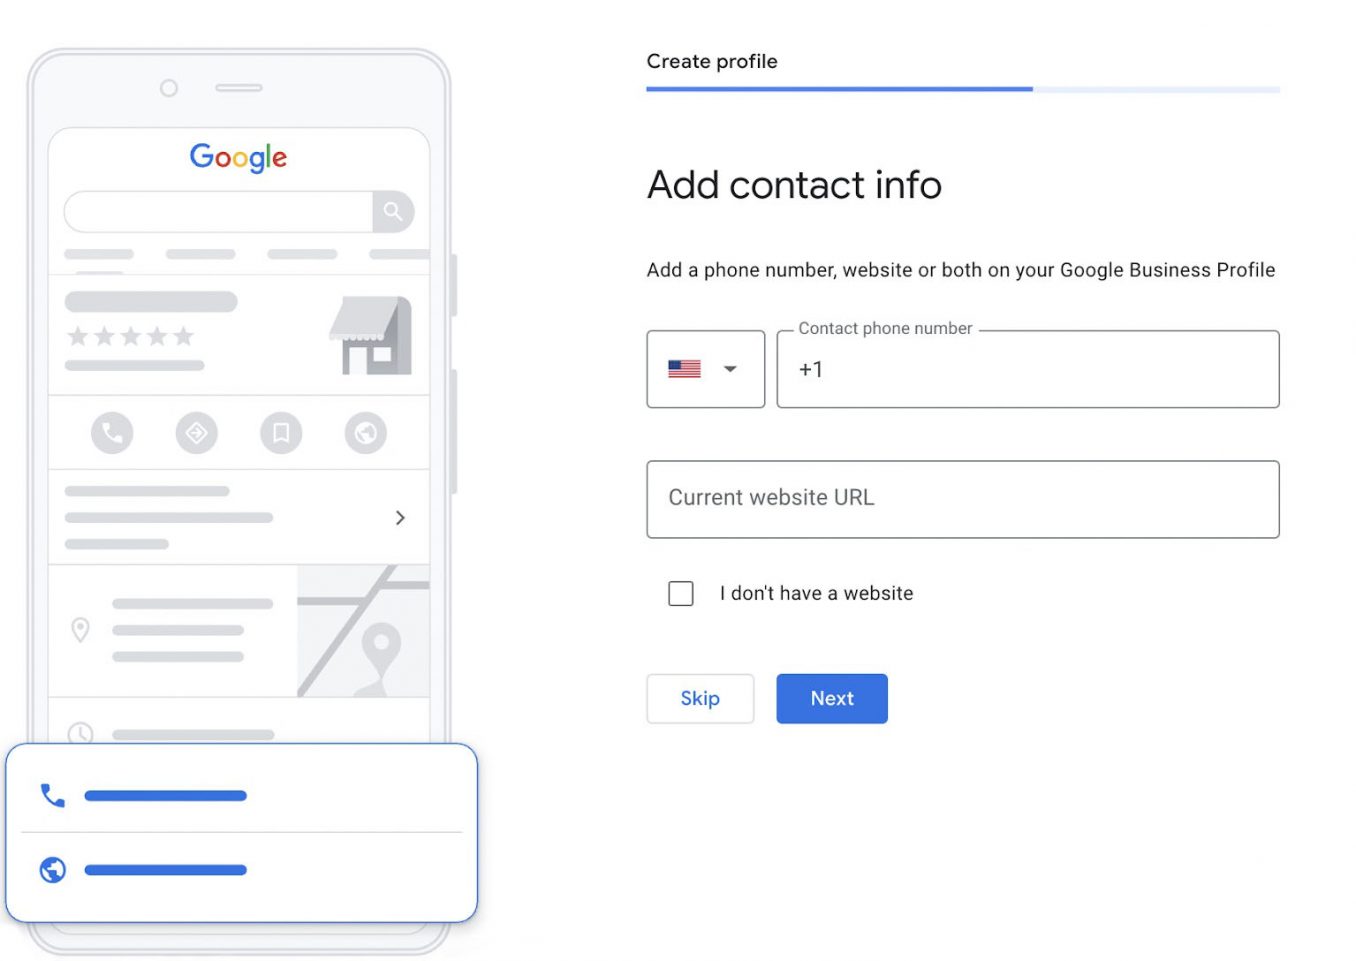
If the business doesn’t have a website yet, then click the checkbox next to “I don’t have a website” on this page. You can come back later and add it when it’s ready.
Step 9. Verify the business
For this step, Google will mail a postcard to the address of the business with a code on it that, once entered, will verify your Google Business Profile.
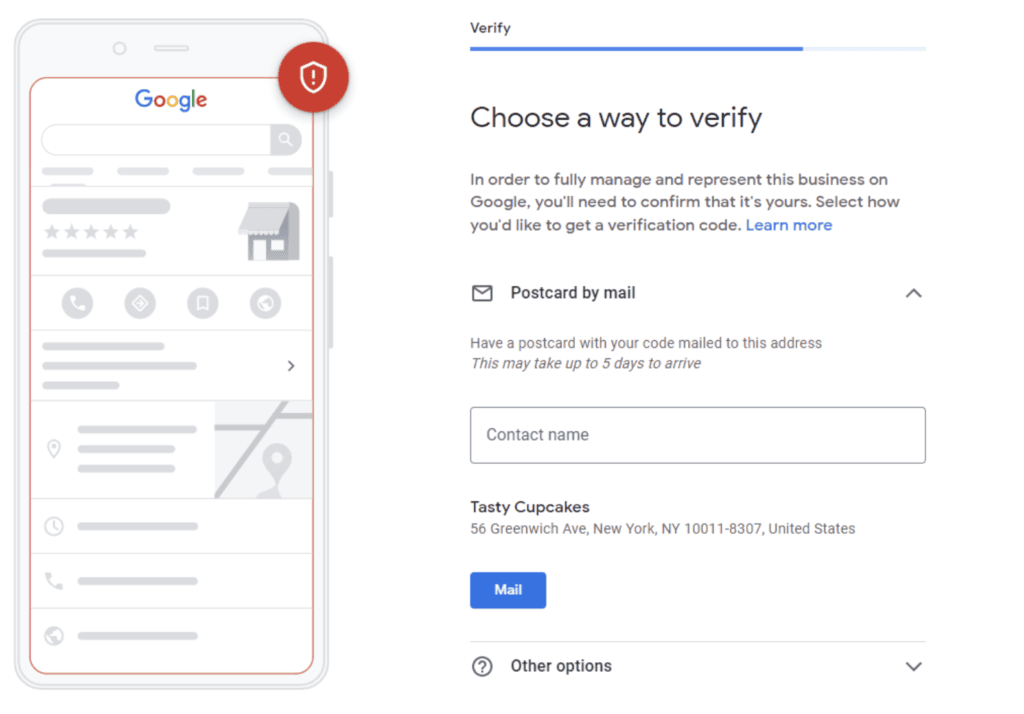
This is how Google proves that your business is operating at the specified address.
Once your postcard arrives, log back into your Google Business Profile and enter the verification code. The code expires after 30 days, so be sure to verify your listing as soon as possible after you receive the postcard.
You might also be presented with the option to verify with email or phone number if your business doesn’t have a physical address.
While you can continue to make edits to your Google Business Profile before the verification step is complete, your listing won’t show up on Google during this time.
Step 10. Add your business hours
Adding your business hours is essential. This is how potential customers know when they can visit or contact you if they find you on Google.
At this stage, enter your primary business hours. Holiday and special hours will be taken care of later.

There are a number of reasons your hours of operation might change temporarily. Maybe an employee got sick or there’s a shortage of inventory. In these cases, it’s a good idea to let your customers know by updating your hours.
The changes take effect immediately, meaning your potential and existing customers will see the new hours right away. If this is taken care of, they won’t arrive during your off hours because of misinformation.
Step 11. Add messaging
Enabling messaging is a great way to connect with your customers through your Google Business Profile, but you should only enable this if you’re going to be able to manage it regularly. Unresponsiveness can hurt your reputation, which will hurt your rankings.
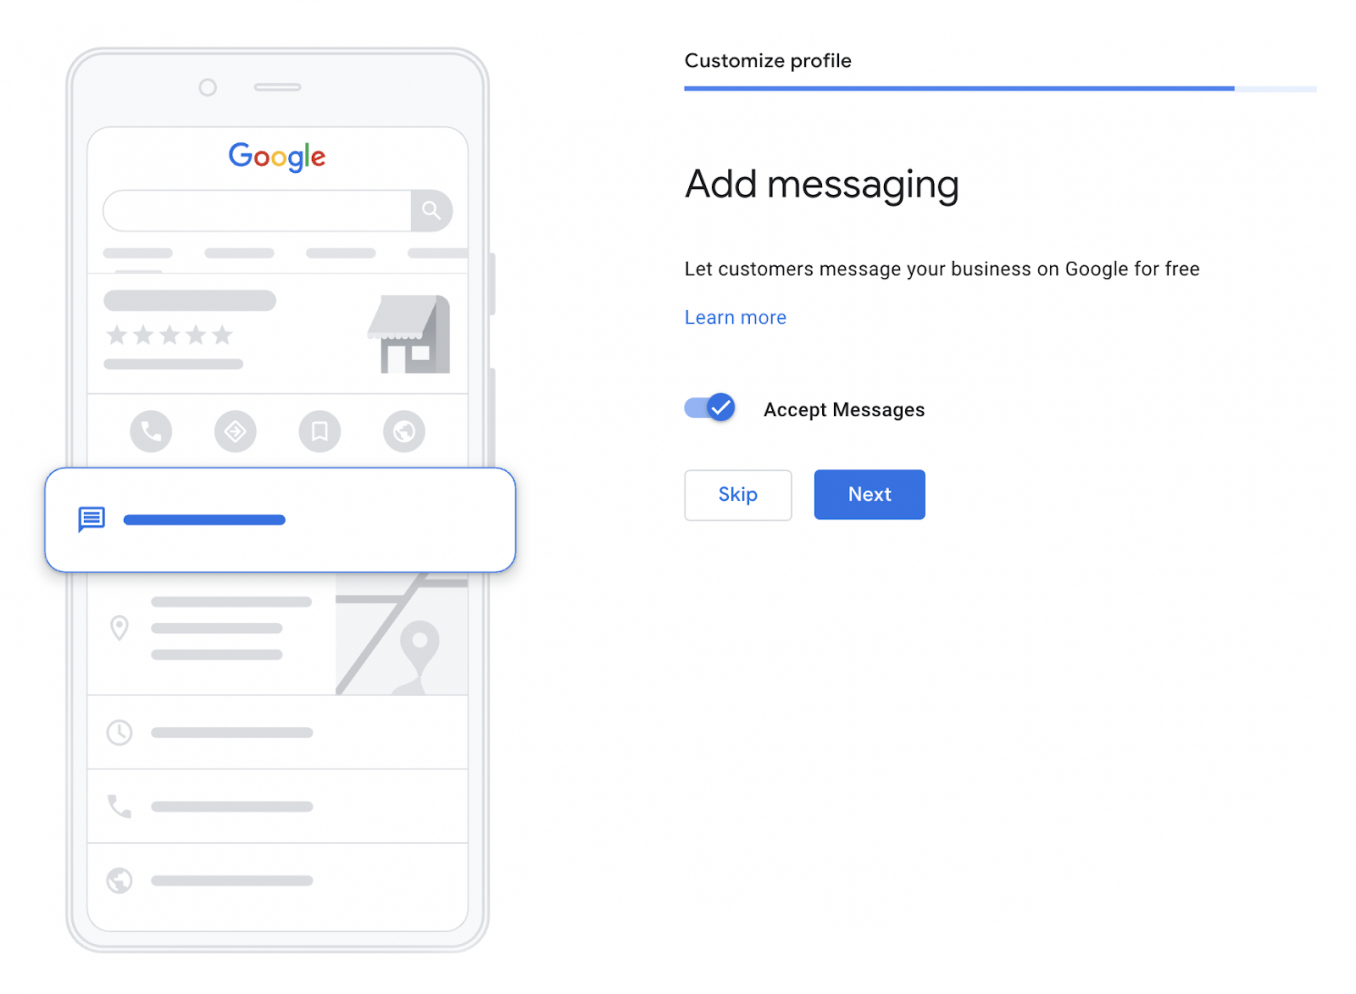
If you change your mind later, no problem. This can be changed.
Step 12. Write a business description
Writing a description for your business helps searchers know what you’re all about and whether your business is a good fit for their needs.
For this section, you can write up to 750 characters.
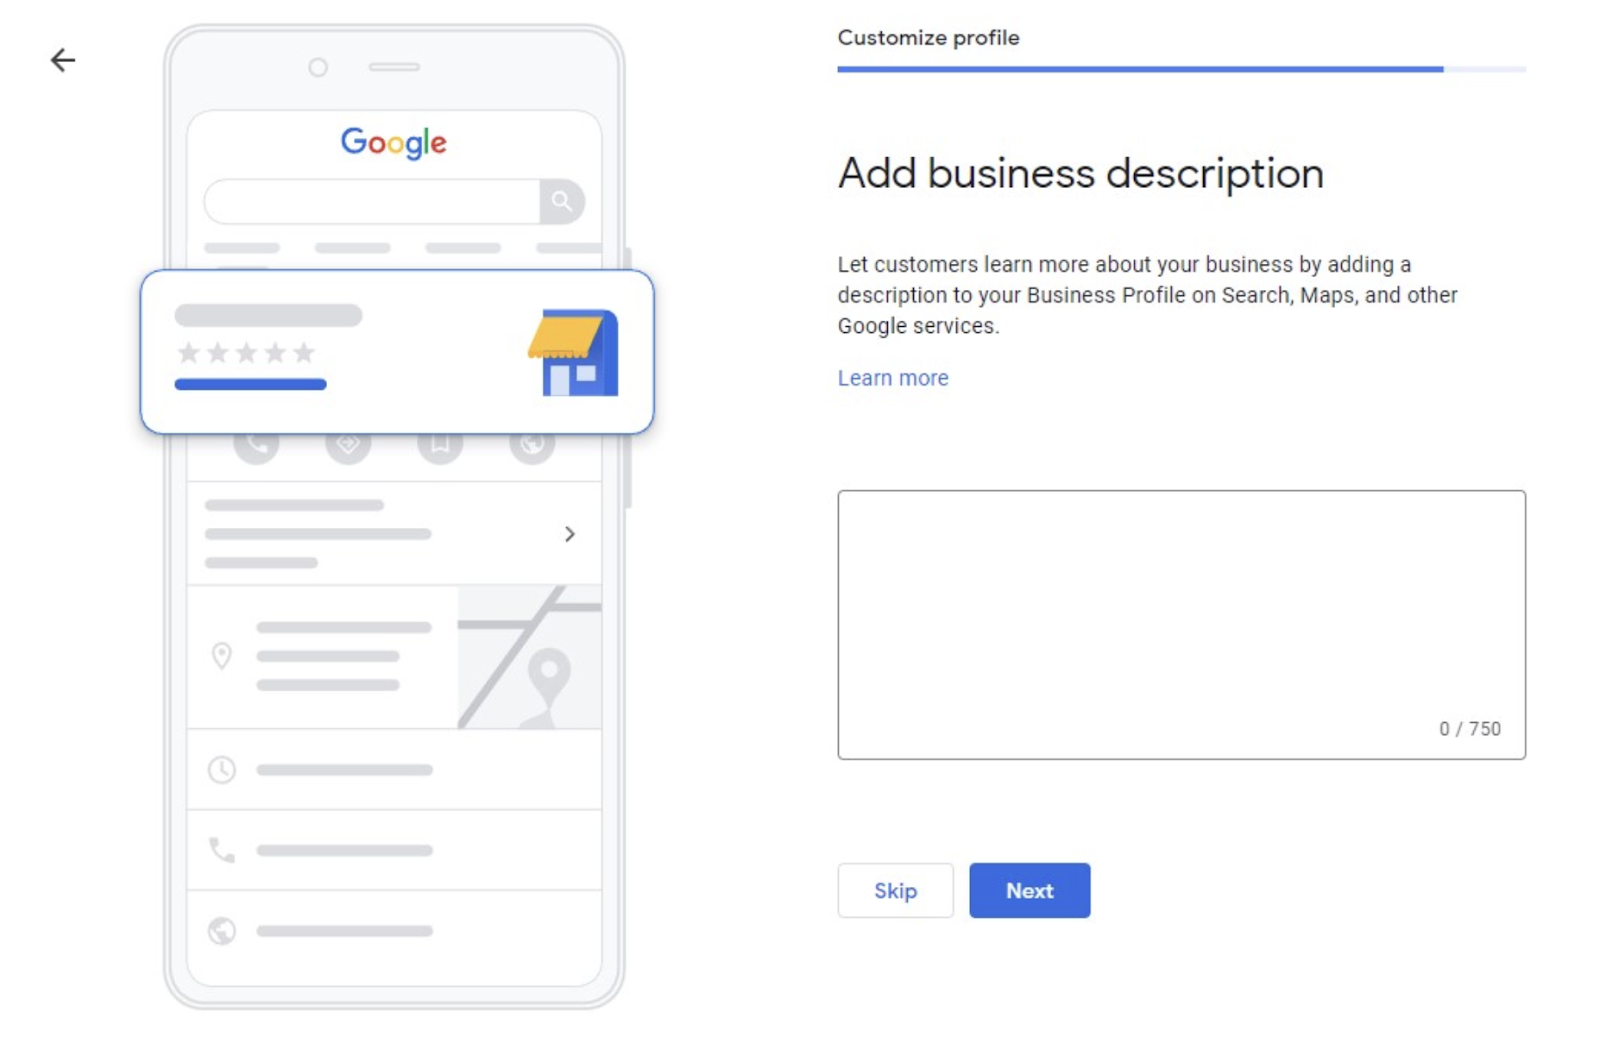
When writing a description for your business, be sure to include:
- Details about your products or services.
- Who and what area you serve.
- A few keywords to increase your chances of showing up for relevant searches.
Take this pizza place, for example:
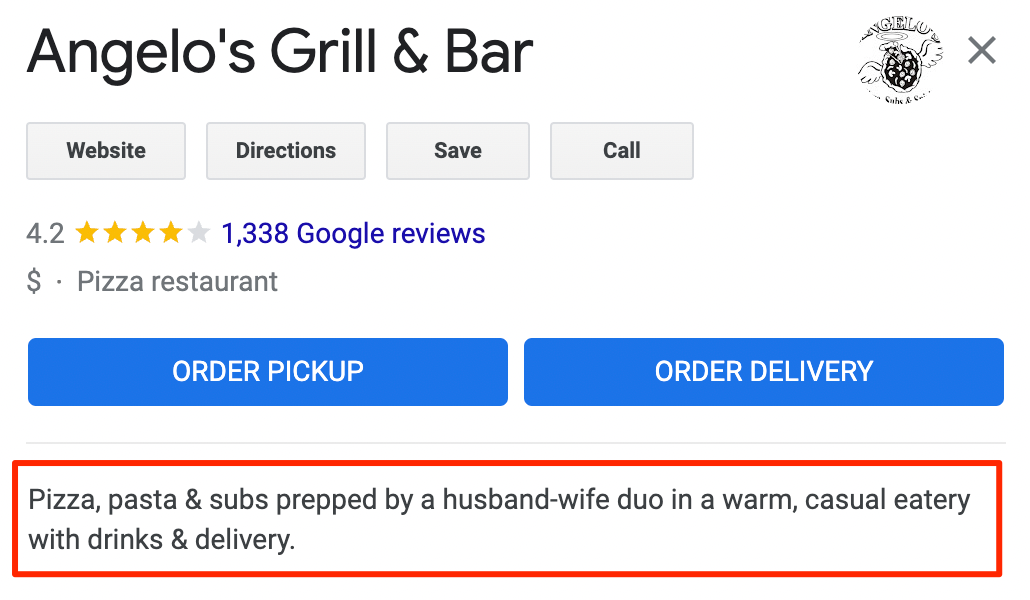
When writing yours, also keep in mind some of the guidelines Google has.
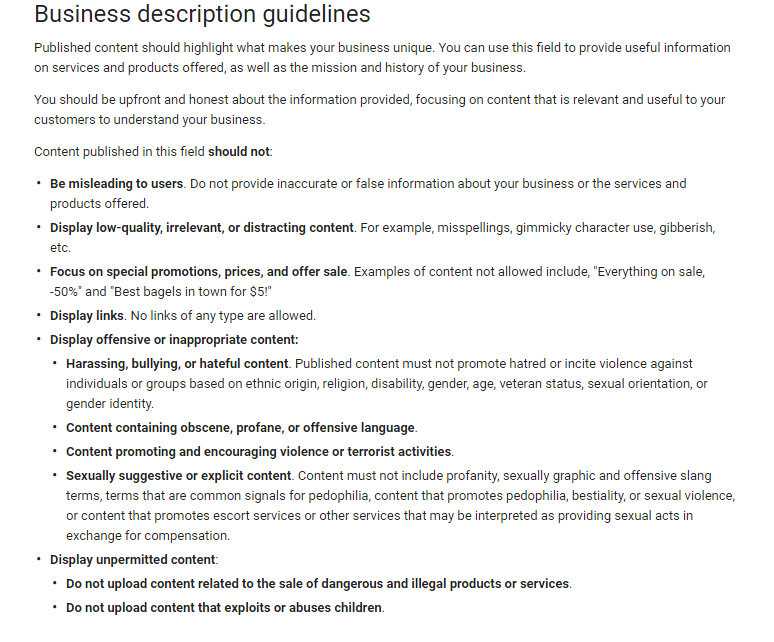
The goal of the business description is to help the user take the next step, such as making a call, requesting directions, or booking a reservation.
Step 13. Add photos
Finally, you can add photos to your business profile.
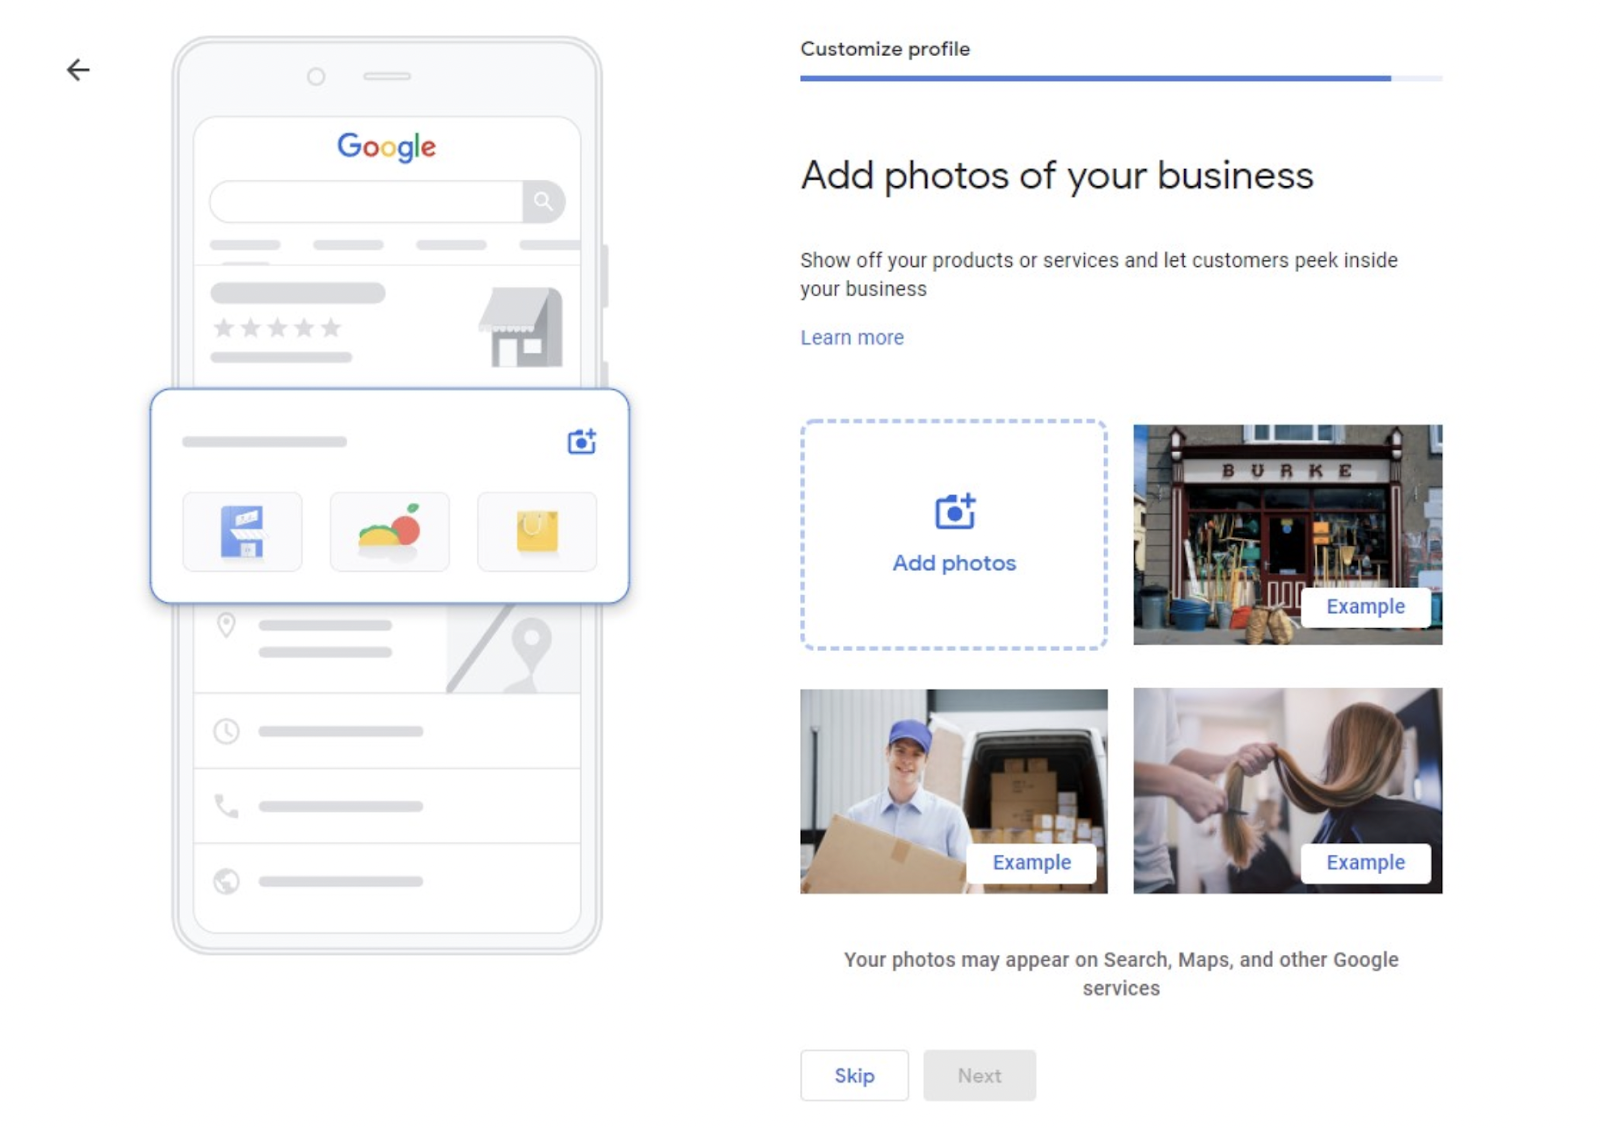
The photos will display on Google Maps, in the local pack results, and in other Google services when someone sees your business.
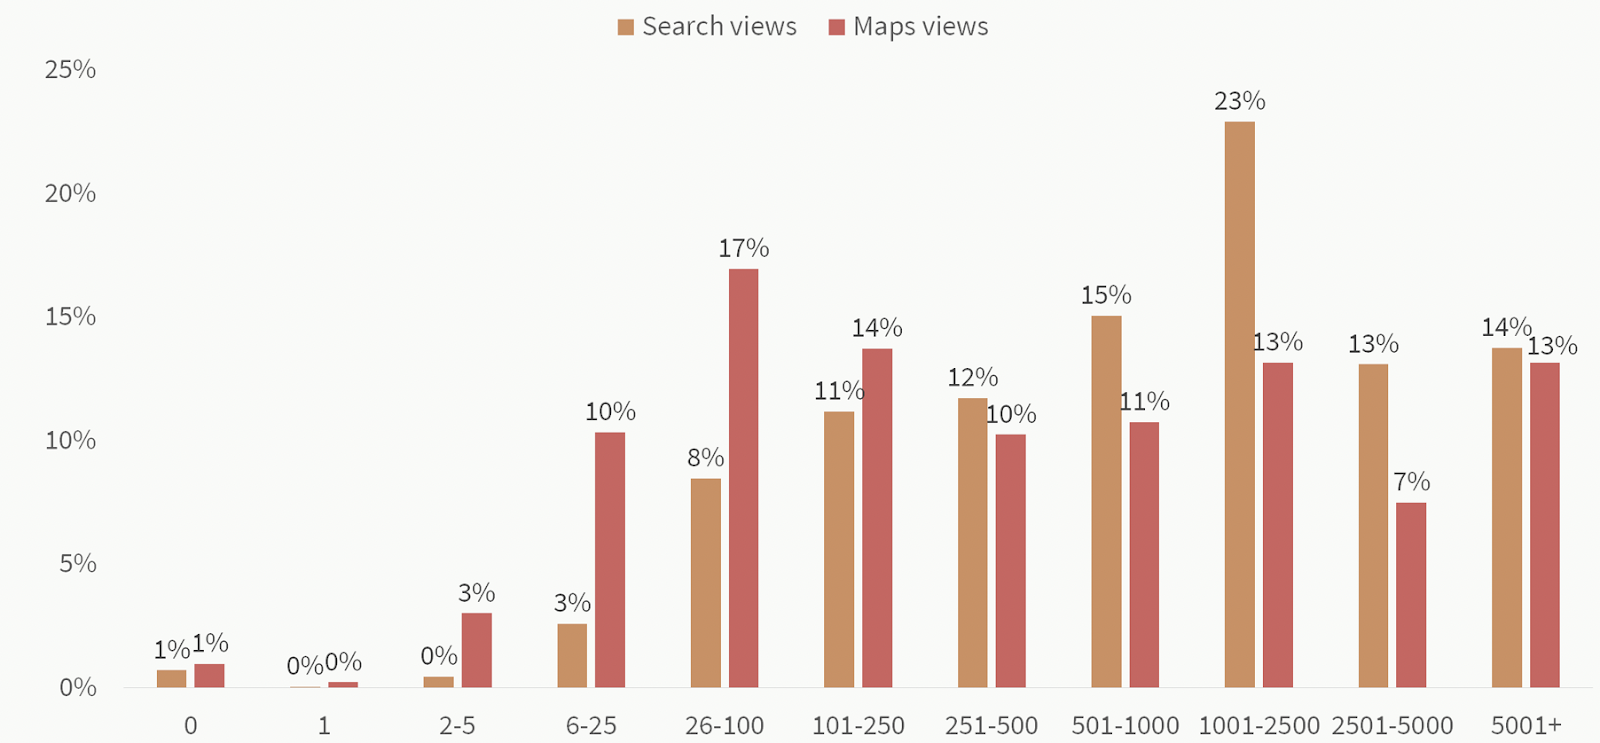
When it comes to the number of photos you should add, more is better. A study from BrightLocal found that businesses with more than 100 images on GBP get 520% more calls, 2,717% more direction requests, and 1,065% more website clicks than the average business.
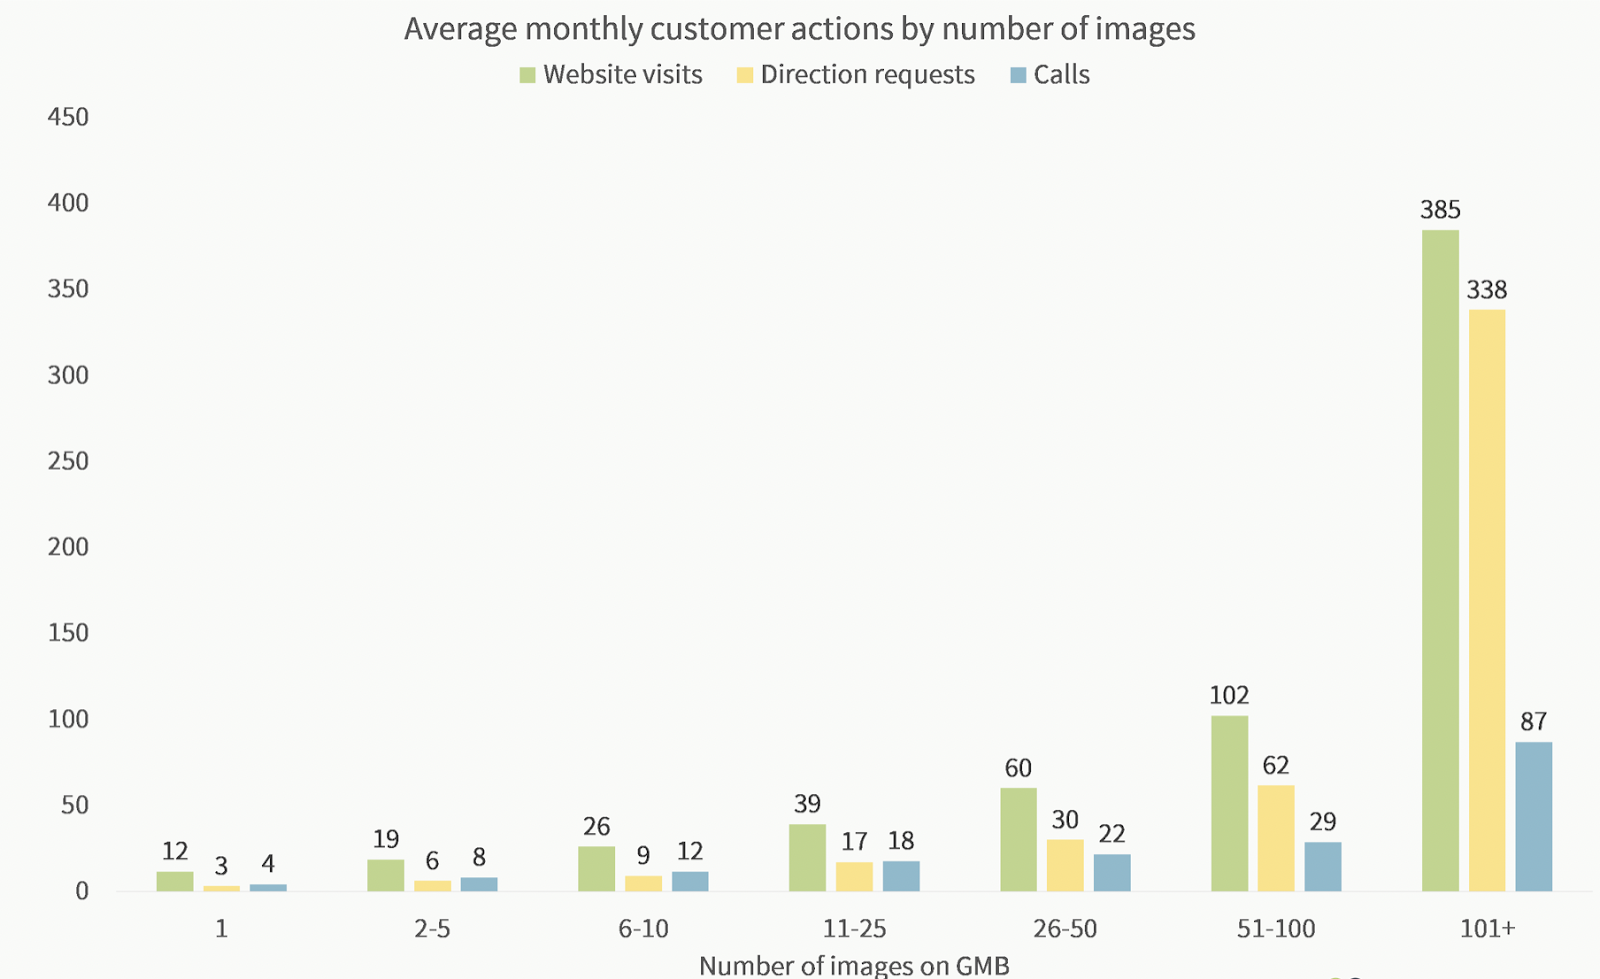
These businesses also get more views on Google Maps and in local Google search results.
The quality of the images you add to your profile matter, too. Higher quality images drive more conversions from your Google Business Profile, which may be the reason why more images lead to more views in the search results. So, consider hiring a professional photographer to take lots of pictures for you to upload. A fitting photographer can also help you decide on what types of images would best fit your business.
Note that you don’t necessarily need 100+ photos for your business. Doing so will put you in a good position, but what’s most important is that you have more than your competitors. Search Google for competitors in your area and see how many images they have to help you determine the proper level of investment for your business.
How to optimize your Google Business Profile
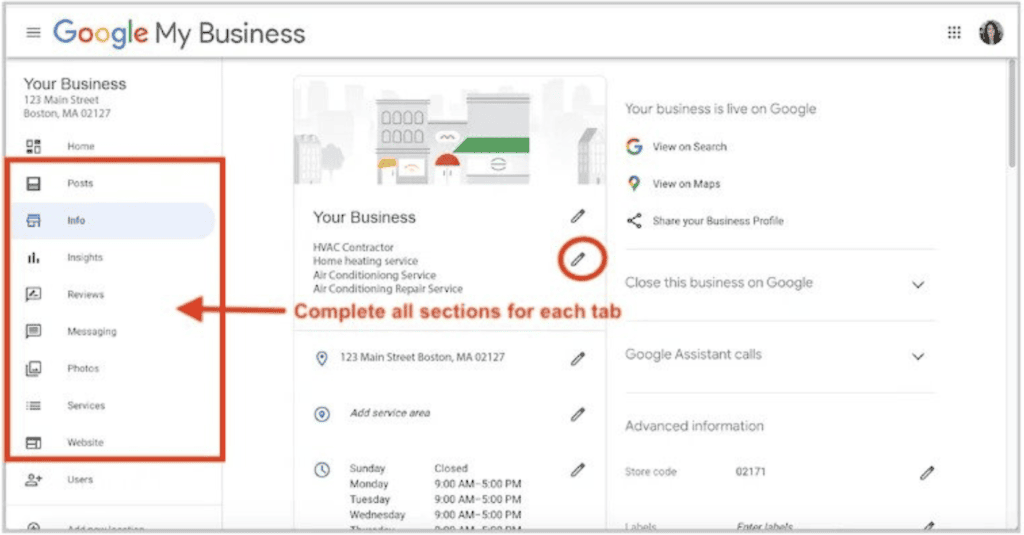
Once you’ve completed the initial setup steps above, there are some additional steps to complete to make sure your Google Business Profile is optimized for SEO with complete, 100% accurate information.
This includes things such as:
- Adding secondary categories.
- Adding products and services.
- Setting your opening date.
- Making sure your holiday hours are set up and correct.
- Selecting attributes for your business.
- Q&A.
- Linking to the Google Business Profile from your website.
Regardless of what we have written in this guide, Google updates the Google Business Profile regularly. The important thing is that you complete every single section of your Google Business Profile so you feed everything about your business into Google. This helps their algorithms pair your business with the right users in the search results.
Here’s how to complete each of the suggested optimization steps above.
Step 1. Add secondary categories by stealing them from competitors
Adding and editing secondary categories for your Google Business Profile is very simple.
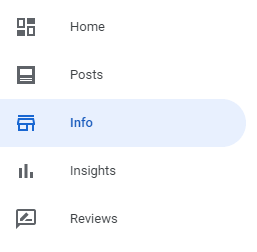
On the menu on the left side of your screen, click on the “Info” link to bring up your business information. From there, click the pencil icon under the name of your business.
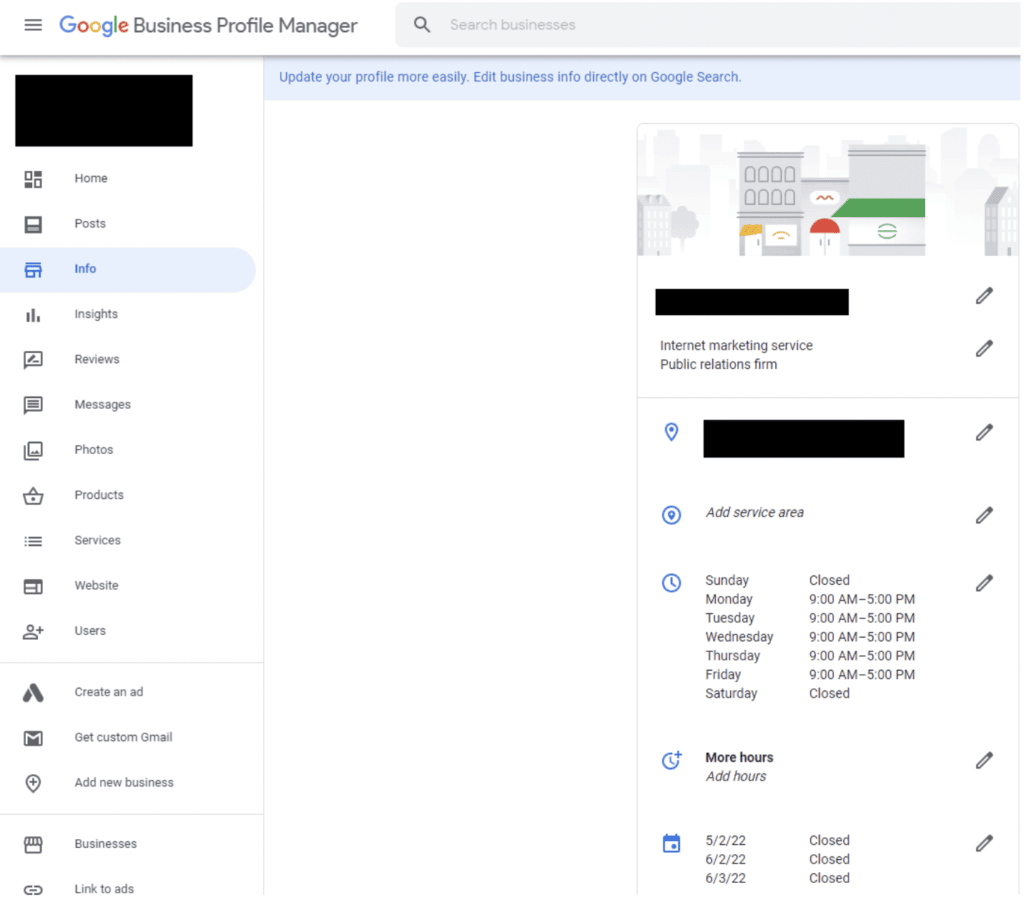
When you do this, you’ll see a popup where you can start searching for categories. As you type, Google will bring up available categories for selection.
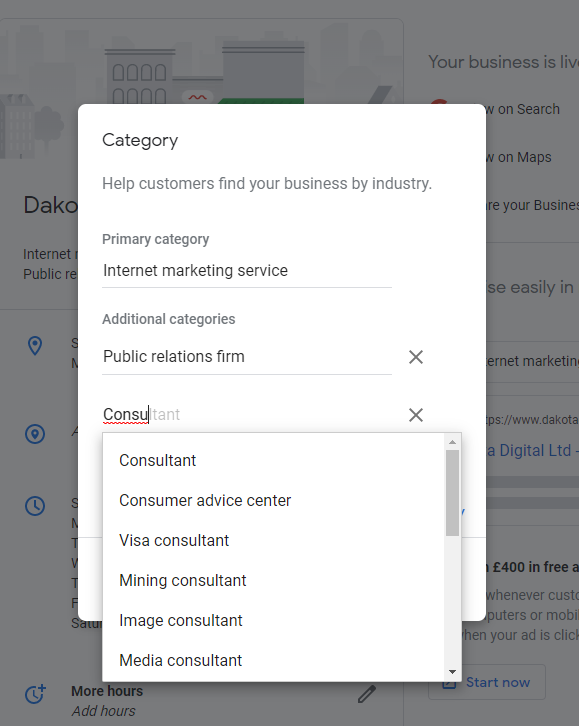
While Google allows you to choose 1 primary category and up to 9 secondary categories, it’s often suggested that you choose no more than 4 total categories to avoid diluting your ability to rank for keywords related to your primary category.
While this is a good starting point, we’ll talk later about how to make more performance-driven decisions.
For now, the best way to choose your secondary categories is to examine the ones your competitors are using.
Start by visiting a competitor’s business via Google Maps (on desktop). When you find their business, right click inside of the area with the business name and reviews, and choose “View Page Source.”
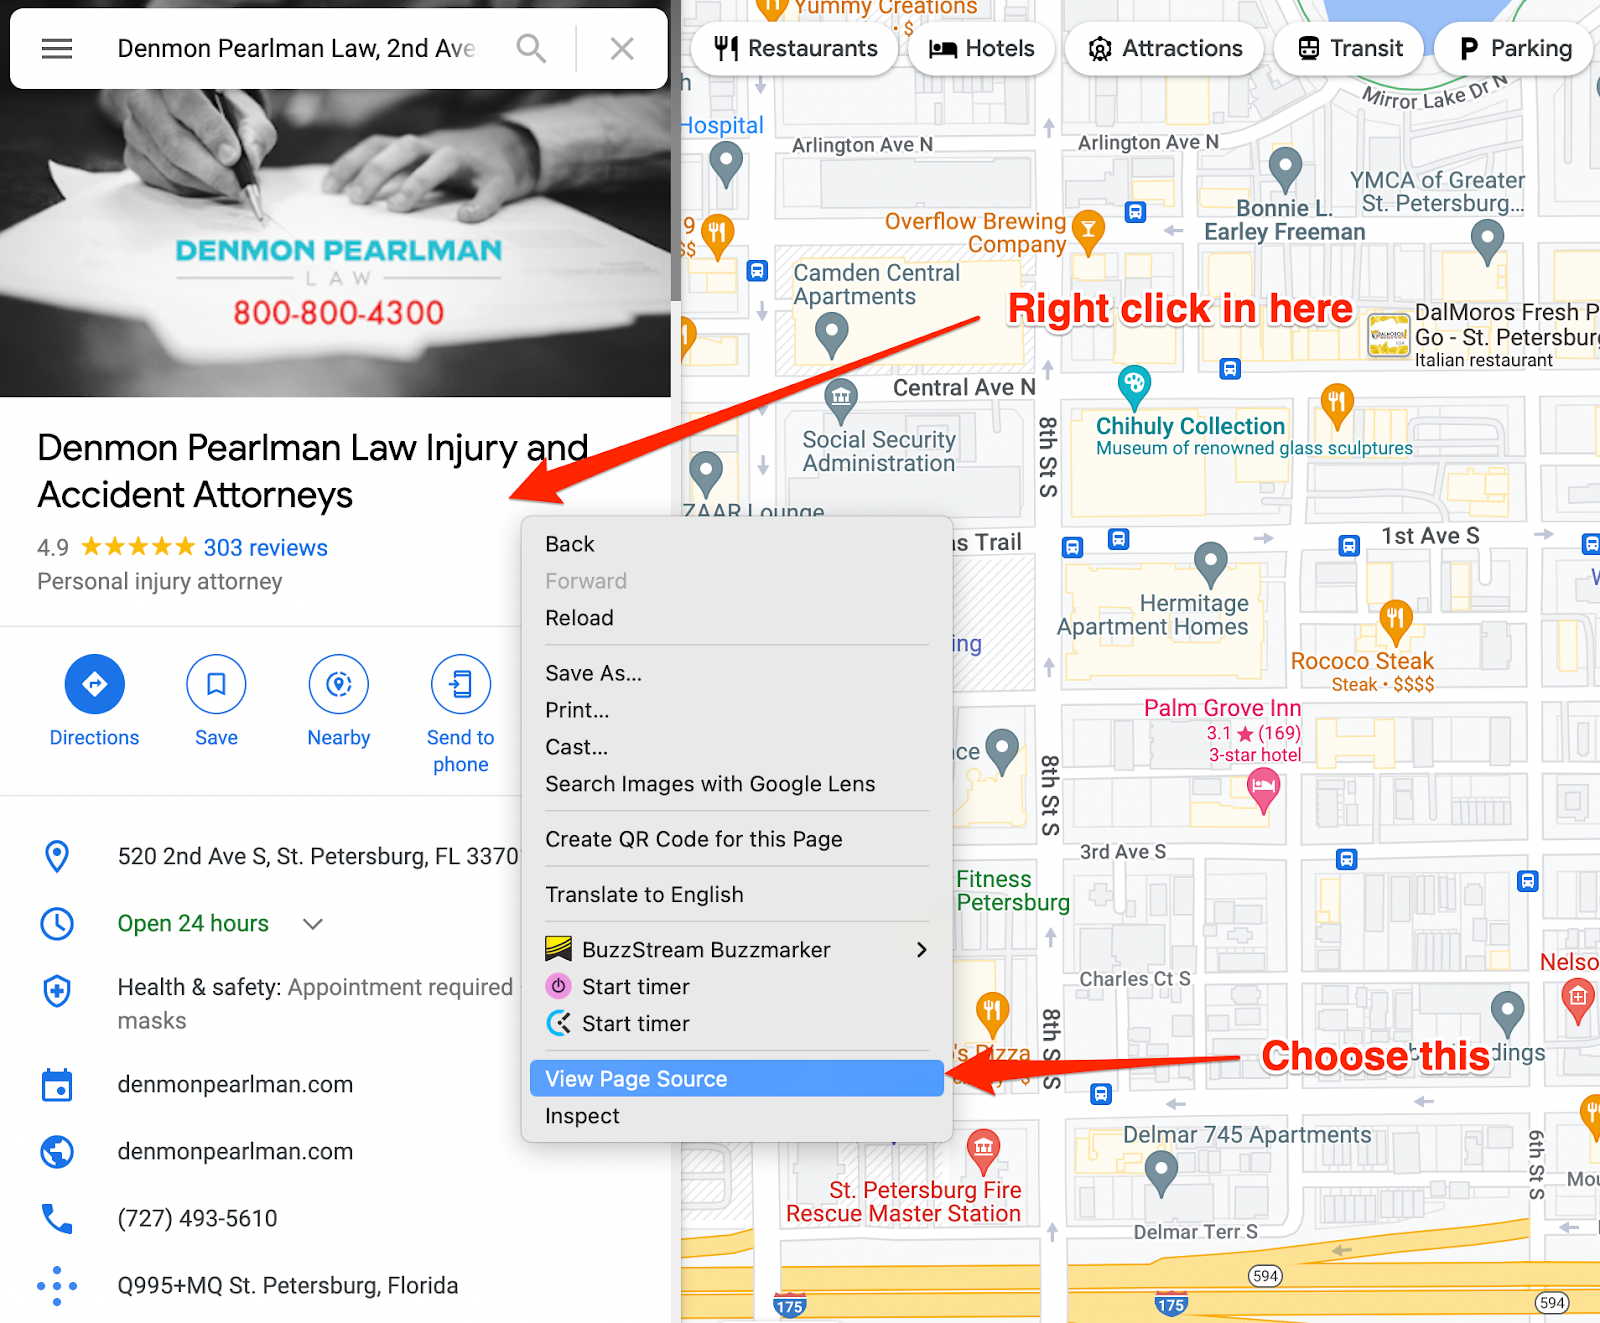
From here, Open up your browser’s search function by pressing <code>⌘ + F</code> on a Mac and <code>Control + F</code> on Windows and enter the competitor’s primary category.
You might have to click through the instances to find it. Usually it’s the 4th or 5th one. When you find it, you’ll see their secondary categories in the code.
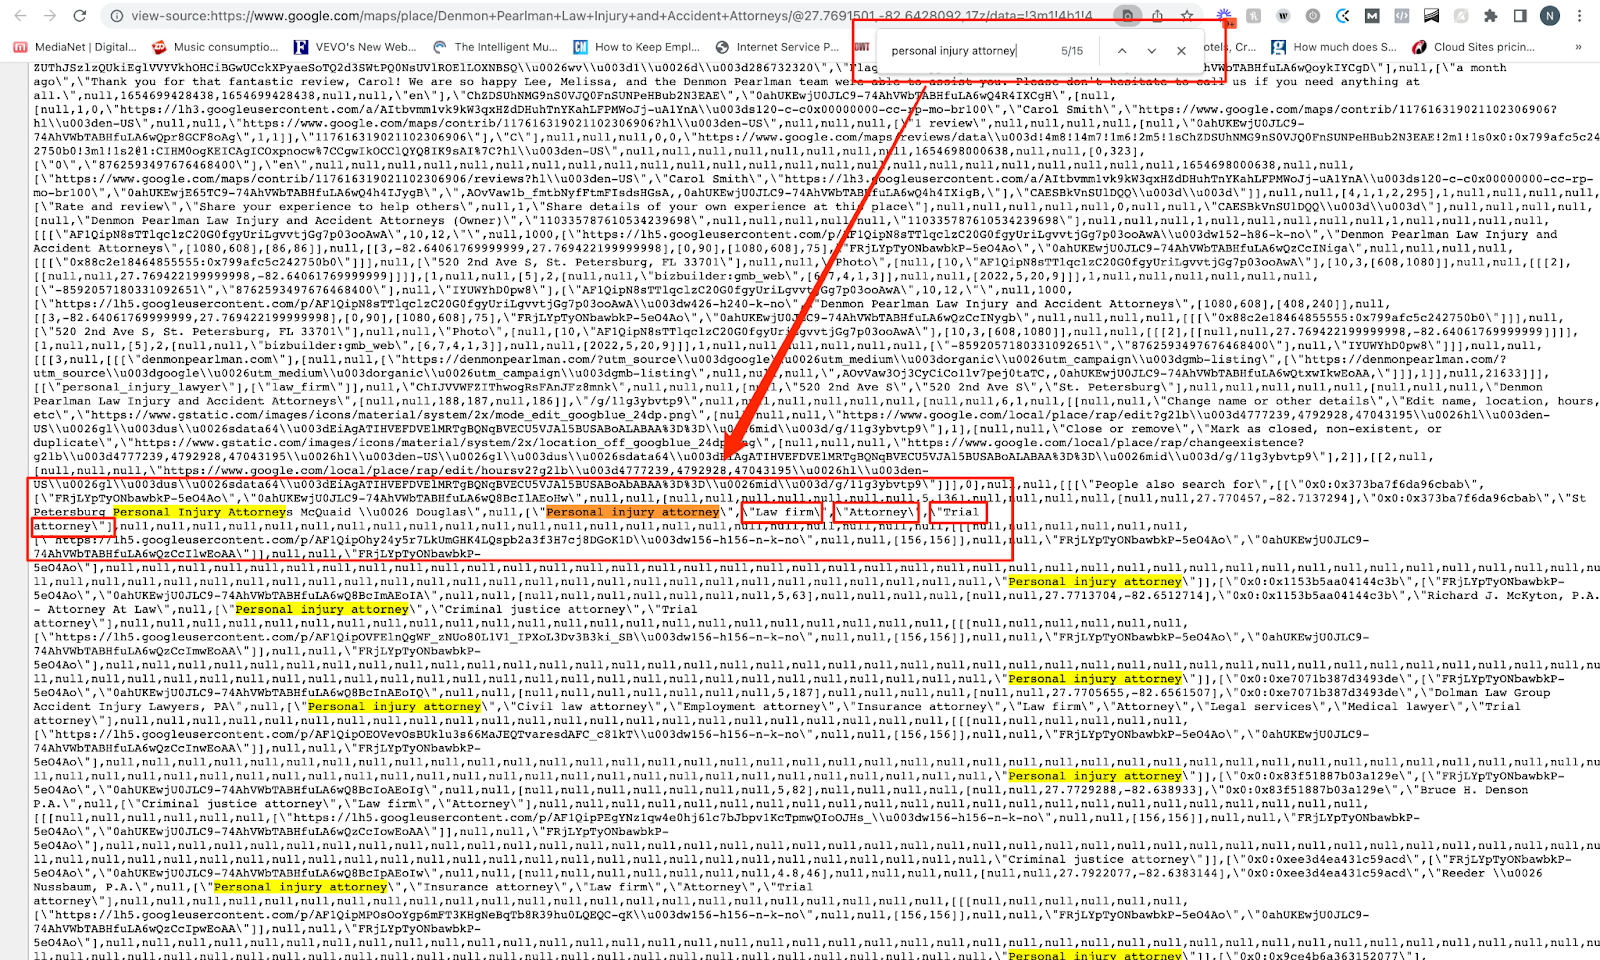
This will give you a good starting point for either choosing or brainstorming categories.
There are more than 4,000 categories to choose from. These change all the time, so it’s worth auditing your categories at least monthly.
Google doesn’t provide a full list but you can find a breakdown here.
Step 2. Add products, services, and (for restaurants) menu items
Adding products and services to your Google Business Profile is how your business can rank for search queries like “Who has X near me?”
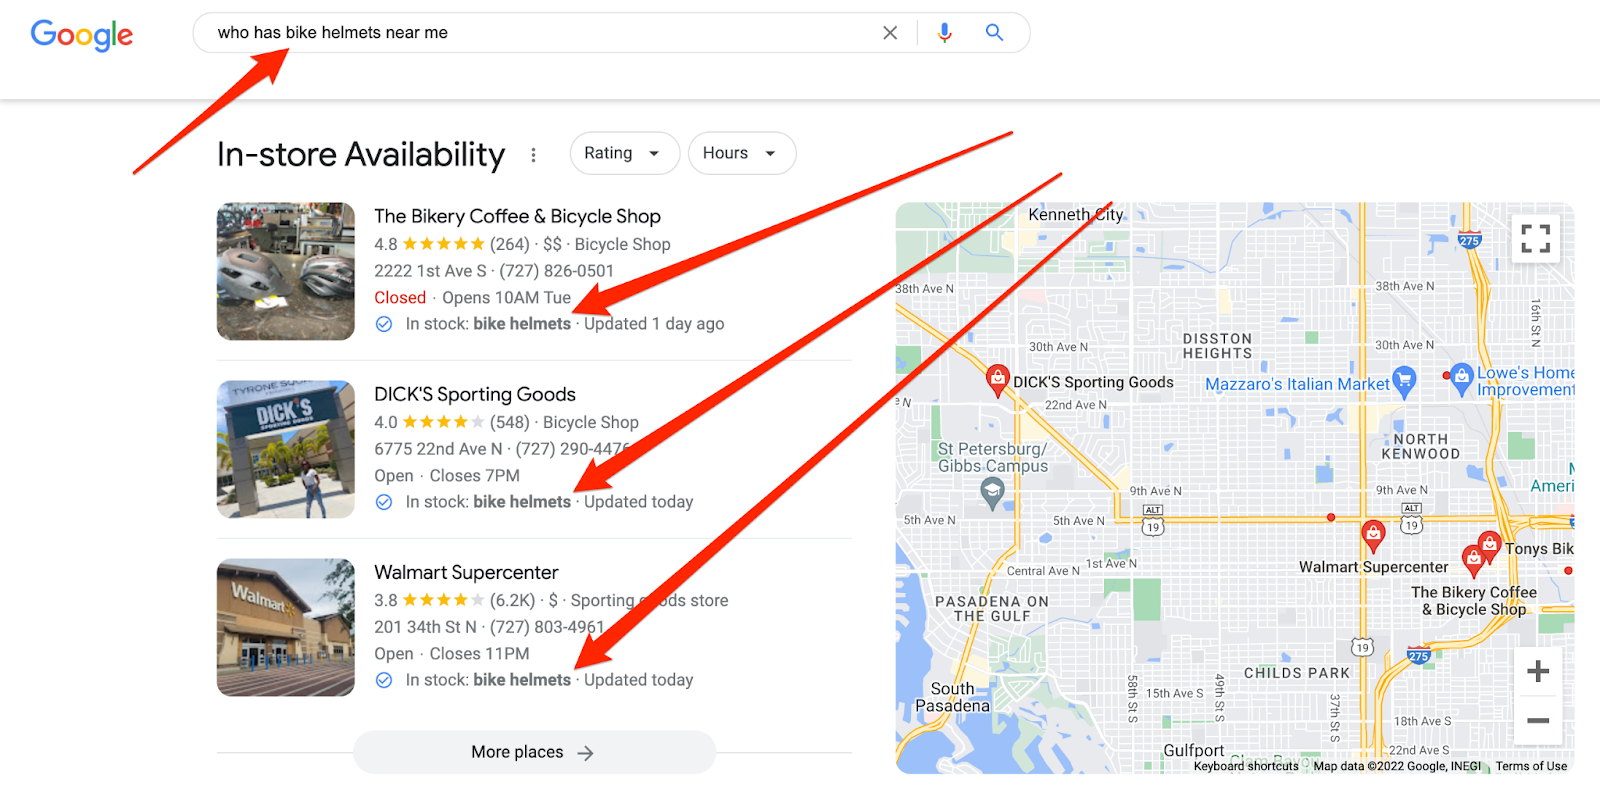
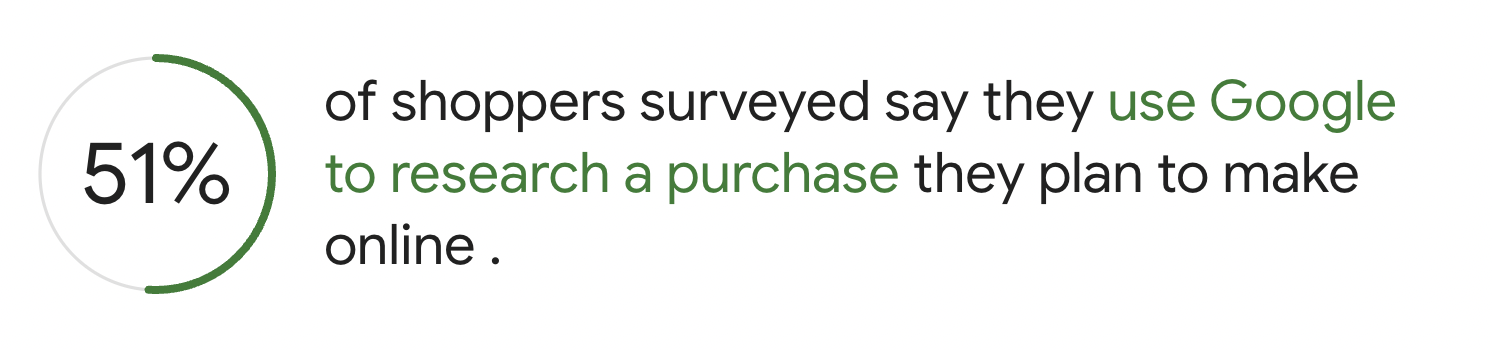
With 51% of shoppers saying they use Google to research a purchase they plan to make online, listing your product on your Google Business Profile can bring in a meaningful amount of sales.
This feature isn’t available to every business, though. If you sign into your Google Business Profile and you see a tab in the left menu for “products” or “services,” you are eligible. Products listed here are the ones that you can’t upload.

Moz has a guide on entering your products and services manually, but for the most part, just follow steps and enter your information accurately.
Manual setup is good for businesses with a limited range of products or services. But for businesses with a selection of products that require inventory management, I’d suggest setting this up through Pointy. This is Google’s tool for helping businesses list products in the search results based on inventory so that you don’t have customers showing up at your store for sold out products.
Here’s a quick video about it from the website.
Many point of sale (POS) systems support Pointy directly, but others will require you to get the free Pointy box from Google.
For more on Pointy, check out the FAQ.
If you’re a restaurant, there are additional steps to take if you want people to be able to place food delivery orders through your Google Business Profile.
Step 3. Set your opening date
If your business recently opened, adding your opening date to your listing gives you an opportunity to rank for keywords like “new restaurants near me.”
To do that, just go to the Info section of your account.
Then scroll down to where it says “Add opening date” and click the pencil.

In the popup, enter your business’s opening date.
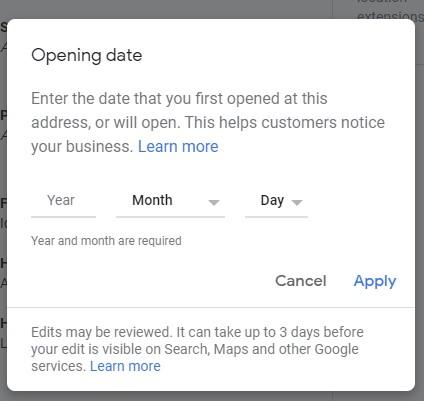
This is best done early because, after a while, you aren’t “new” anymore to Google or their users.
As your business ages, though, Google will use this as added social proof on your profile.
In any case, Google can use the extra data to put you in the right search results for their users.
Step 4. Set up your custom hours
In addition to your standard opening hours, Google lets you set and manage more hours and special hours.
Here’s how each of these works.
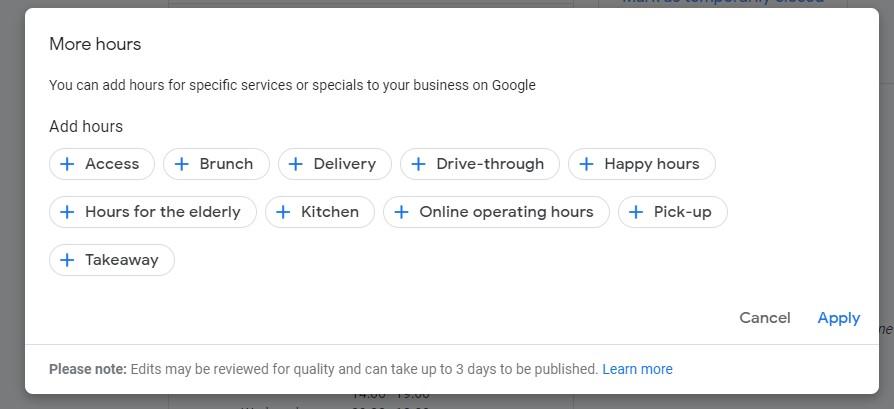
Set more hours on your Google Business Profile
“More hours” is a subset of hours for specific services, such as:
- Access
- Breakfast
- Brunch
- Delivery
- Dinner
- Drive-through
- Happy hour
- Hours for the elderly
- Kitchen
- Lunch
- Online operating hours
- Pickup
- Takeaway
If any of these apply to your business, you want to set them up correctly in your profile.
This way, you can be found in long-tail searches like “brunch near me” or “happy hour near me” while presenting potential with custom hours in Google Maps and in Google search results. Like this:
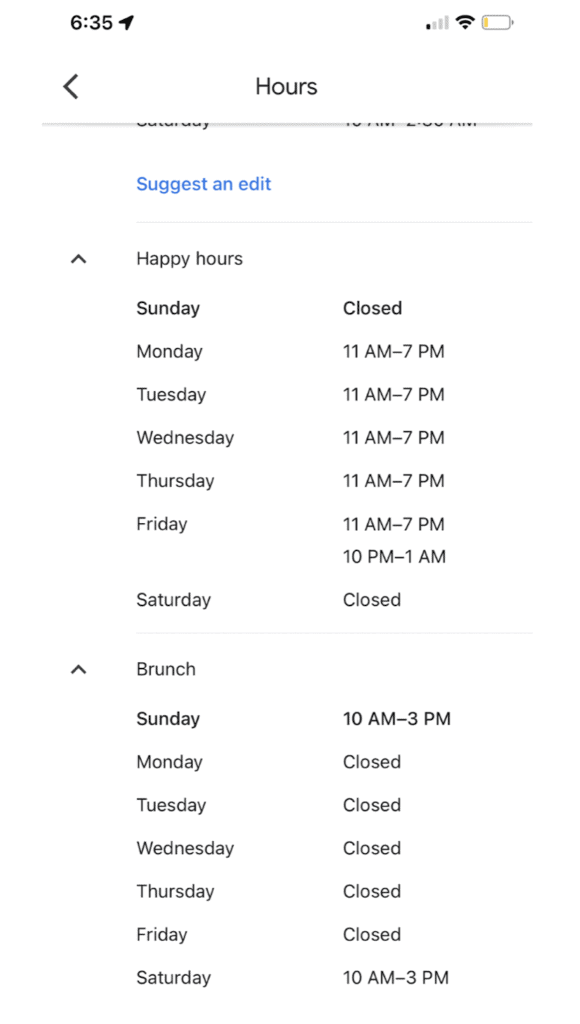
When they see this in Google, this can influence their decision to visit your business over another one.
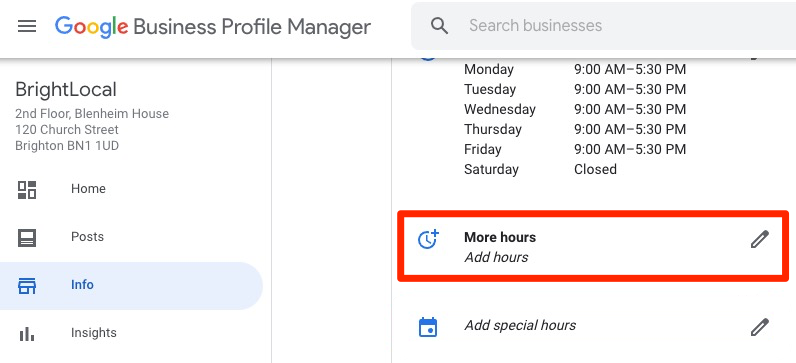
To set More Hours, click on the “Info” tab and then click “More hours”:
Specify the type.
Finally, you can add your hours for the specified service.
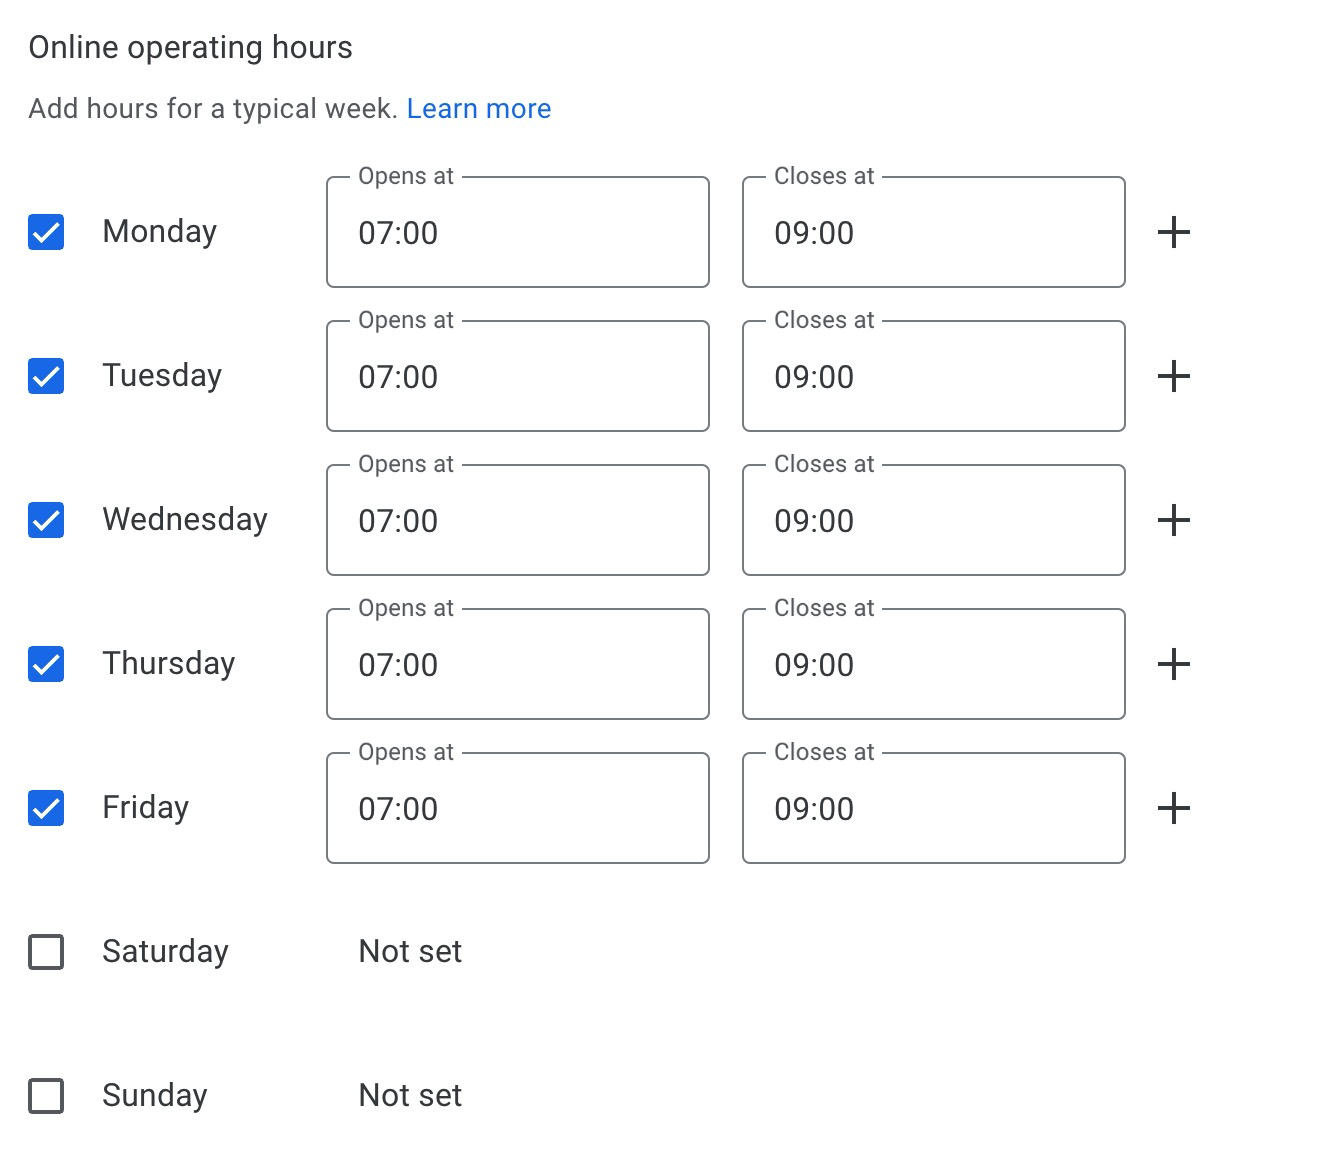
You can do this for as many “more hours” types as you want.
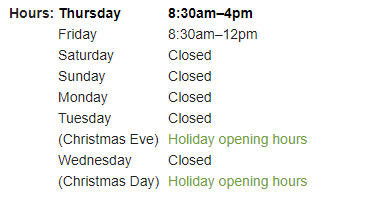
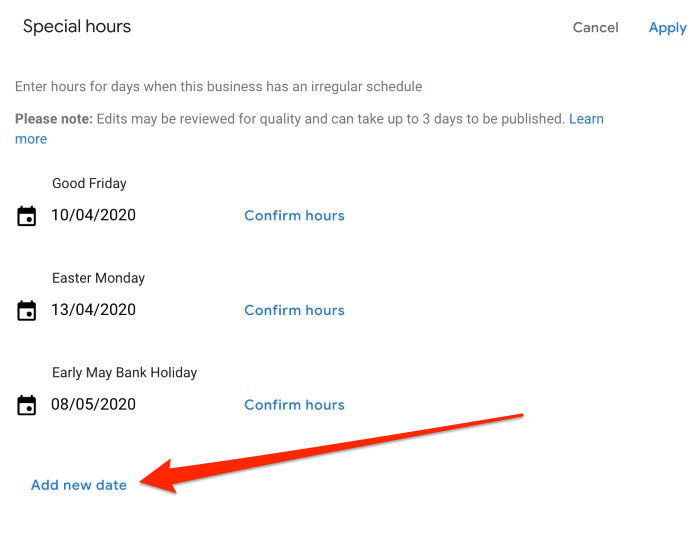
Set special hours on your Google Business Profile
If your business is closed or has reduced hours on holidays, or if it takes certain times of the year off, you don’t have to change your main hours. Instead, you can pre-set different hours for specific days in your Google Business Profile.
This way, on these days, your special hours are displayed on your profile instead so your customers have easy access to your unique hours right in Google and Google Maps.
For your customers, it’ll look something like this:
To set special hours, click on the “Info” tab and then click “Add special hours”:
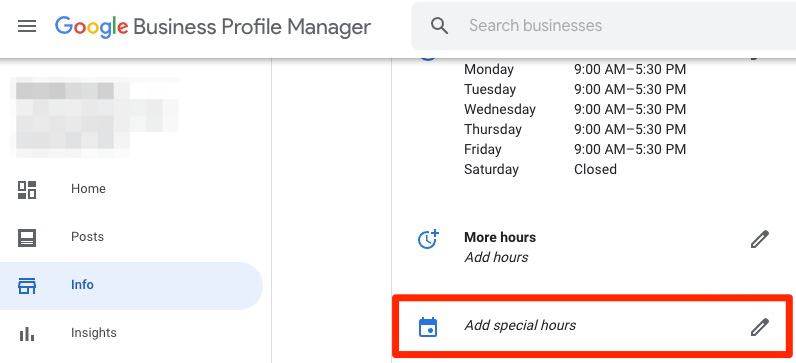
Google has a database of holidays by region, so you may see some already listed there for you to fill in.
To add a custom one, you can click “Add new date,” select the dates from the calendar, and add the open and close times for those dates.
Step 5. Select attributes for your business
While some attributes assigned to your business are determined by Google’s users, Google lets you identify specific qualities about your business that help your Google Business Profile show up in more relevant local searches.
The more detailed your listings attributes are, the more likely your listing is to rank for more detailed keyword searches. For example, “accessible restaurants in Tampa” or “Orlando hotels with free wifi.”
To edit your attributes, go to the “Info” section and click “From the business – Add attributes.”

At this point, you’ll be able to see the categories and specific attributes available for your listing.
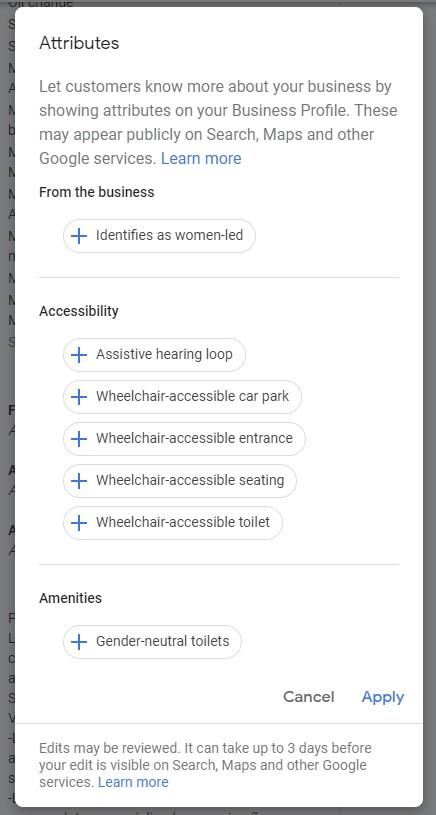
There are lots of attributes, and they do change from time to time. When going through this, make sure you add all of the attributes that apply to your business. This gives you the best chance at showing up when your potential customers use super-specific searches in Google.
Here’s a full list of attributes that are available. However, the specific ones you have available to you depend on your type of business.
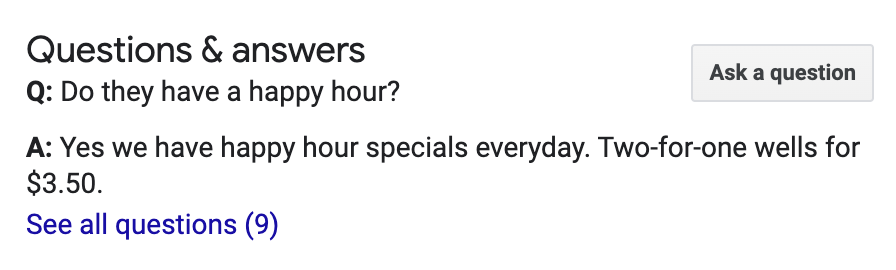
Step 6. Add Q&A to your Google Business Profile
The Q&A section of your Google Business Profile is where customers can ask and answer questions about your business from Google Maps or the search results pages.
It’s a community section, and looks like this:
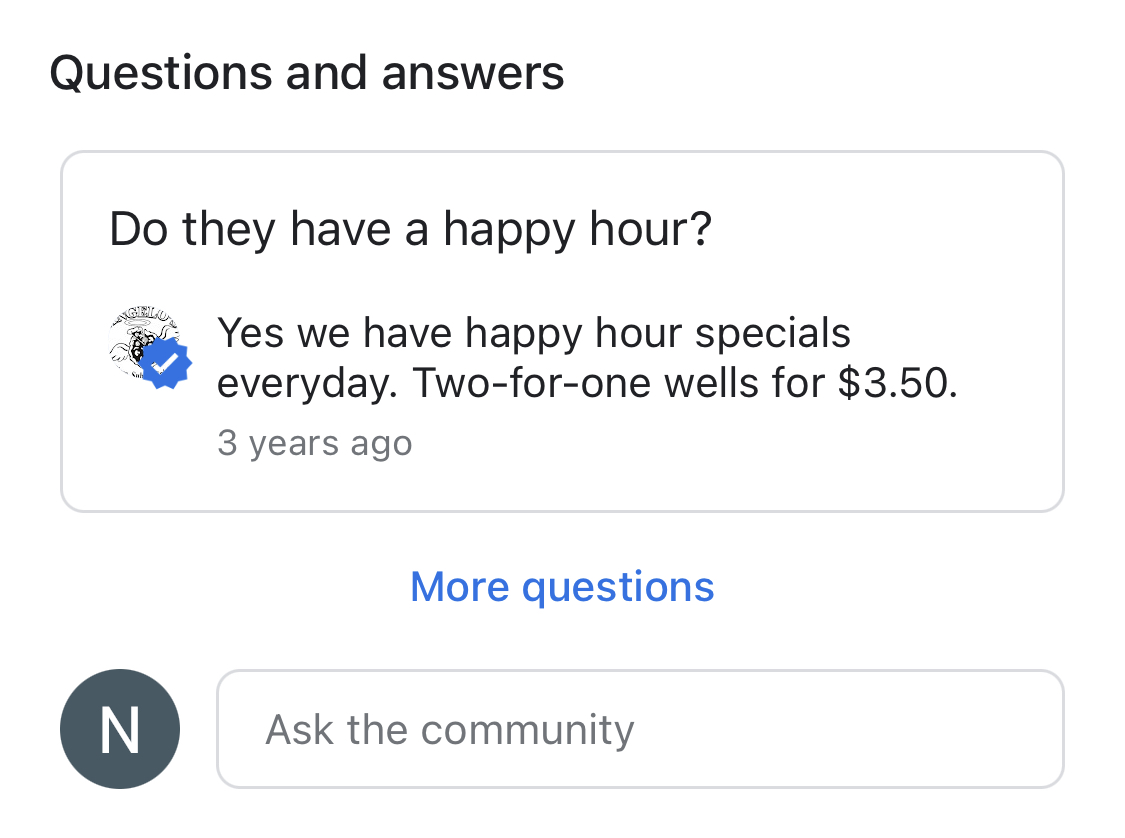
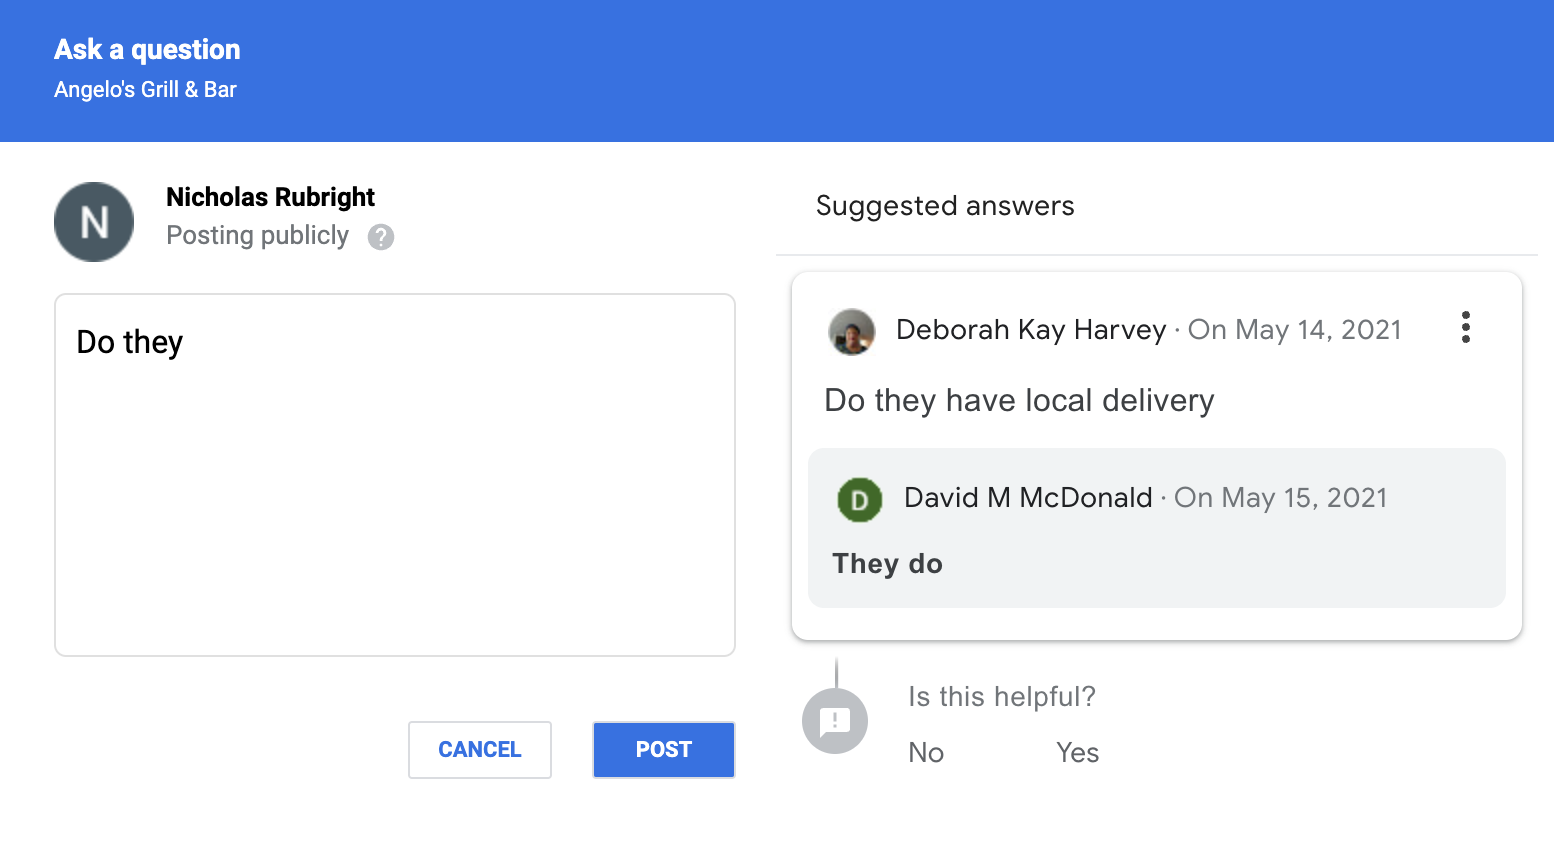
On the computer, when users try to ask a question, Google will use reviews and existing questions to give them an answer they’re looking for.
While there can be multiple answers to the questions on your profile, the most helpful one, as voted by other users, is the one that’s shown.
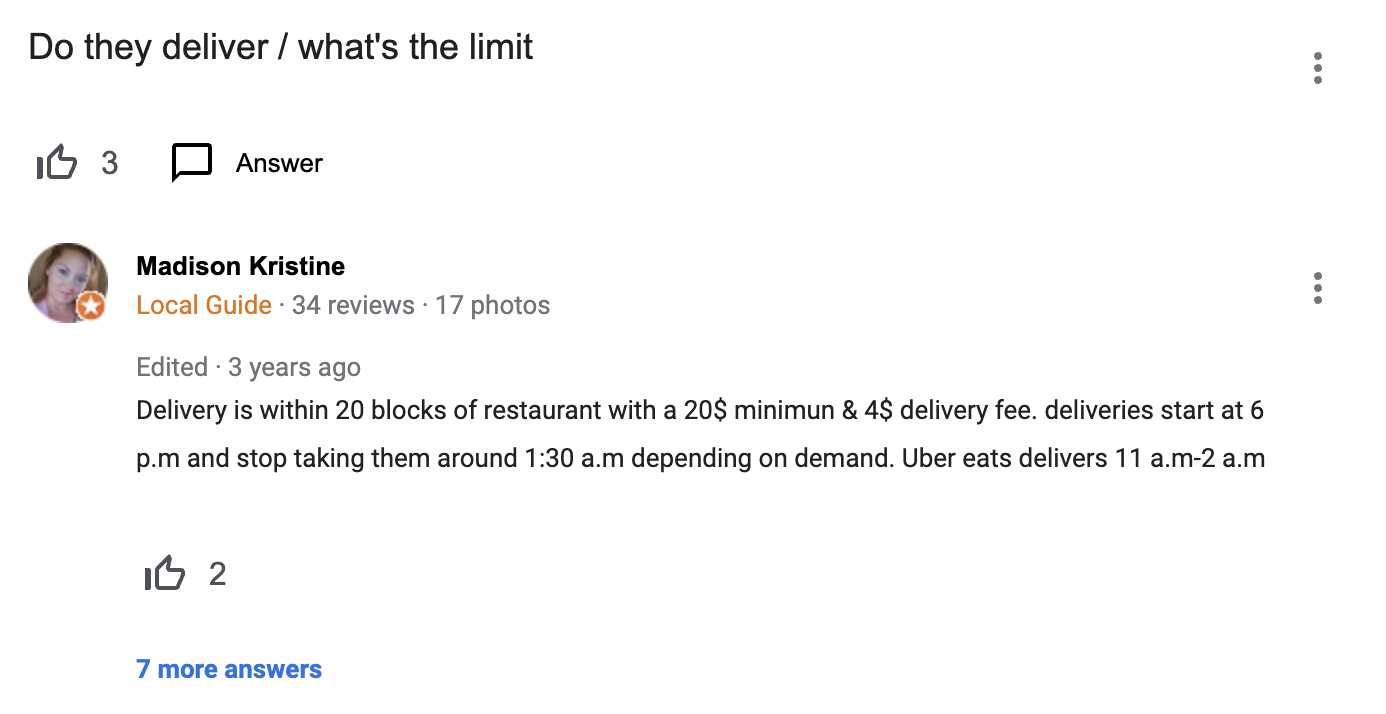
Questions can be voted on as well, and the one with the highest votes is the one that’s displayed on your Google Business Profile.
Having questions and answers related to what your customers are searching for on Google will help you show up in more searches.
For example, having a question and answer about your use of green cleaning products could help you gain more prominence around searches related to green cleaning services in your area. For example, “eco friendly cleaning services near me.”
This doesn’t mean you need to wait on your customers to ask the right questions. You, the owner, can also ask and answer questions. While Google doesn’t actually say anywhere that you can post questions on your Google Business Profile, they don’t have any rules against it as long as the added content is helpful to their users.
To add questions to your profile, follow the steps above that any other user would, but do so when logged in to Google with the same account that manages your Google Business Profile.
You can then immediately follow up by answering those questions using the same login. The workflow for this is also the same as it is for a standard user.
Add at least 7-10 questions that you know your customers are asking, then add additional questions that you find on competing listings that are also relevant to your business.
Step 7. Add a Google Business Profile link to your website
Having a link to your Google Business Profile displayed on your website is important because it helps with the rankings of your Google Business Profile in two ways:
- It passes authority to your Google Business Profile URL.
- It proves the relationship between your website and Google Business Profile to Google’s algorithms.
The best place to embed the Google Business Profile URL is in the footer so that it’s on every page, like this:
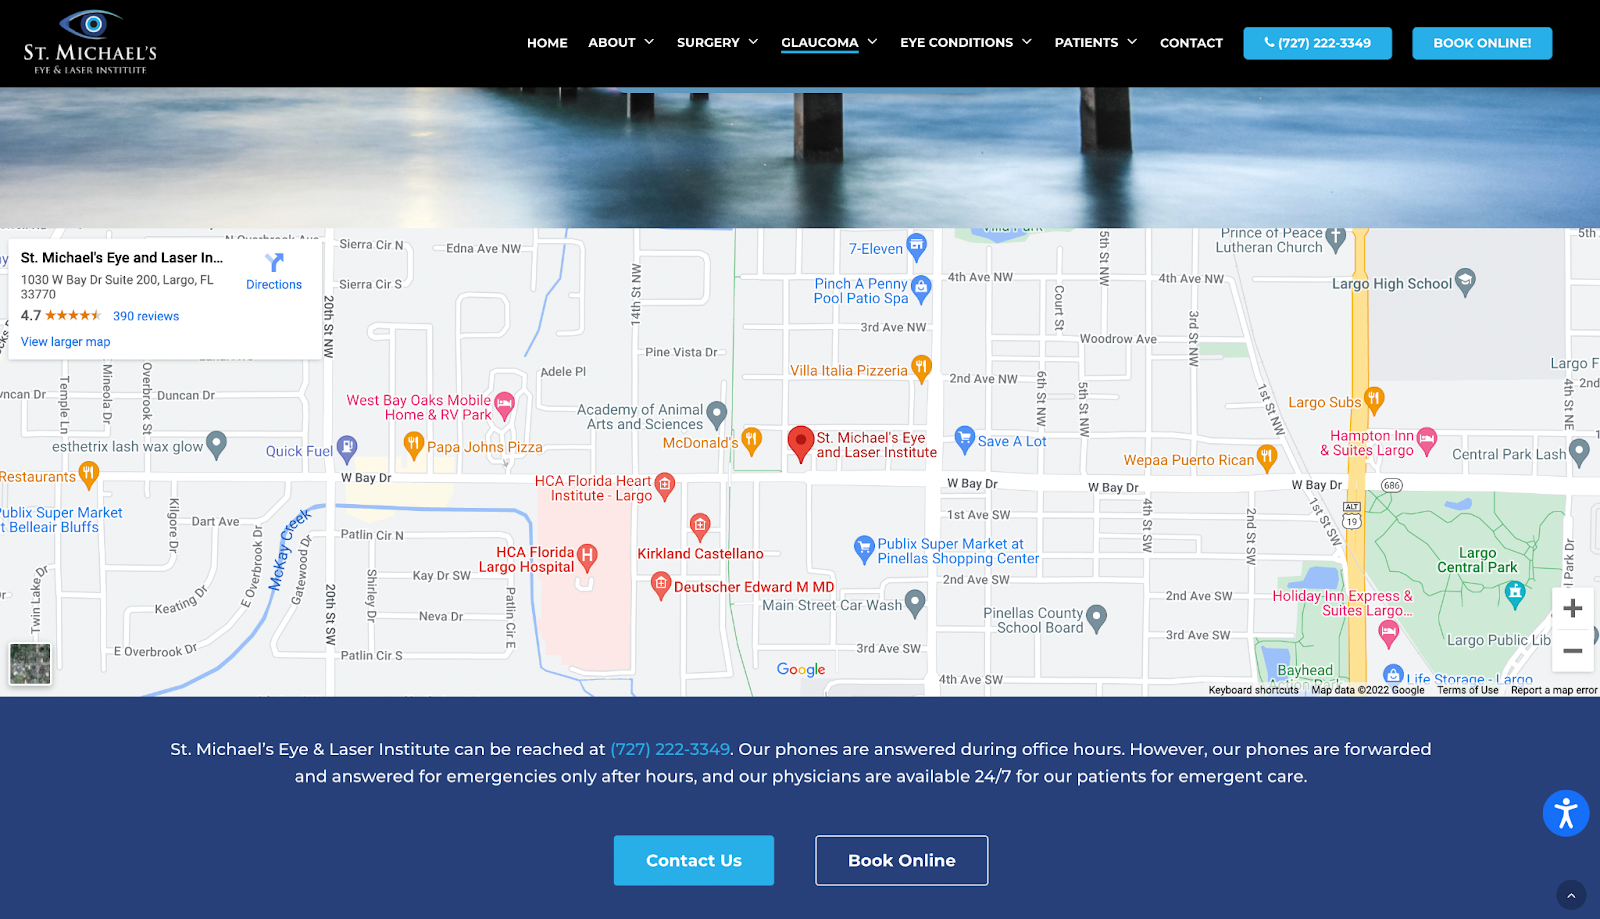
This is because different pages on your website have different levels of authority to Google, and you want as much of that as possible to pass on to your Google Business Profile as Google follows the links.
To get the embed code, go to your Google Business Profile, click the “Share” button, choose “Embed a map,” and click “Copy HTML.”
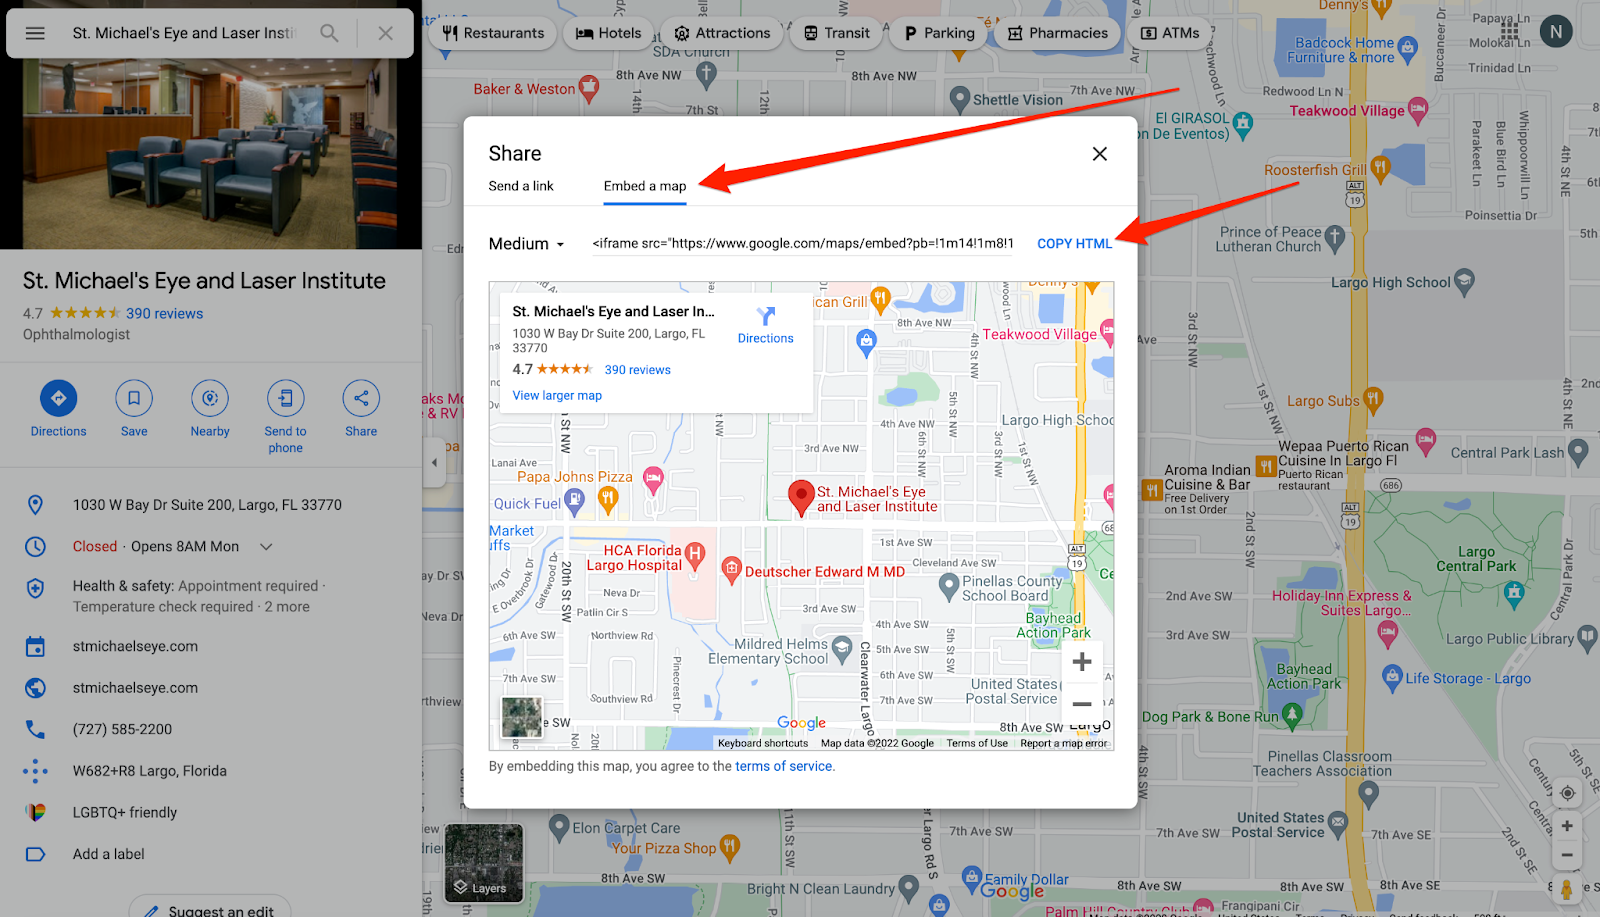
Then add it to the footer of your website as you see fit.
Step 8. Set up reservations
Reserve with Google is a feature Google released that allows their users to book reservations through various types of businesses.
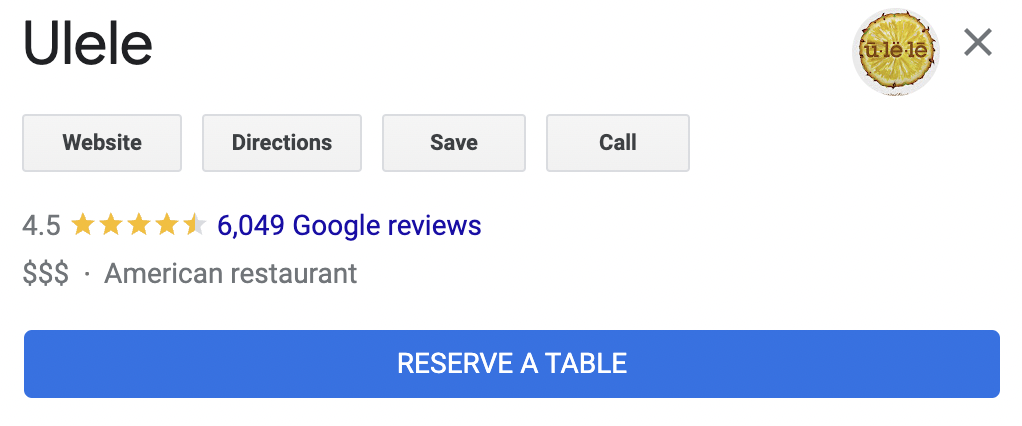
If you set this up for your business, Google Maps users will see an option to schedule an appointment with your business.
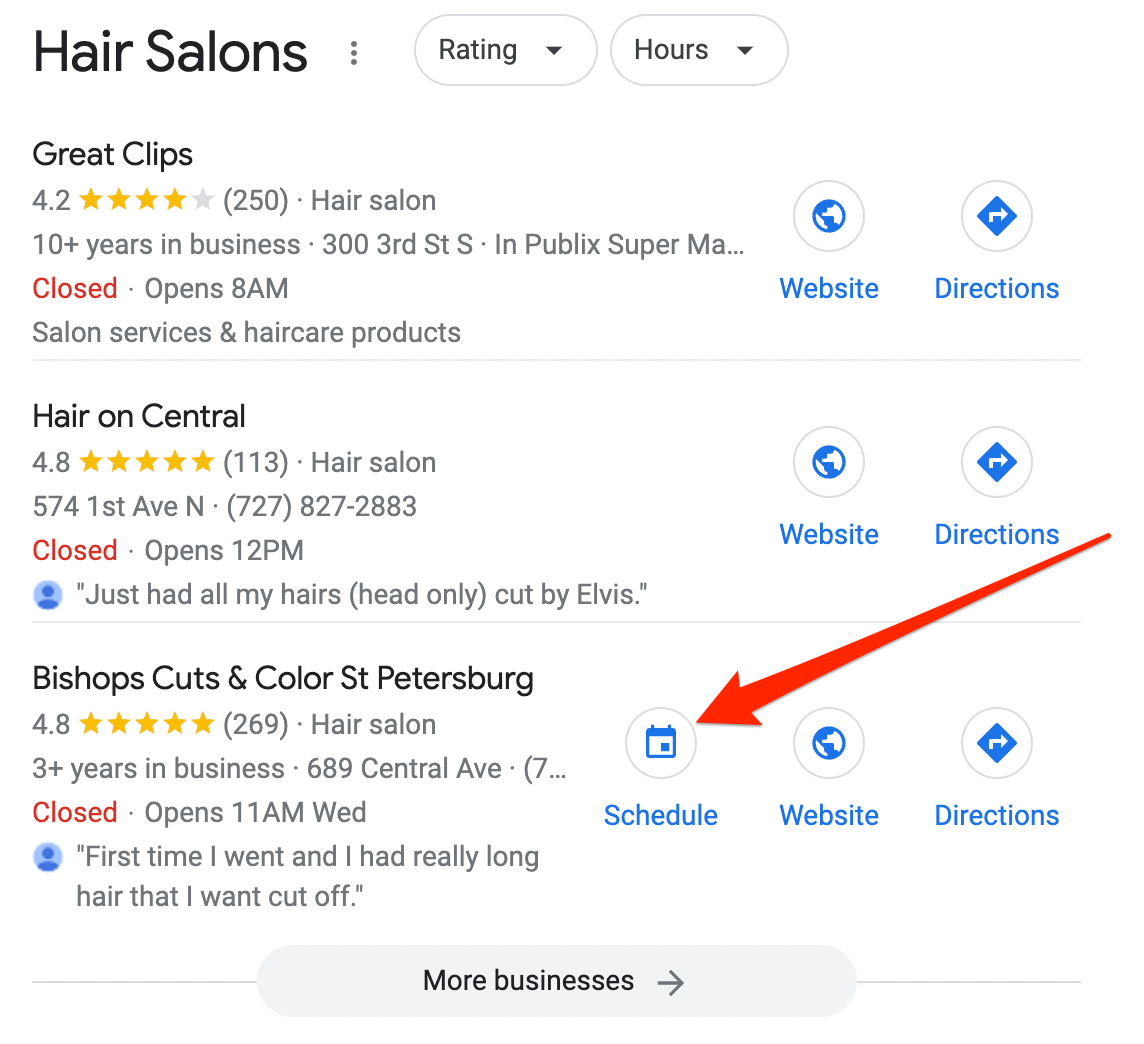
For restaurants, they’ll be able to reserve a table.
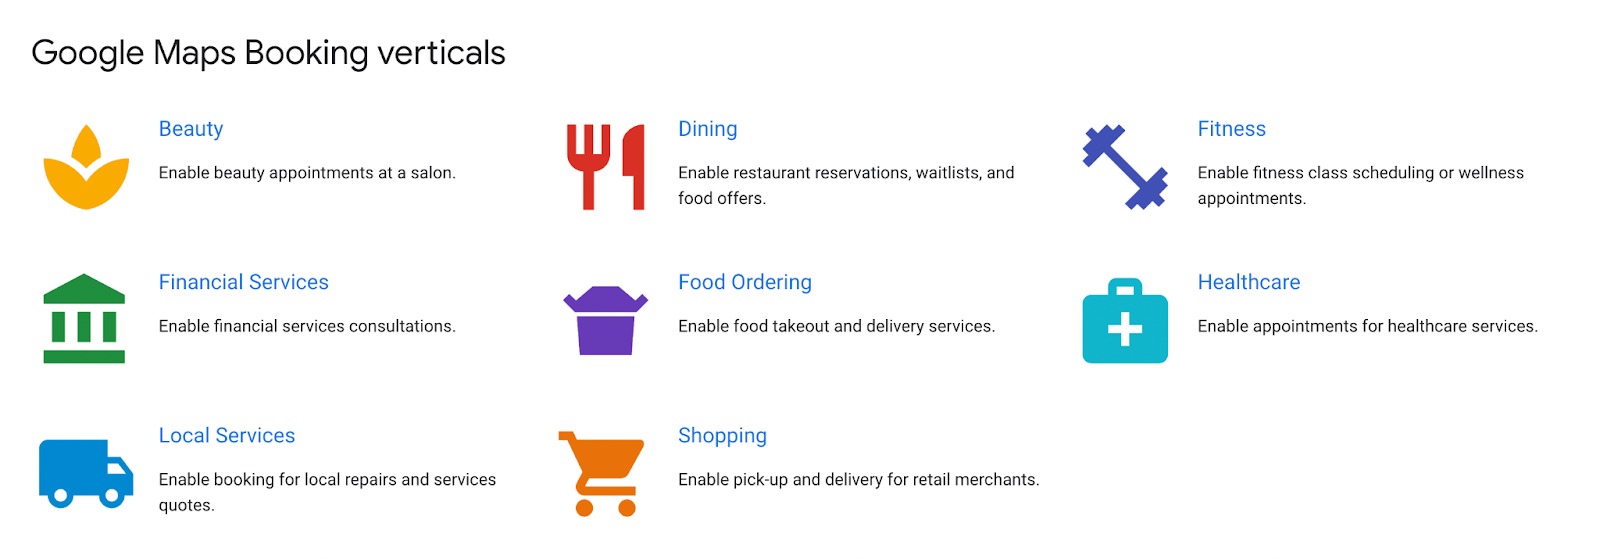
There are currently 8 verticals that the Bookings option is available for:
- Beauty
- Dining
- Fitness
- Financial services
- Food ordering
- Healthcare
- Local services
- Shopping
This feature isn’t always available. If you’re interested in using it, log in to your Google Business Profile to see if it is.
Bookings are available through Google’s “Reserve with Google” partners. If you don’t see your provider, don’t worry. They add more regularly.
To set this up, just head over to the Bookings section of your Google Business Profile manager and follow the setup instructions.

During the setup process, Google will ask you to choose a scheduling partner. Some are free, others are paid.
Once you go through the process, Google will review your profile to approve the Reserve with Google sync. If Google doesn’t approve your business, they’ll send details about why to your scheduling partner.
After you’re approved, you can head back to the Bookings section of your Google Business Profile to see all of the information on searchers who book with your business.
The best part is that, once the booking time has passed for your customer, Reserve with Google will automatically send an email asking for a Google review.
This is great for restaurants and businesses who otherwise don’t have direct access to many of their customers’ contact information because it will likely earn you more reviews. This will further impact your rankings and visibility in Google.
5 weekly action items to manage your Google Business Profile’s SEO performance
1. Do a branded search and profile audit
This step is about making sure that when people search for your business, the right information shows up.
For this, just do a quick Google search of your company name and make sure the information that is displayed is accurate.
As long as the search results are representative of your business, you’re good.
If there are issues, examine your Google Business Profile using the information found in this guide to ensure your profile is filled out correctly and accurately.
If after examining your Google Business Profile you’re still having issues with the search results when typing your business name into Google, getting listed on social media sites and other platforms like Facebook, Yelp, Bing, and Apple Maps can help. This will send more signals to Google that your business information is correct and that you have local authority.
Lastly, if you have multiple locations, make sure they don’t overlap in the chosen service area. This would cause them to compete with each other in the search results.
2. Respond to reviews and questions
Responding to reviews and questions regularly makes it more likely that customers will choose you over your competitors.
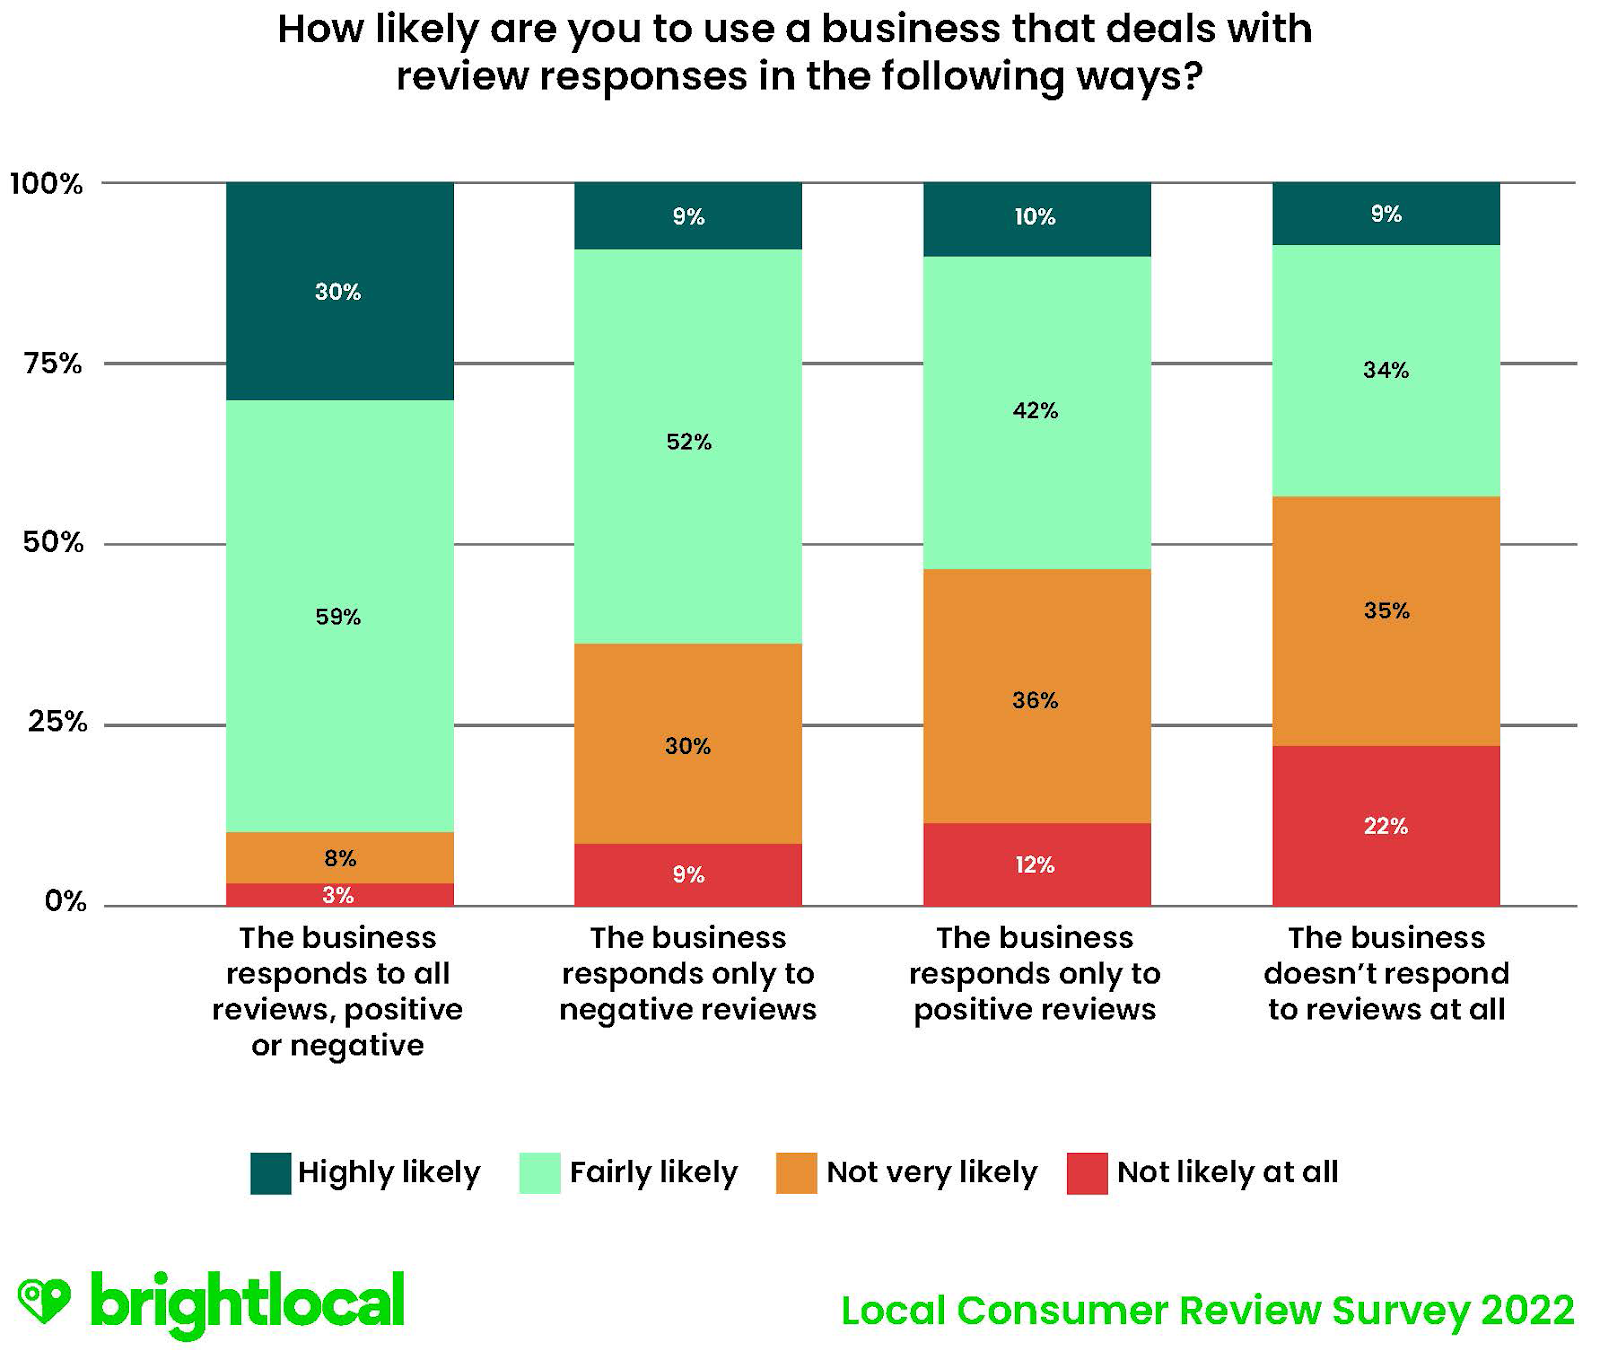
There are tons of ways you can respond to reviews on your profile. For positive reviews, it’s pretty straightforward. Thank your customer for the review in a friendly, authentic way.
If you get a negative review, Brightlocal has some good tips for how to respond depending on the situation.
3. Add new photos to your Google Business Profile
If you have any new photos, adding them to your profile can help draw attention from existing customers that may be suffering from brand fatigue.
Brand fatigue is the tipping point when your audience starts to become bored with your image and messaging. Adding new photos to your Google Business Profile regularly helps avoid this because when your customers see new photos on your listing, it has the potential to trigger curiosity and interest.
You can add photos to your business by choosing the “Add photo” button at the top of your dashboard and following the upload instructions.

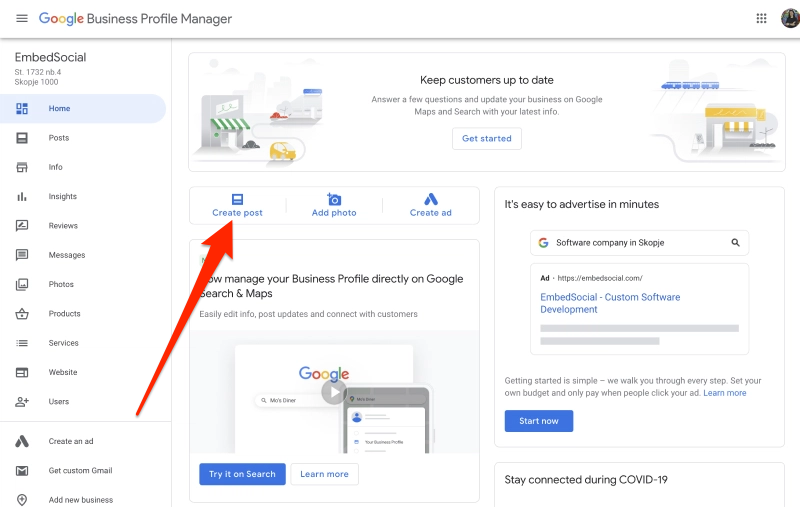
4. Make a post
At minimum, you should post on your Google Business Profile once per week.
There are several different types of posts you can make on your Google Business Profile, including:
- COVID-19-related posts: These posts are to provide customers with an update about changes related to COVID-19.
- Offers: These posts are promotional in nature and allow you to post promotional sales or offers from your business. Offers require a title as well as start and end dates and times, and will automatically include a “view offer” button.
- What’s new: This category of posts is designed to provide general information about your business. You can include a photo or video, a description, and an action button. You can use this to promote new blog content from your website or to announce a new menu item.
- Events: Great for places with live music or frequent events. Promoting events on your Google Business Profile can help you show up for “things to do near me” searches.
To make a post, click on the “Create post” button on the main page of your Google Business Profile dashboard and follow the instructions.
5. Report spammy reviews
Spammy reviews negatively impact the visibility and conversion rate of your Google Business Profile.
Review spam happens when competitors try to hurt your conversions or rankings by having negative reviews posted on your profile, like this:
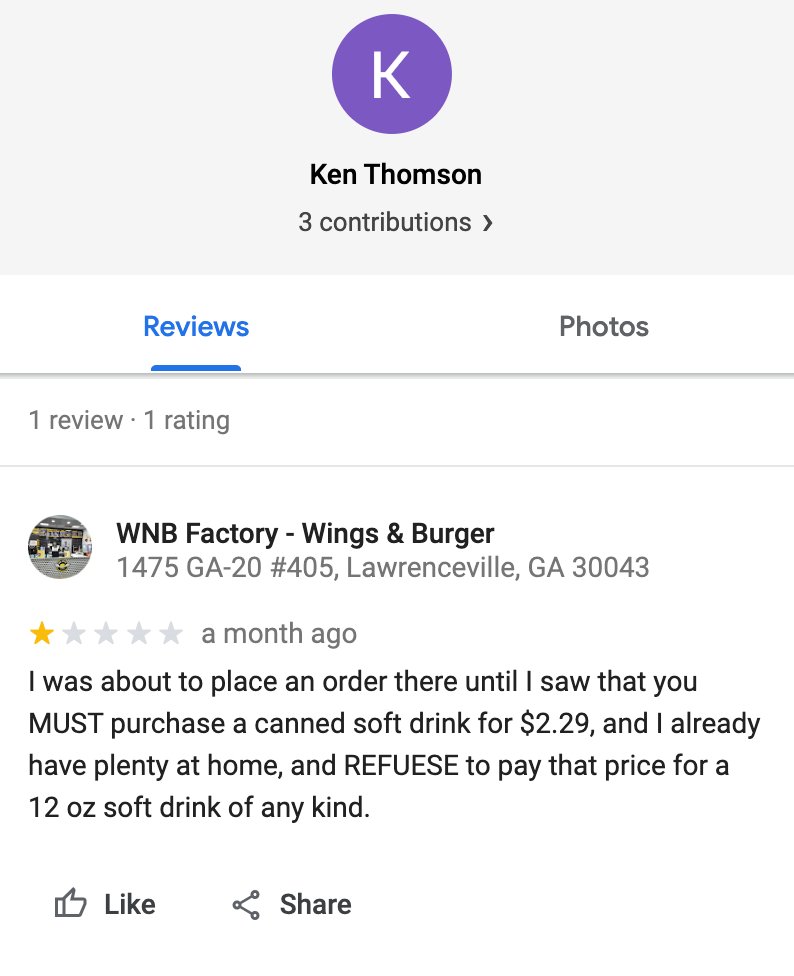
Not all of the reviews that are spam are this obvious, though. While you can’t always spot all of them, HubSpot has a guide that can help you spot and report as many as possible.
In any case, it’s still important to respond to the review in case potential customers see it.
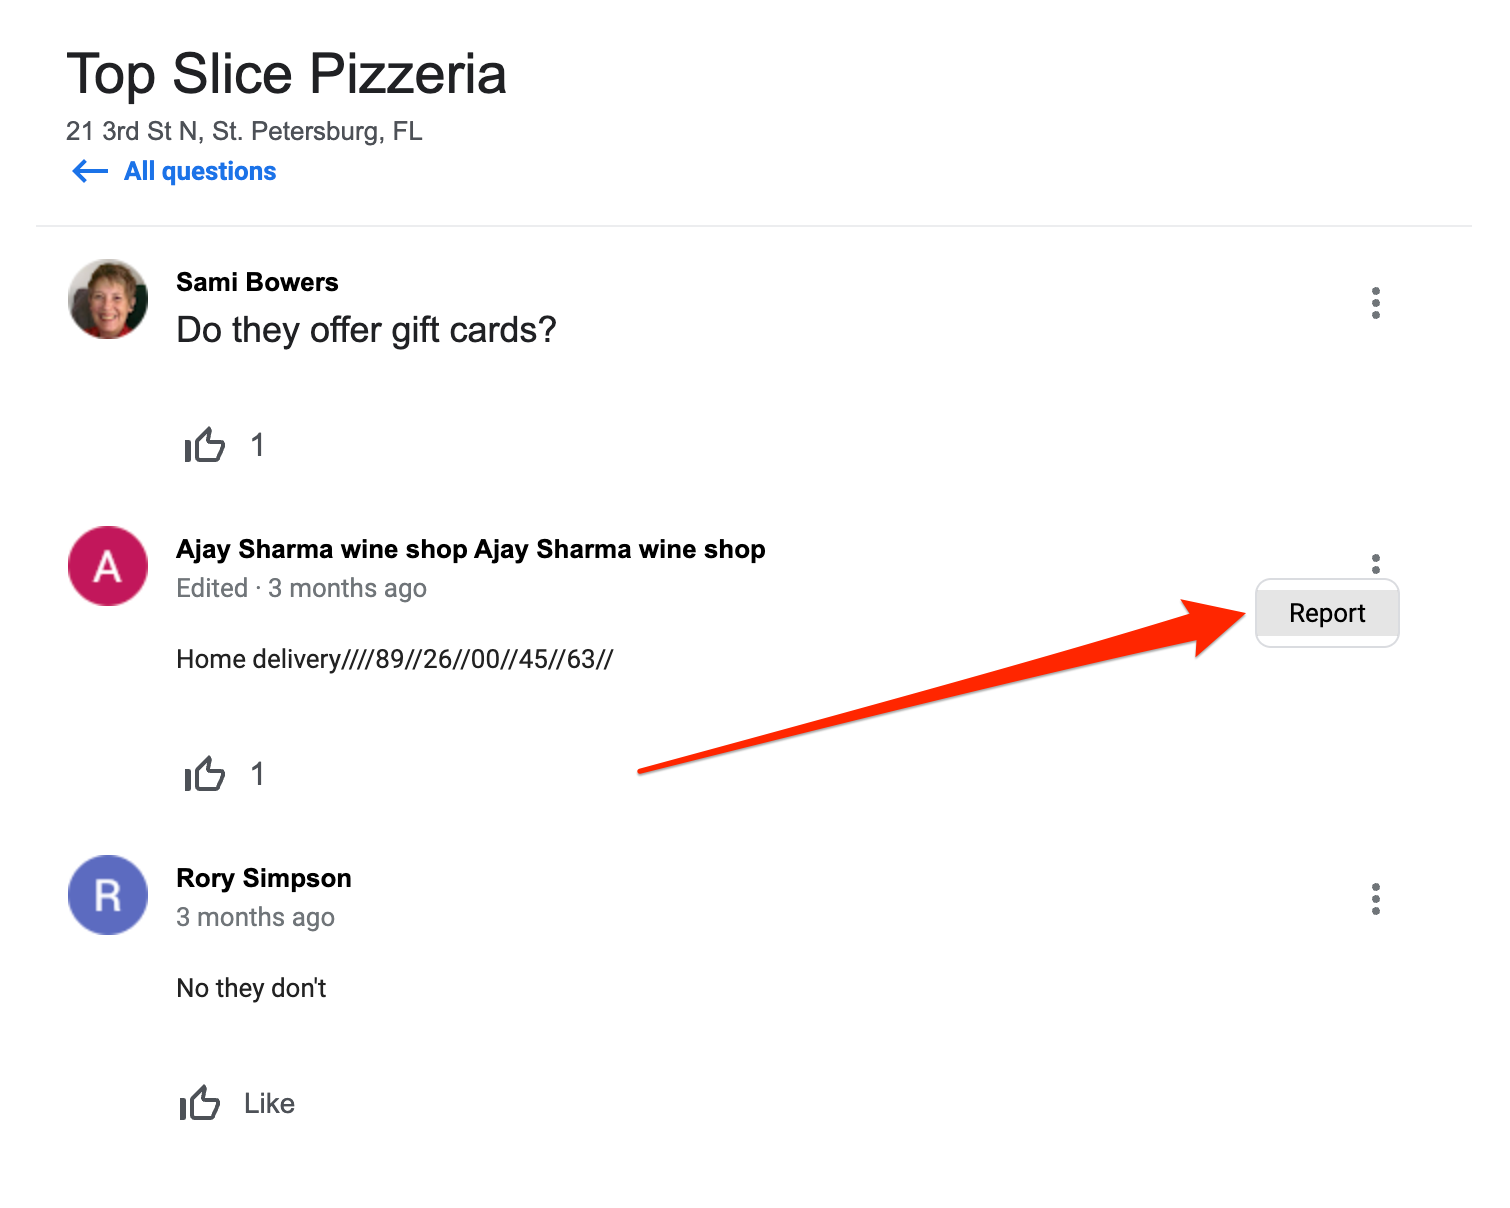
6. Report spammy Q&A discussions
Sometimes, the Q&A section can fill up with spam questions or topics of discussion that are against Google’s guidelines.
When you find one like this, just choose the three dots next to the question or answer and click “Report”.
7. Report search result spam
Many businesses use shady tactics like keyword stuffing, multiple Google Business Profiles, lead generation websites, and fake reviews to manipulate local search results.
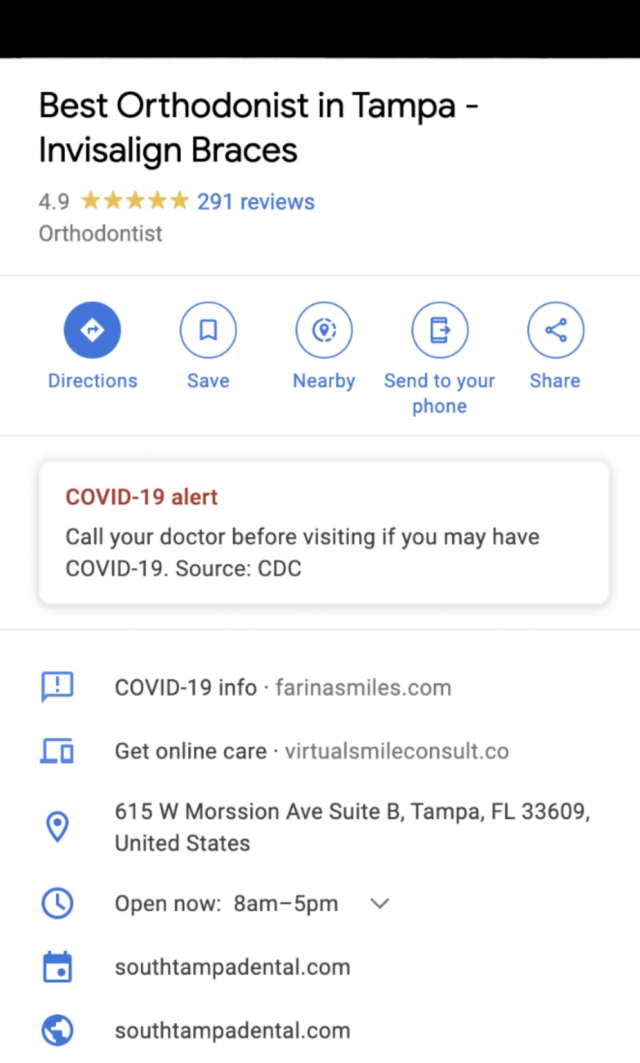
The most common type of spam you’ll come across in the search results is Google Business Profile name spam.
One example of this is including the location in the name in an effort to show up higher for keywords with the city in it, like “dentist in Tampa.”
Using adjectives to make the business stand out or attract clicks is another tactic to look out for. In this case, describing the orthodontist as “best.”
This can be accidental, where the person wasn’t aware that they had to use the actual business name, or intentional, where the person stuffs keywords into the name to manipulate their rankings in local pack and Google Maps results.
Regardless, both of these are examples of things that are against Google’s naming guidelines. Things like this might be reducing the visibility of your listing, so it’s good to work against them.
In any case, Google’s algorithms aren’t perfect at detecting this kind of thing, so it’s best to take an active effort in fighting it yourself to protect your Google Business Profile’s visibility.
You can do this in two ways:
- “Suggest an edit” on their Google Business Profile and hope that Google’s algorithms accept the change.
- Escalate it as an official spam report by filling out Google’s Business Redressal Form.
In some cases, it may be best to attempt both.
Do this for all of the keywords you’re trying to rank for to make sure you aren’t competing with spammy profiles.
Conclusion
After reading all of this, you should have everything you need to properly set up and manage your Google Business Profile for SEO success.
Of course, there are other factors that impact the performance of your Google Business Profile, like reviews and citations, but these will be covered in another article.
If this stuff seems overwhelming to you, you can have us do it for you with our local SEO services!
Otherwise, if we missed anything, let us know in the comments below. 👇


