
For 76% of the population, before they visit a retail store, restaurant, or service business, they first consult the internet.
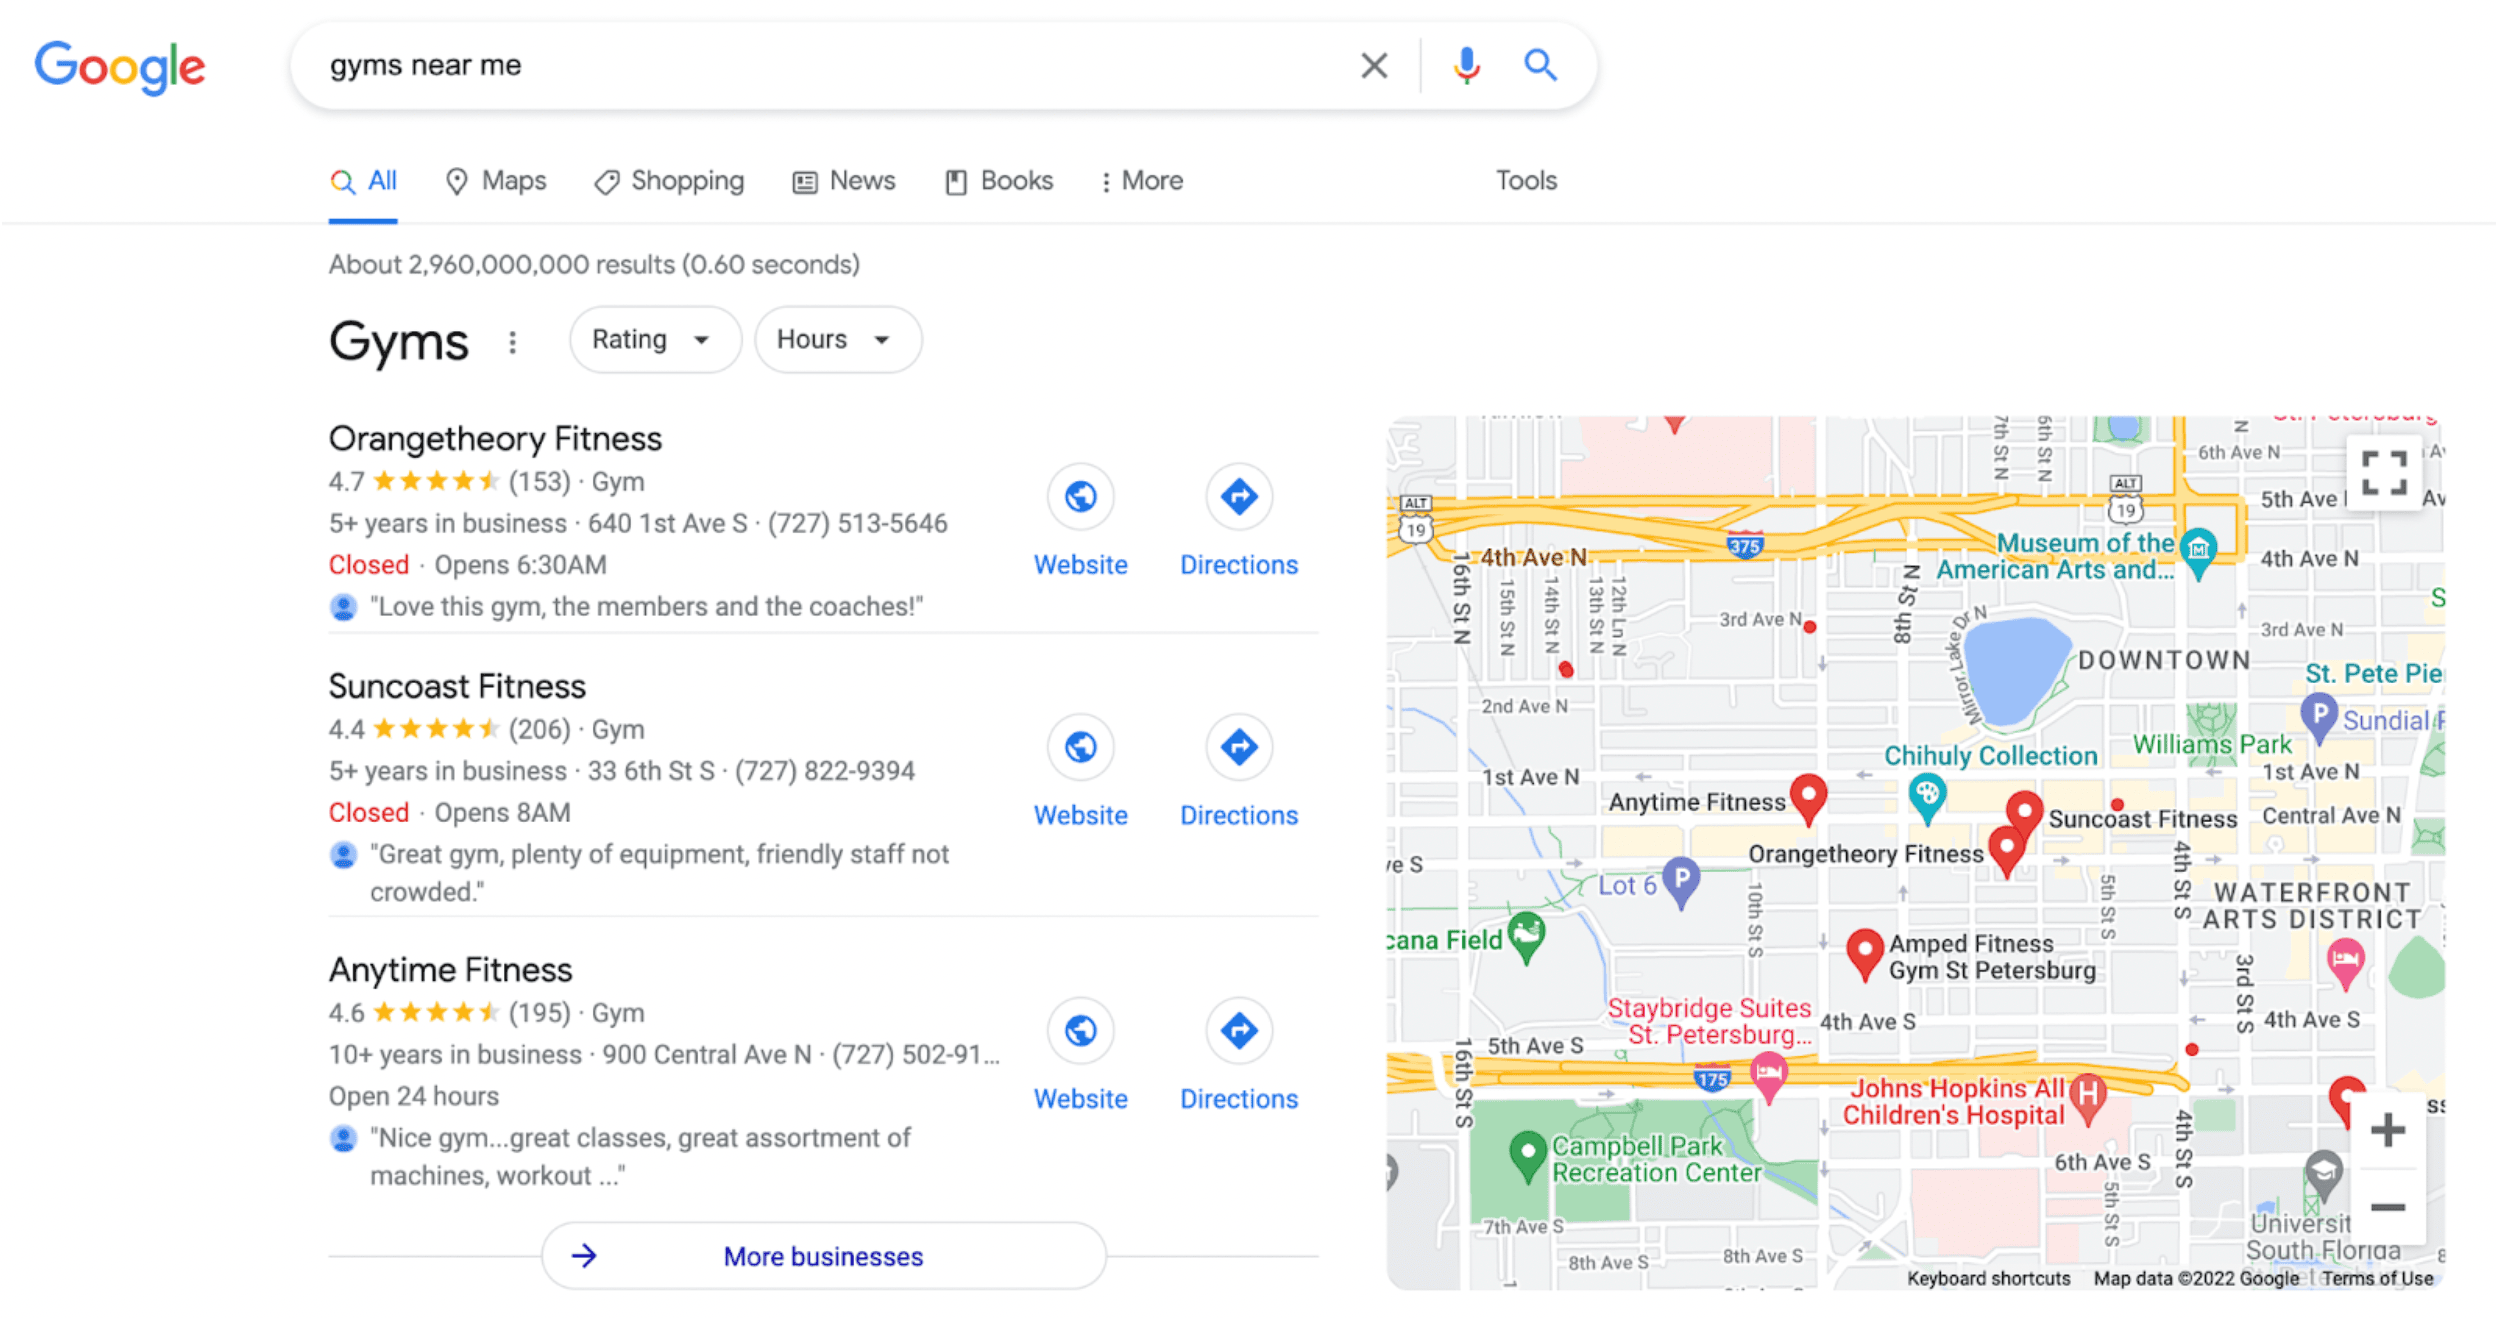
If someone moves to a new city and is seeking a gym membership, for example, they might start their research by looking for the one closest to their new home with a “gyms near me” search.
This will present them with something like this:
If you’ve ever wondered how you can get your business to show up for searches like this, and more, read on.
In this guide, you’ll learn:
- The basics of local SEO.
- How to optimize your Google Business Profile (formerly Google Business Profile).
- How to optimize your website.
- How to rank in the 3-pack (the map results above) using our internal step-by-step approach.
- Local keyword research and content marketing strategies.
- How to get local backlinks.
Let’s go.
What is local SEO and how does it work?
Local SEO is a search engine optimization (SEO) strategy with the goal of improving the visibility of your business in local search results in Google.
So if you’re a pizza shop, this would help you show up for “pizza near me” searches in Google.
Same with real estate agents, doctors, lawyers, dentists, lawn services, and other local businesses.
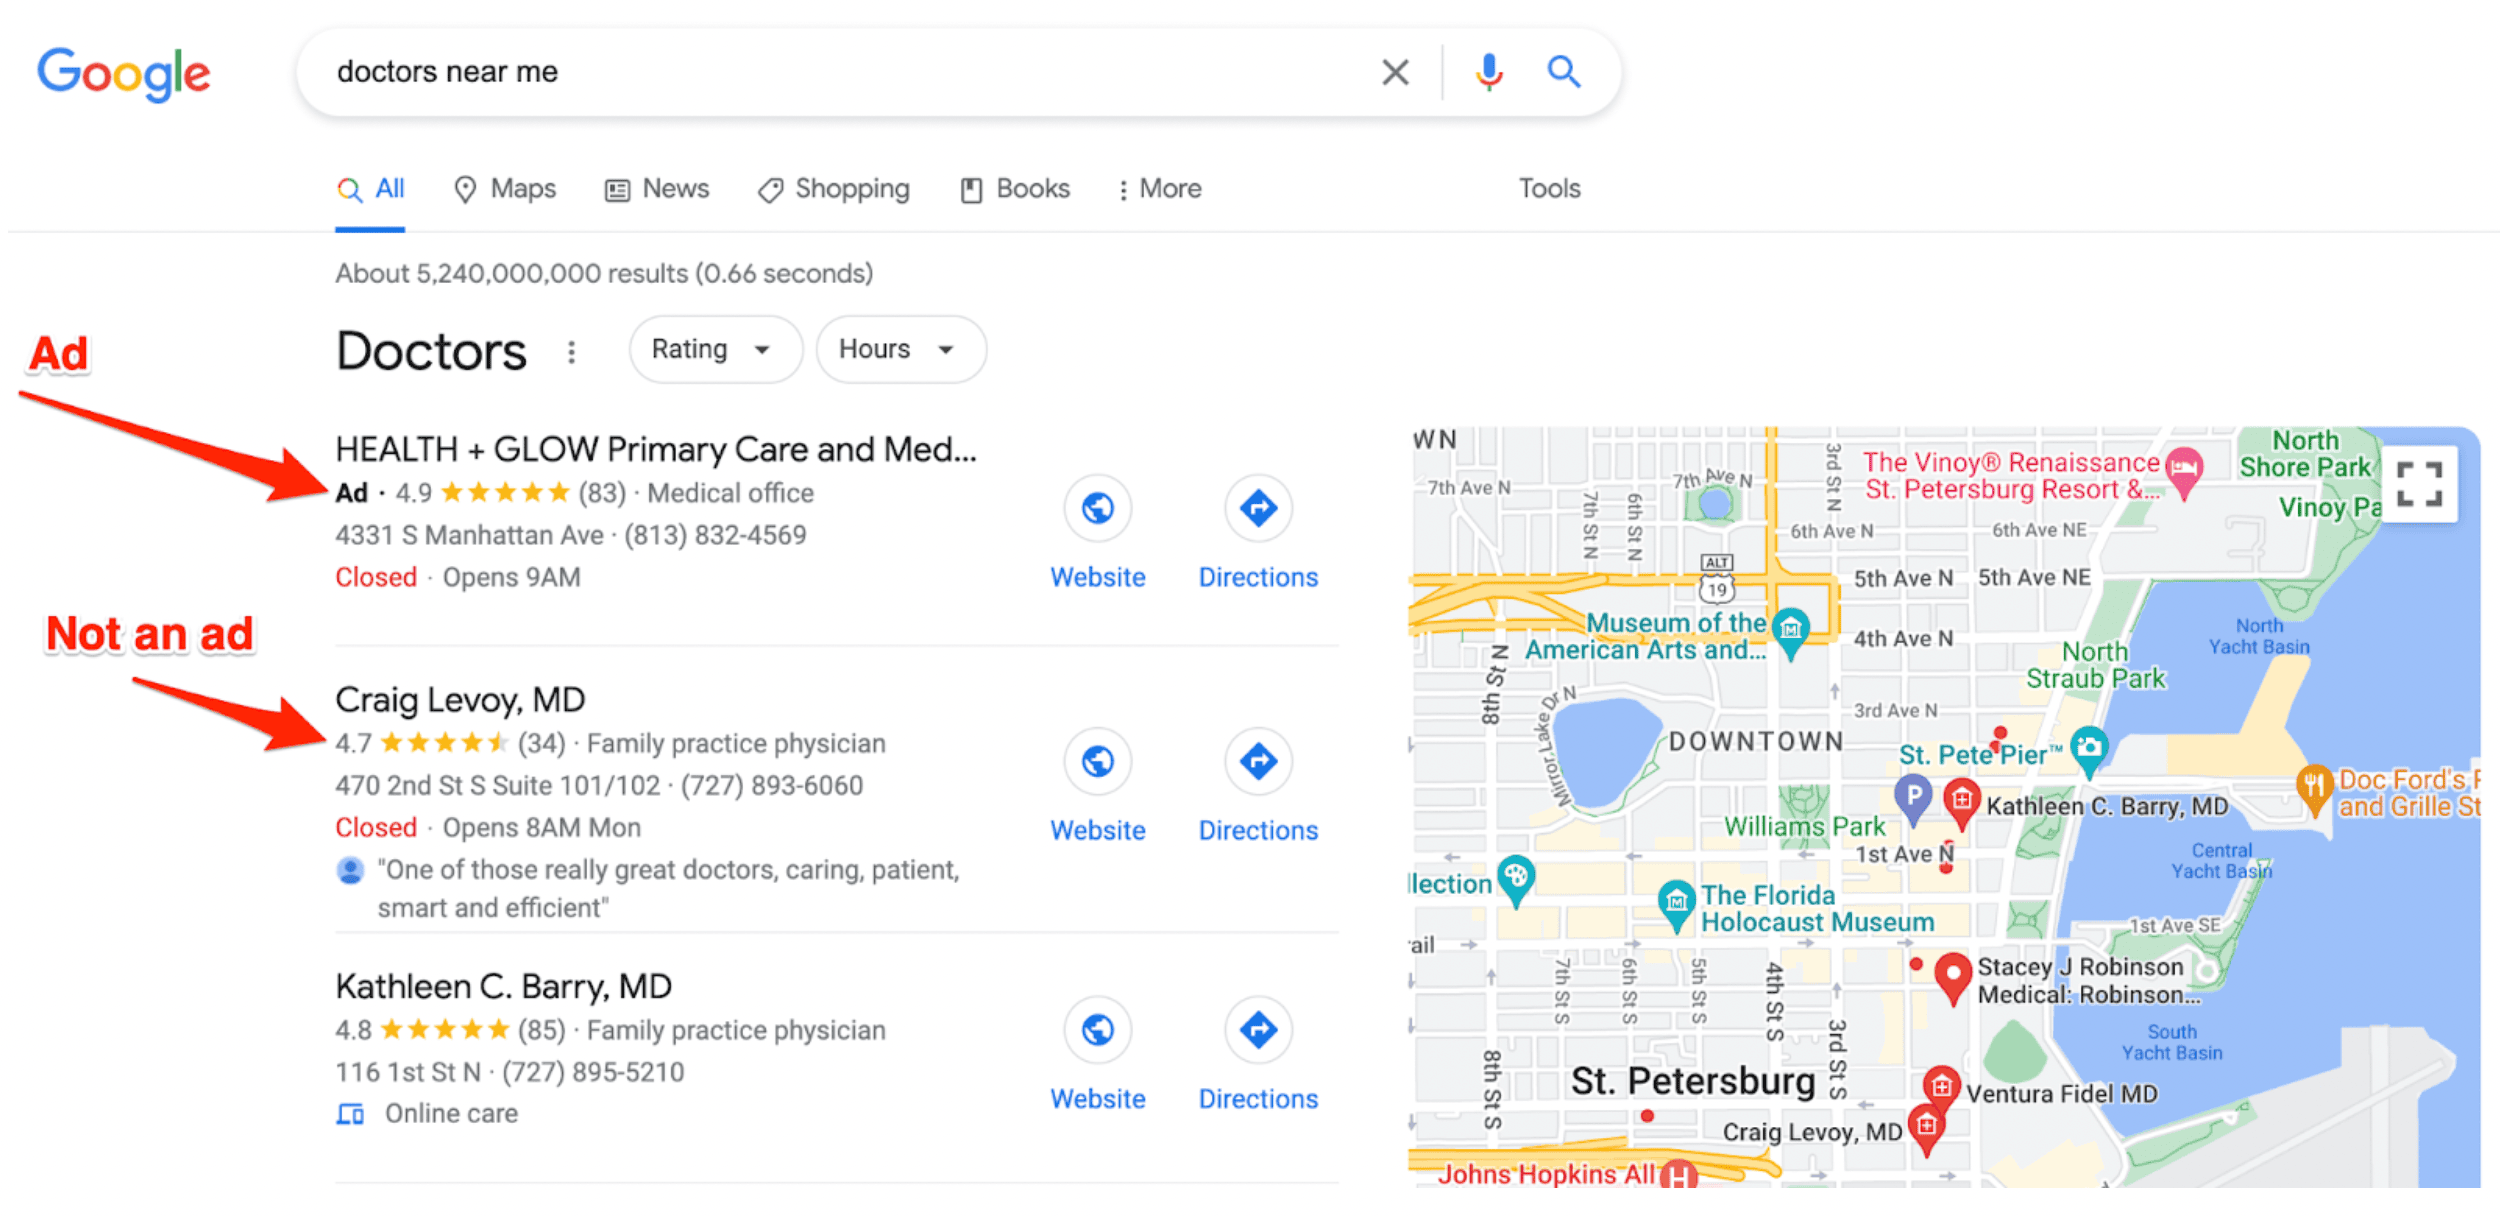
People are searching for what you have to offer in Google, and local SEO is how you position your business to be found without running ads, which are labeled as such.
This article focuses on how to get these listings organically rather than paying for them to bring lasting traffic to your business.
In order to understand how this works, it’s important to understand how Google works.
How does Google work?
When you type a search phrase into Google, it checks every single webpage in their database for 200 different factors, such as how relevant your site is in relation to the searcher’s query and how trustworthy your site is compared to others, to return a list of sites that match your search.
Google isn’t actually doing a live search every single time you put in a new query, though. See, they have web crawlers called “spiders” that follow links around the internet to discover new pages. They start on large sites like Wikipedia, for example, then follow all of the links to continue discovering new pages.
When these new pages are discovered, Google saves the information about these pages, such as how fast they load, what the pages have on them, and who is linking to them, to their index.
Each time a user performs a search, their algorithms use this information to serve the best result to their users based on relevance, prominence, and popularity given by inbound links.
Because Google is looking at the relevance and popularity of your website to your online audience, improving these things is how you improve your SEO performance because you’re giving Google’s users what they want, which is what Google wants and is built to accomplish.
How does local SEO work?
Local SEO works by improving the relevance and popularity of your website to your online audience so that it can be found more easily by Google’s users.
This is done first by understanding what factors play a role in helping Google decide what to serve up to their users.
The way Google decides what to display to users very much depends on the type of search they’re performing. Google categorizes search terms by their search intent and uses different factors for different search types.
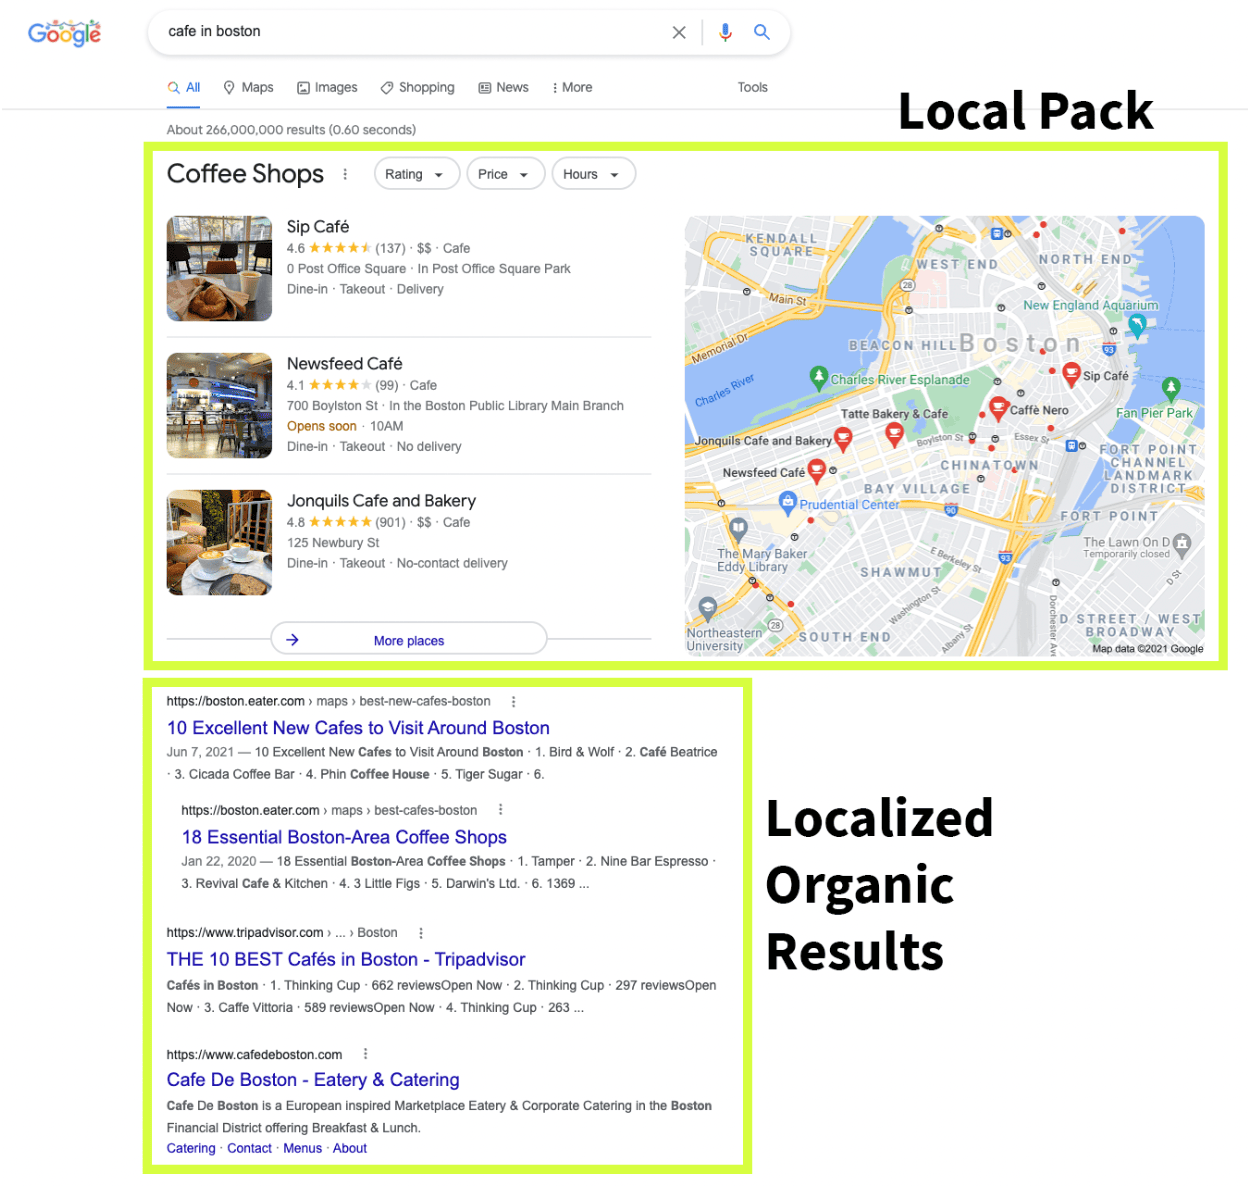
For the purposes of this article, we’re going to focus on the map pack results and local organic results because those are the types of searches that are important to local businesses.
Map pack results are the ones like this that show results from Google Maps listings. SEO people call this the “3-pack.” These are shown in 23% of all searches performed in Google.
Local organic search results are the ones that show underneath the map pack that are still relevant to the searcher’s geographic location. It’s also estimated that 46% of searches have local intent.
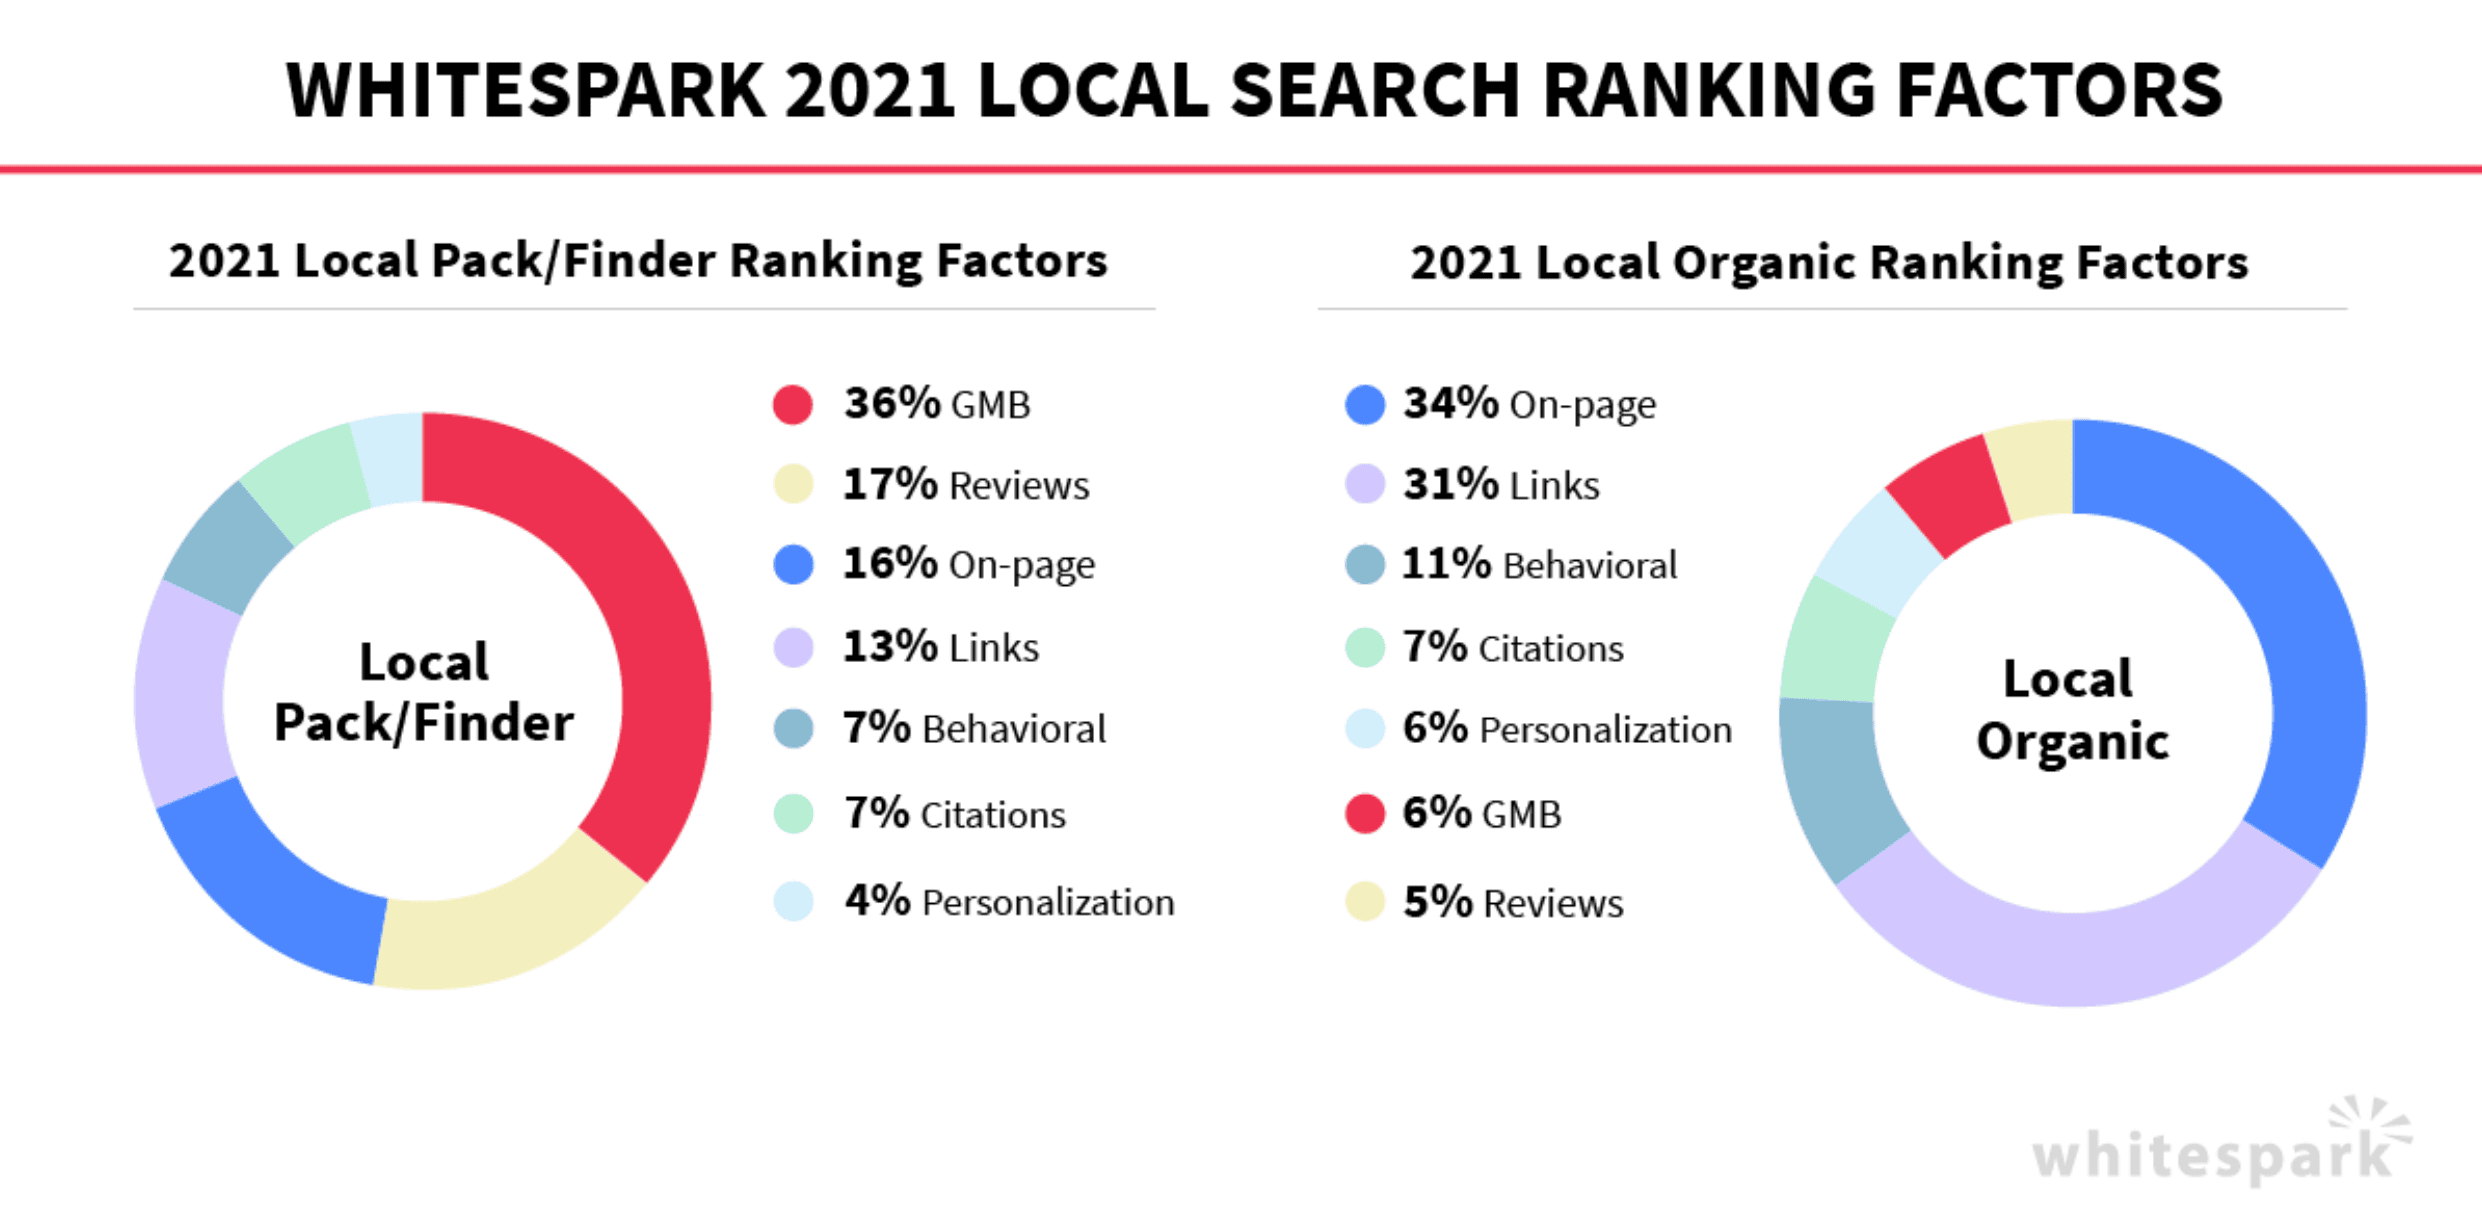
Because Google doesn’t want websites to game the system, they don’t reveal the specifics of their algorithms.
Fortunately, Whitespark did a study that can give us some idea of what factors are important for each of these search types.
Below, we’ll walk you through a step-by-step strategy that focuses on making sure these things are being properly addressed so you can be found in Google.
For the purposes of this guide, we’re going to focus on how you can get traffic and business from the map pack and organic search results.
This means we’re going to show you a strategy that helps you:
- Optimize your GBP listing for search, behavioral, and personalization signals.
- Build citations to your GBP listing.
- Get reviews for your business on any platform.
- Set up your website for SEO performance.
- Write content that’s built to rank in Google.
- Build local backlinks.
Done together, these things will give you the best chance at ranking in the map pack and in Google’s organic search results.
Local SEO for Noobs – The Small Business Guide to Local Website Traffic
Here are 5 steps to local SEO success.
Step 1: Set up and optimize your Google Business Profile listing
Since your Google Business Profile is the most essential part of good local rankings, it’s important to make sure it’s set up correctly.
Here’s a list of things you can go through to make sure yours is set up for success.
1. Claim your profile
To start setting up your Google Business Profile, go to your Google Account and sign in using your primary email address.
In the top right corner, click on the Google Apps tab. Click the third option, called Business Profile. That will take you to another tab. Once you’re there, you can click on the Sign in or Manage now button in the top right corner.
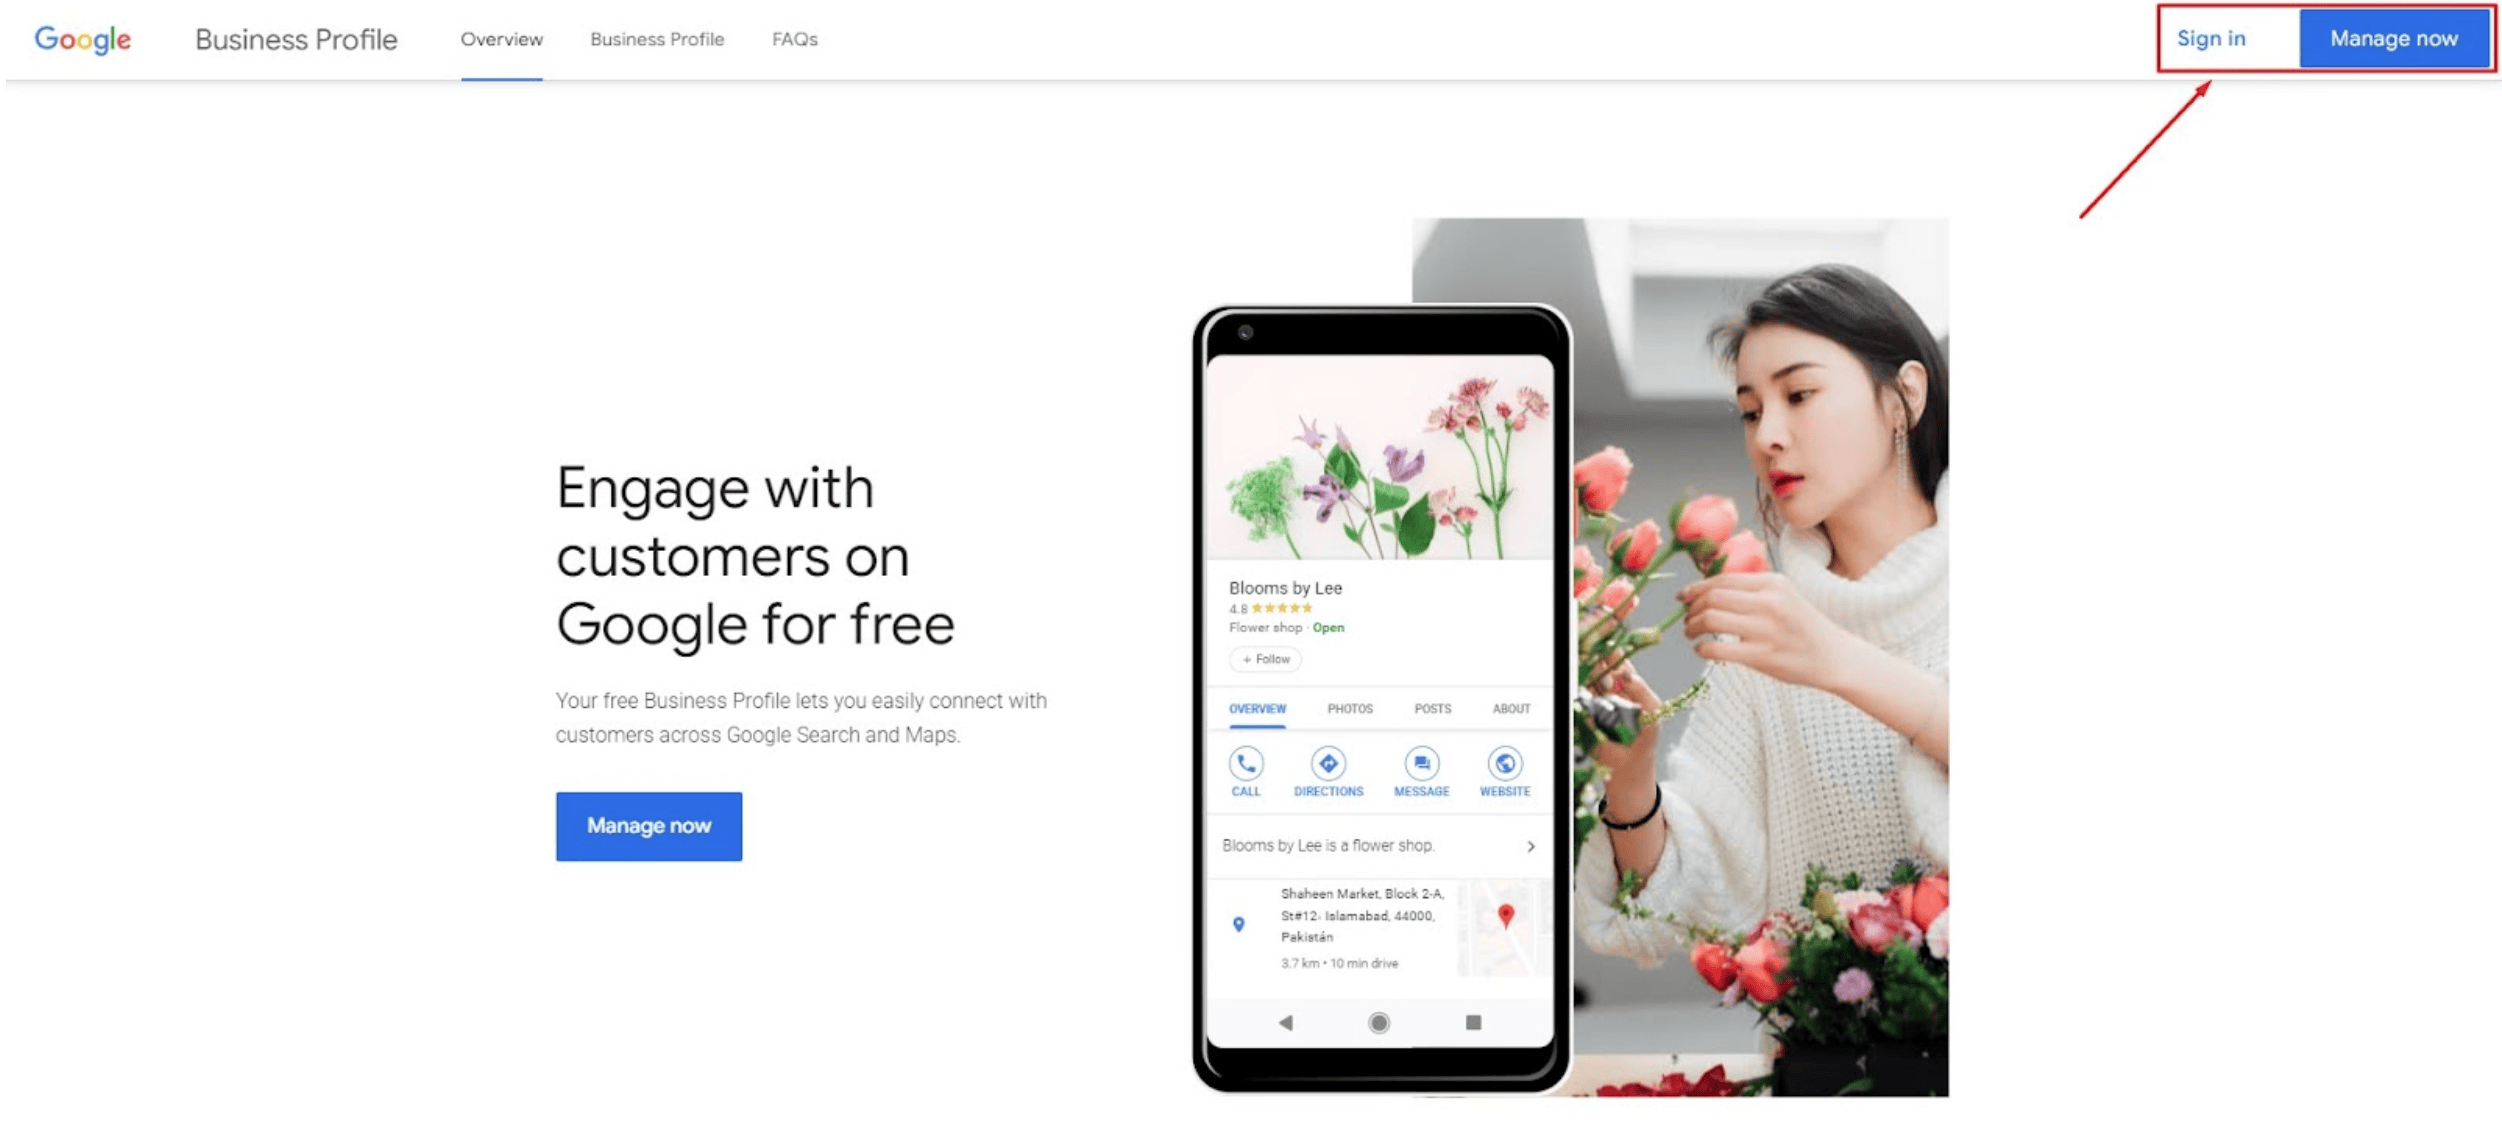
Once you click on any of those buttons, you’ll see the following window.
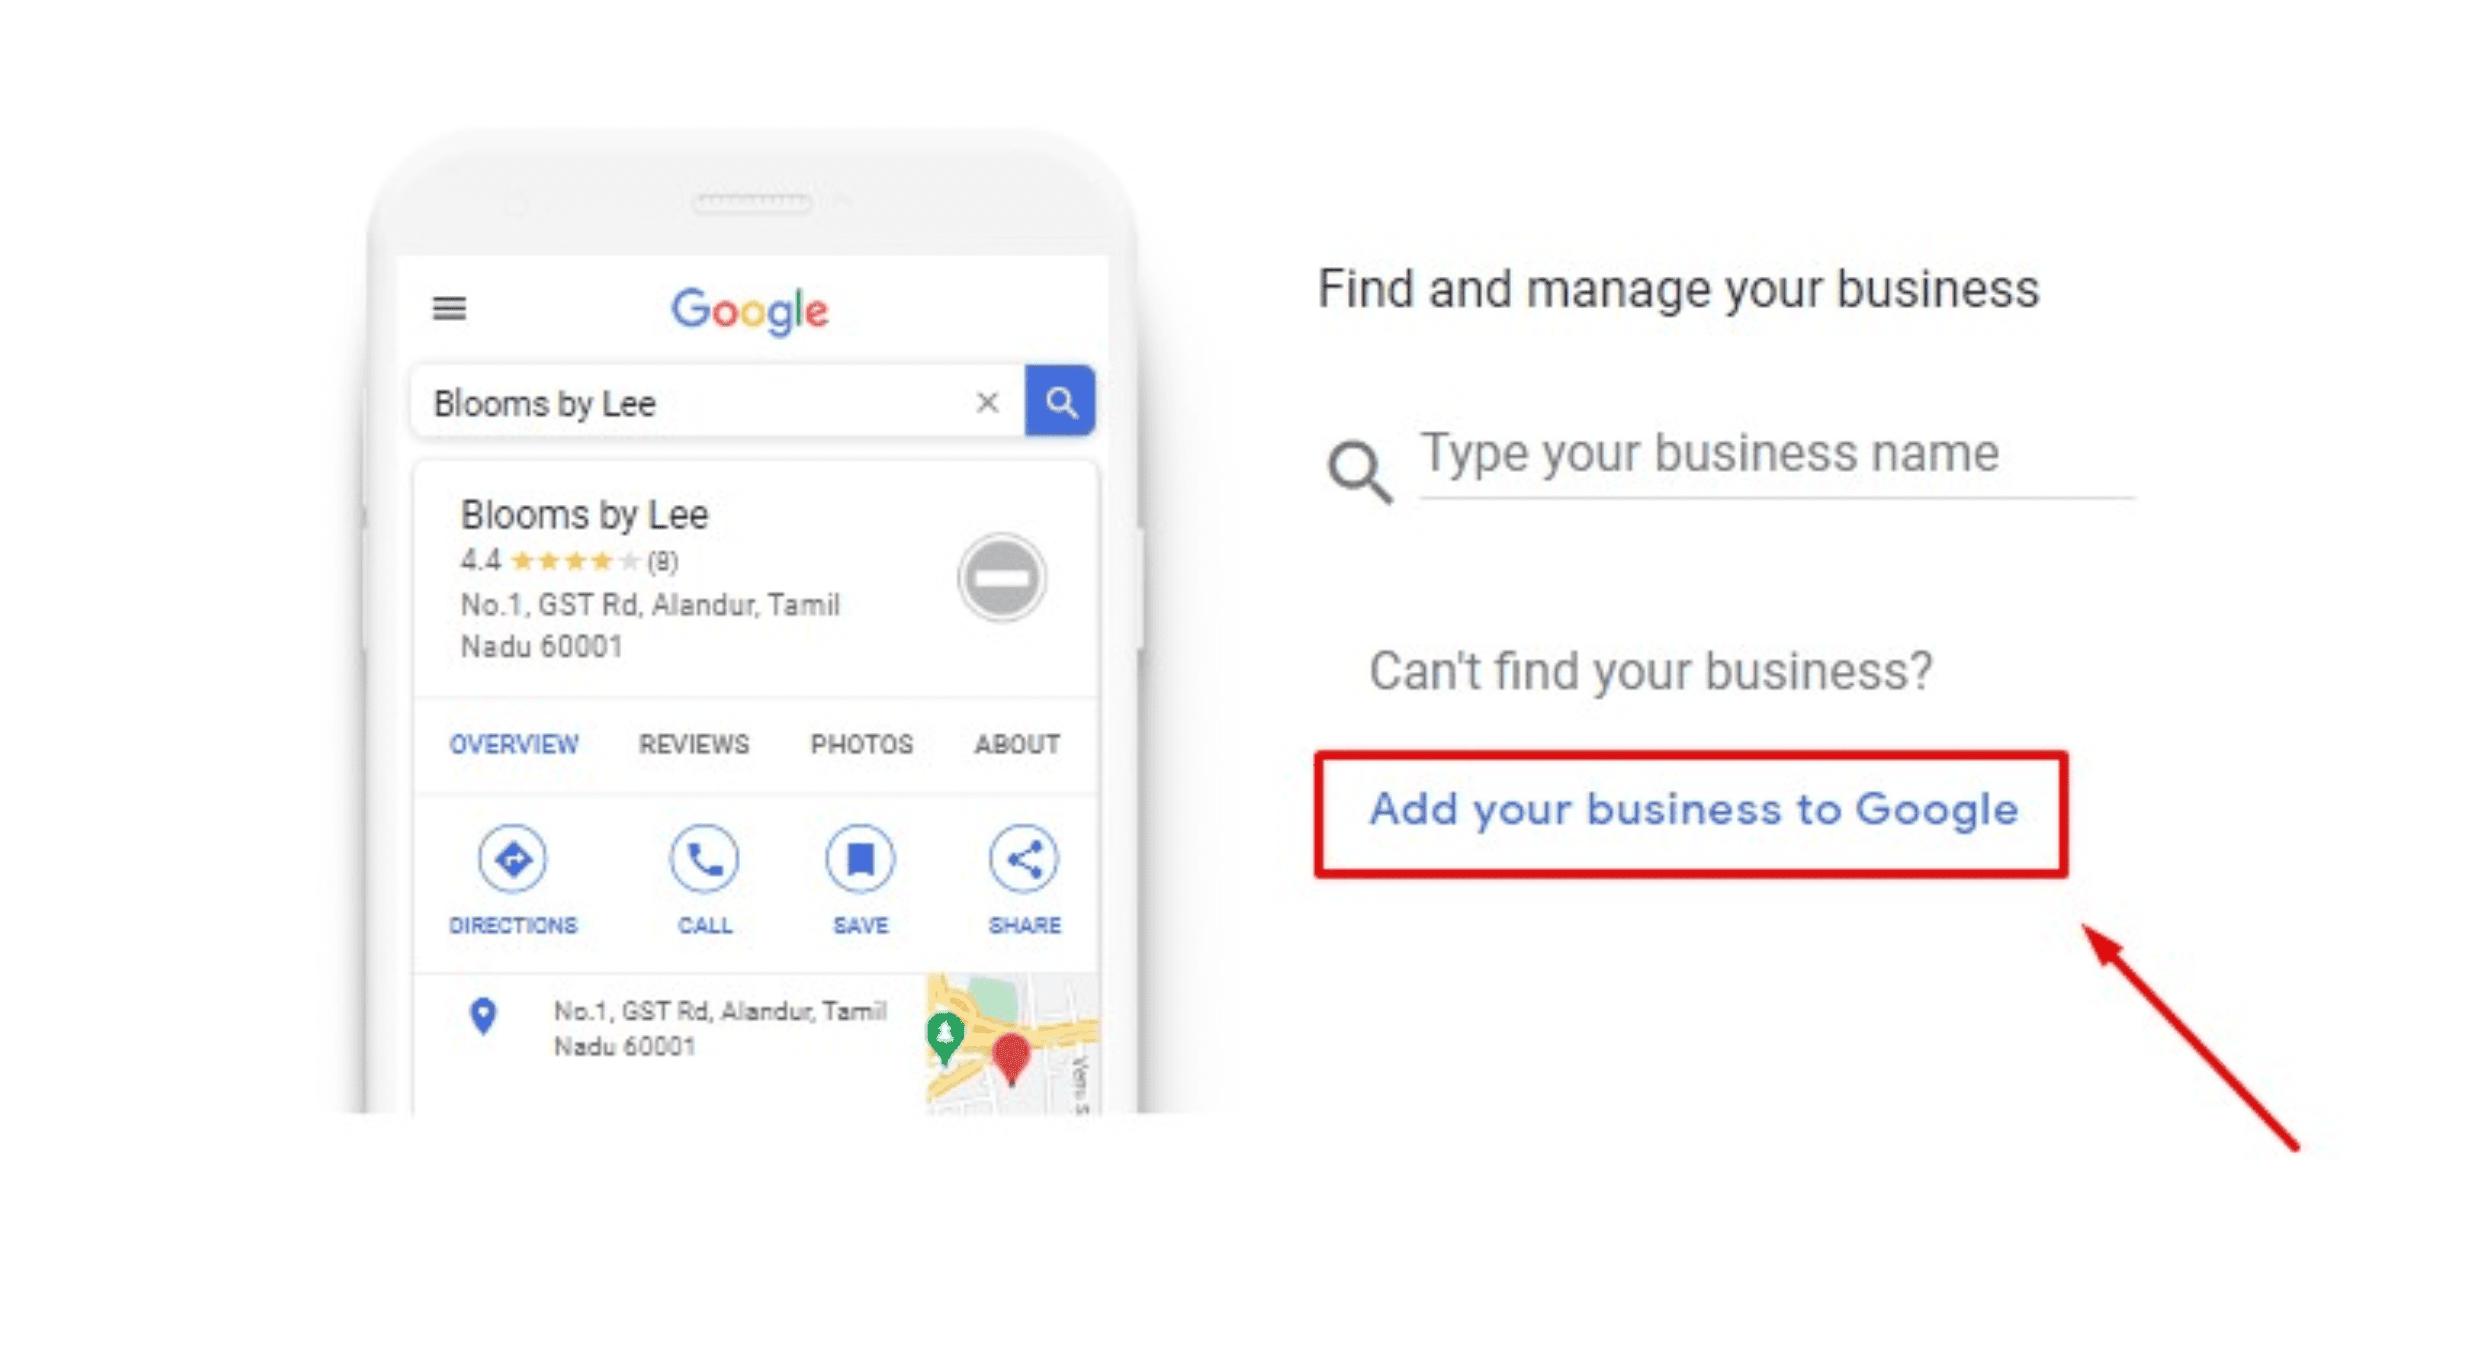
If you’ve already set up your Business Profile, you can type your business name and log in. For newcomers, click the Add your business to Google button.
2. Complete every section of your Google Business Profile account
Once you’ve clicked to add your business, you’ll get to the following window where you enter your business name and general business category.
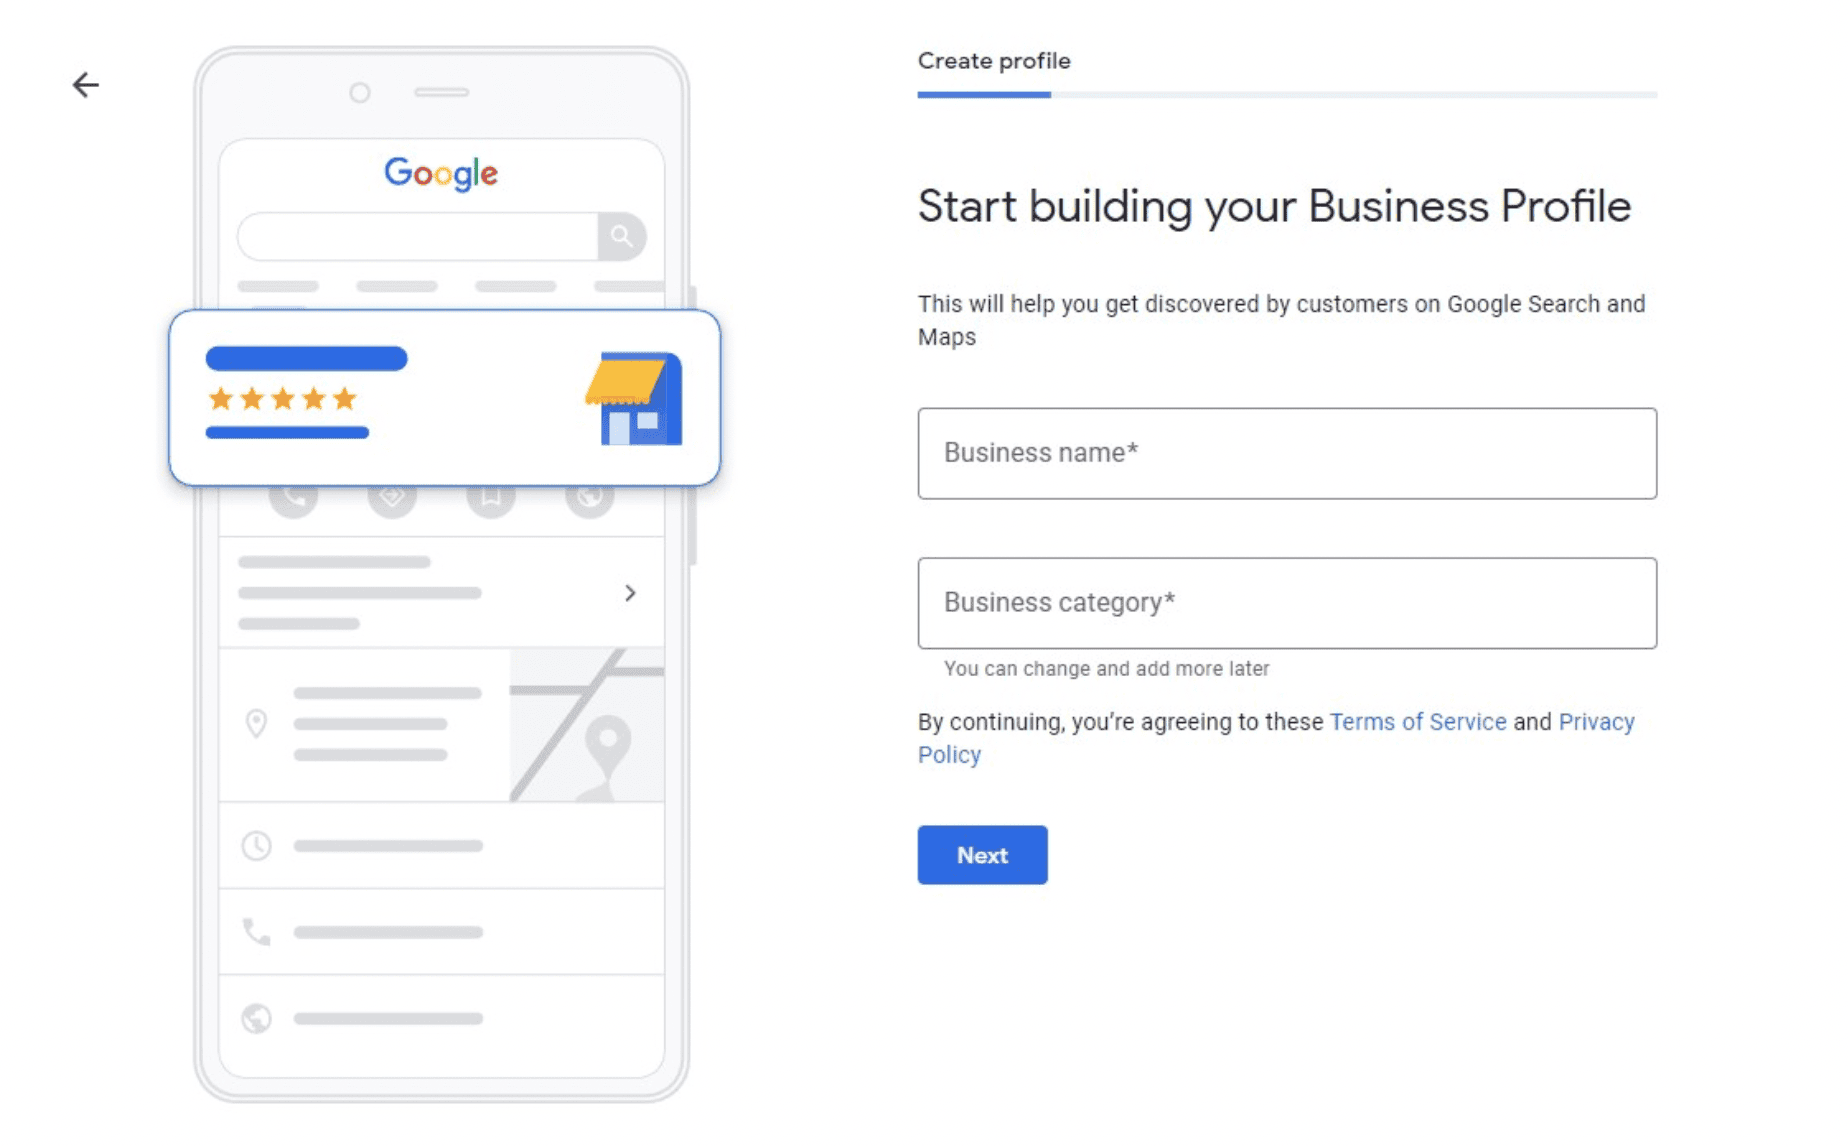
When you’re ready, click Next. You’ll then have the option to add a physical location of your business, such as an office or store.
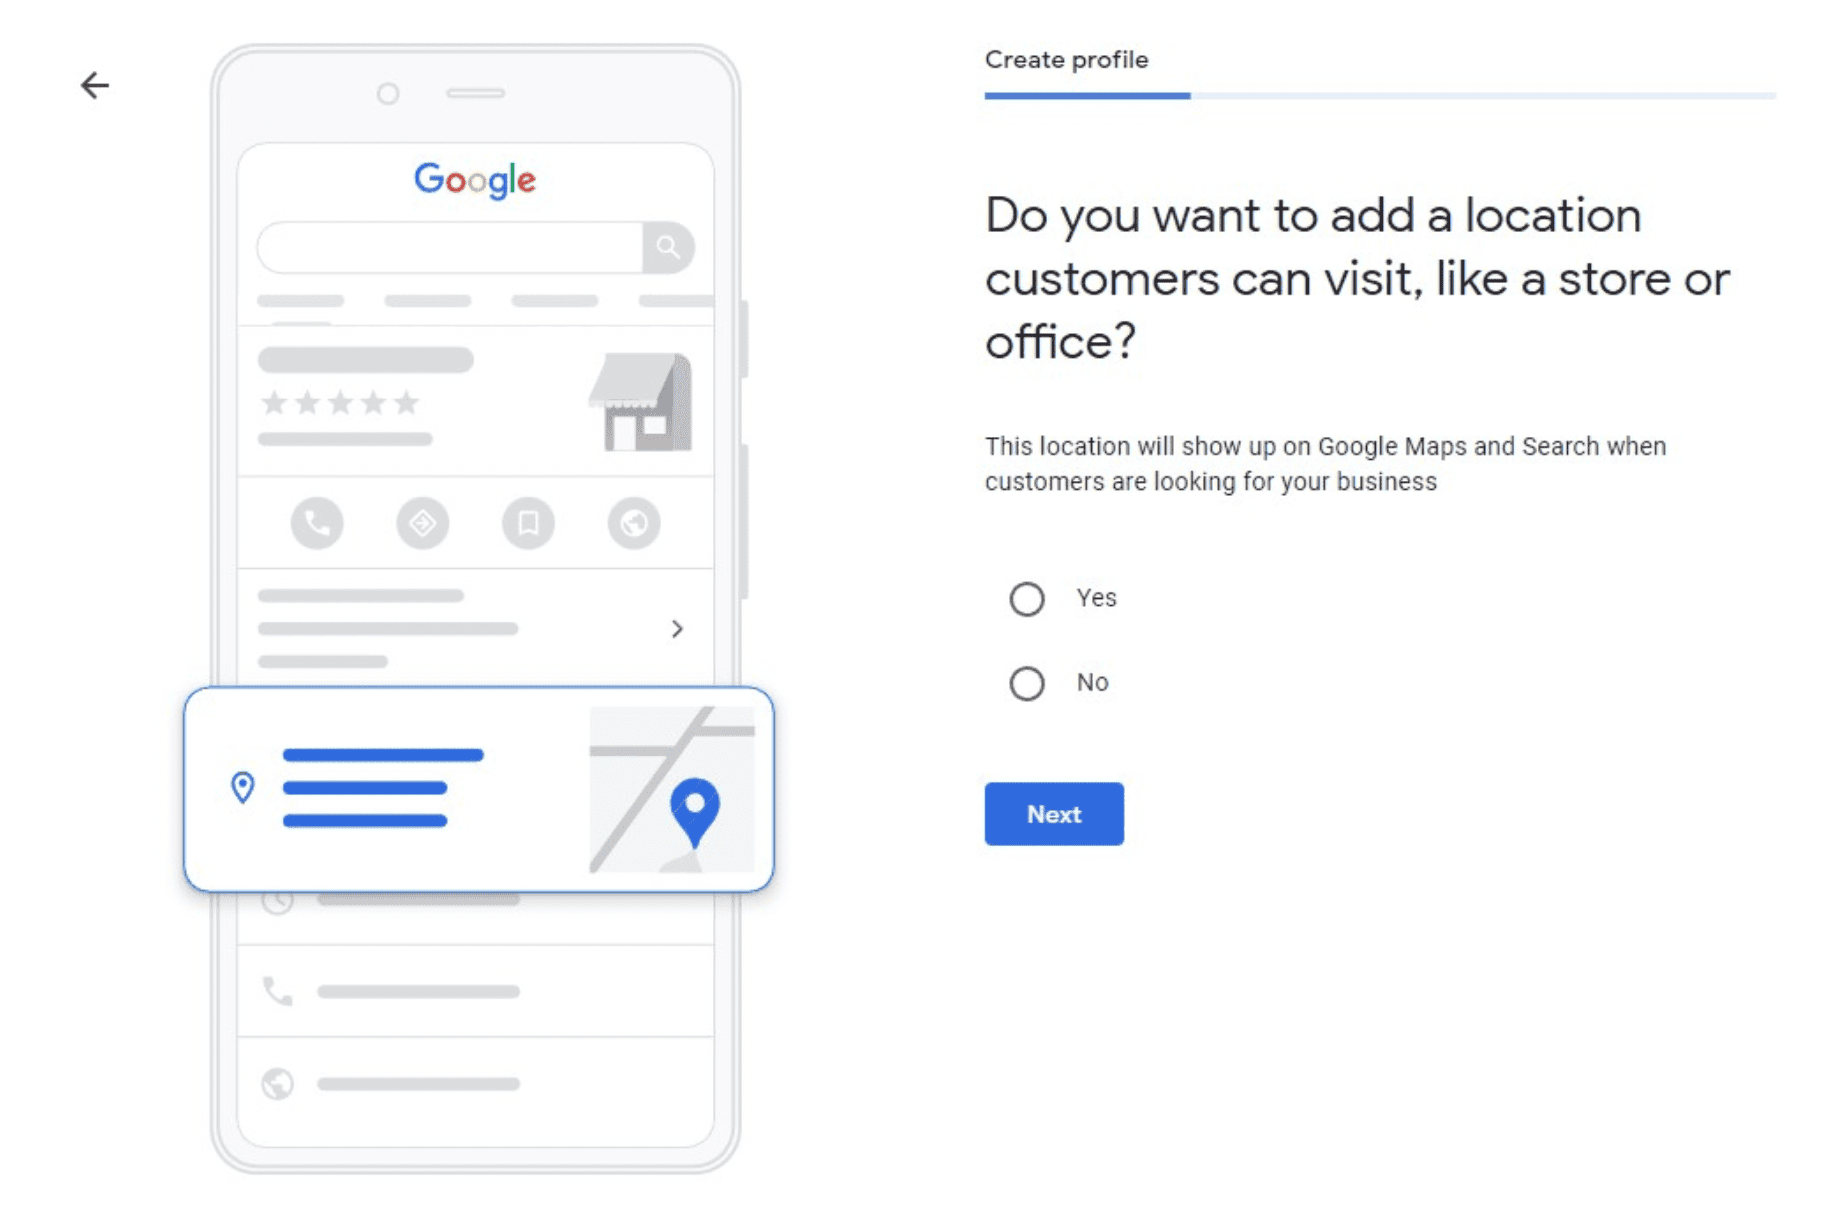
If you choose Yes and continue, you’ll be prompted to the following window.
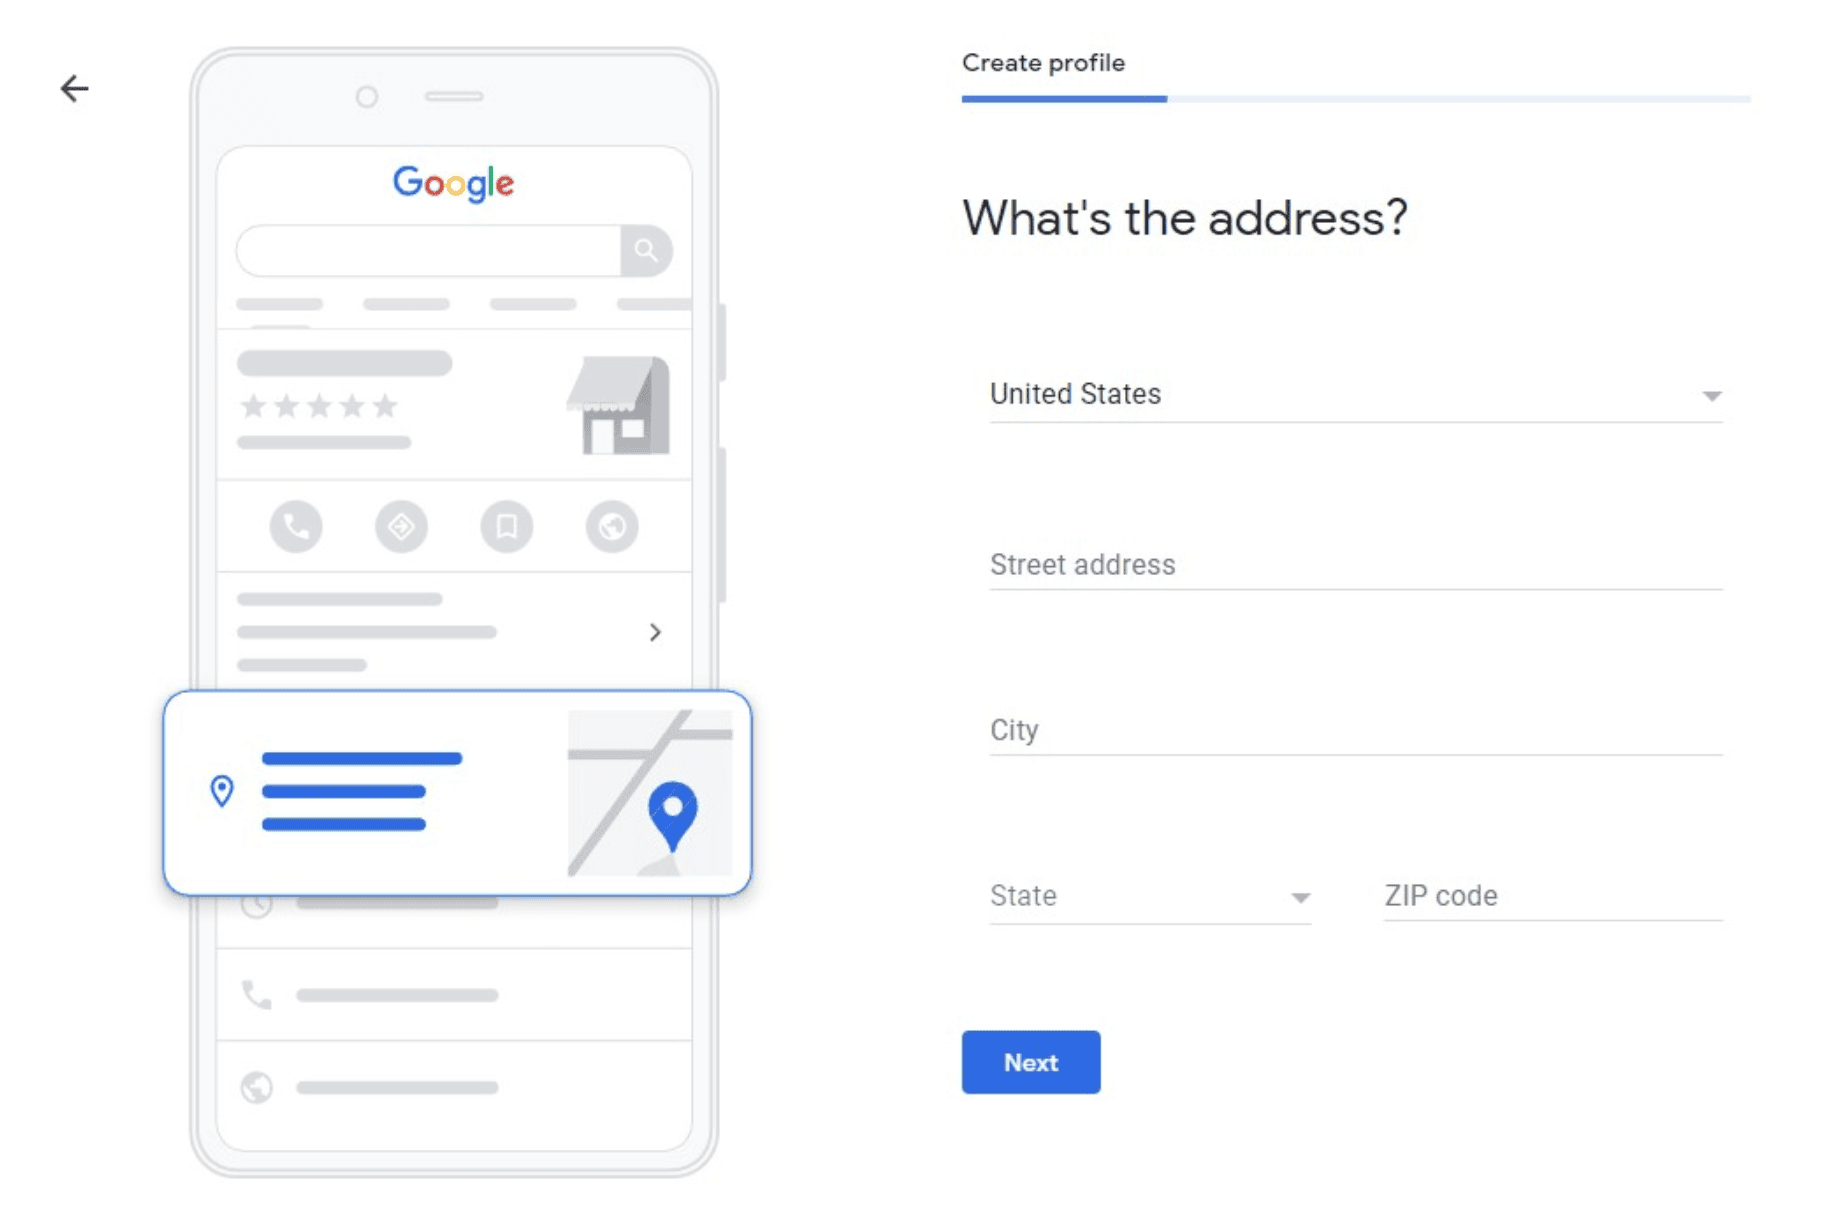
Add your country, store/office address, city, state, and ZIP code. After that, a few business names may pop up and Google will ask if any of those businesses belong to you.
However, if you’re setting up your profile for the first time, choose None of these and move on.
At that point, you’ll have to pinpoint where you’re located on Google Maps. Google will also ask whether you offer deliveries or visits. If you choose yes, you can provide a list of areas you serve.
Once that’s done, you can move on to the next step.On the other hand, if you choose No when Google asks you for a business location, you’ll get to the following window.
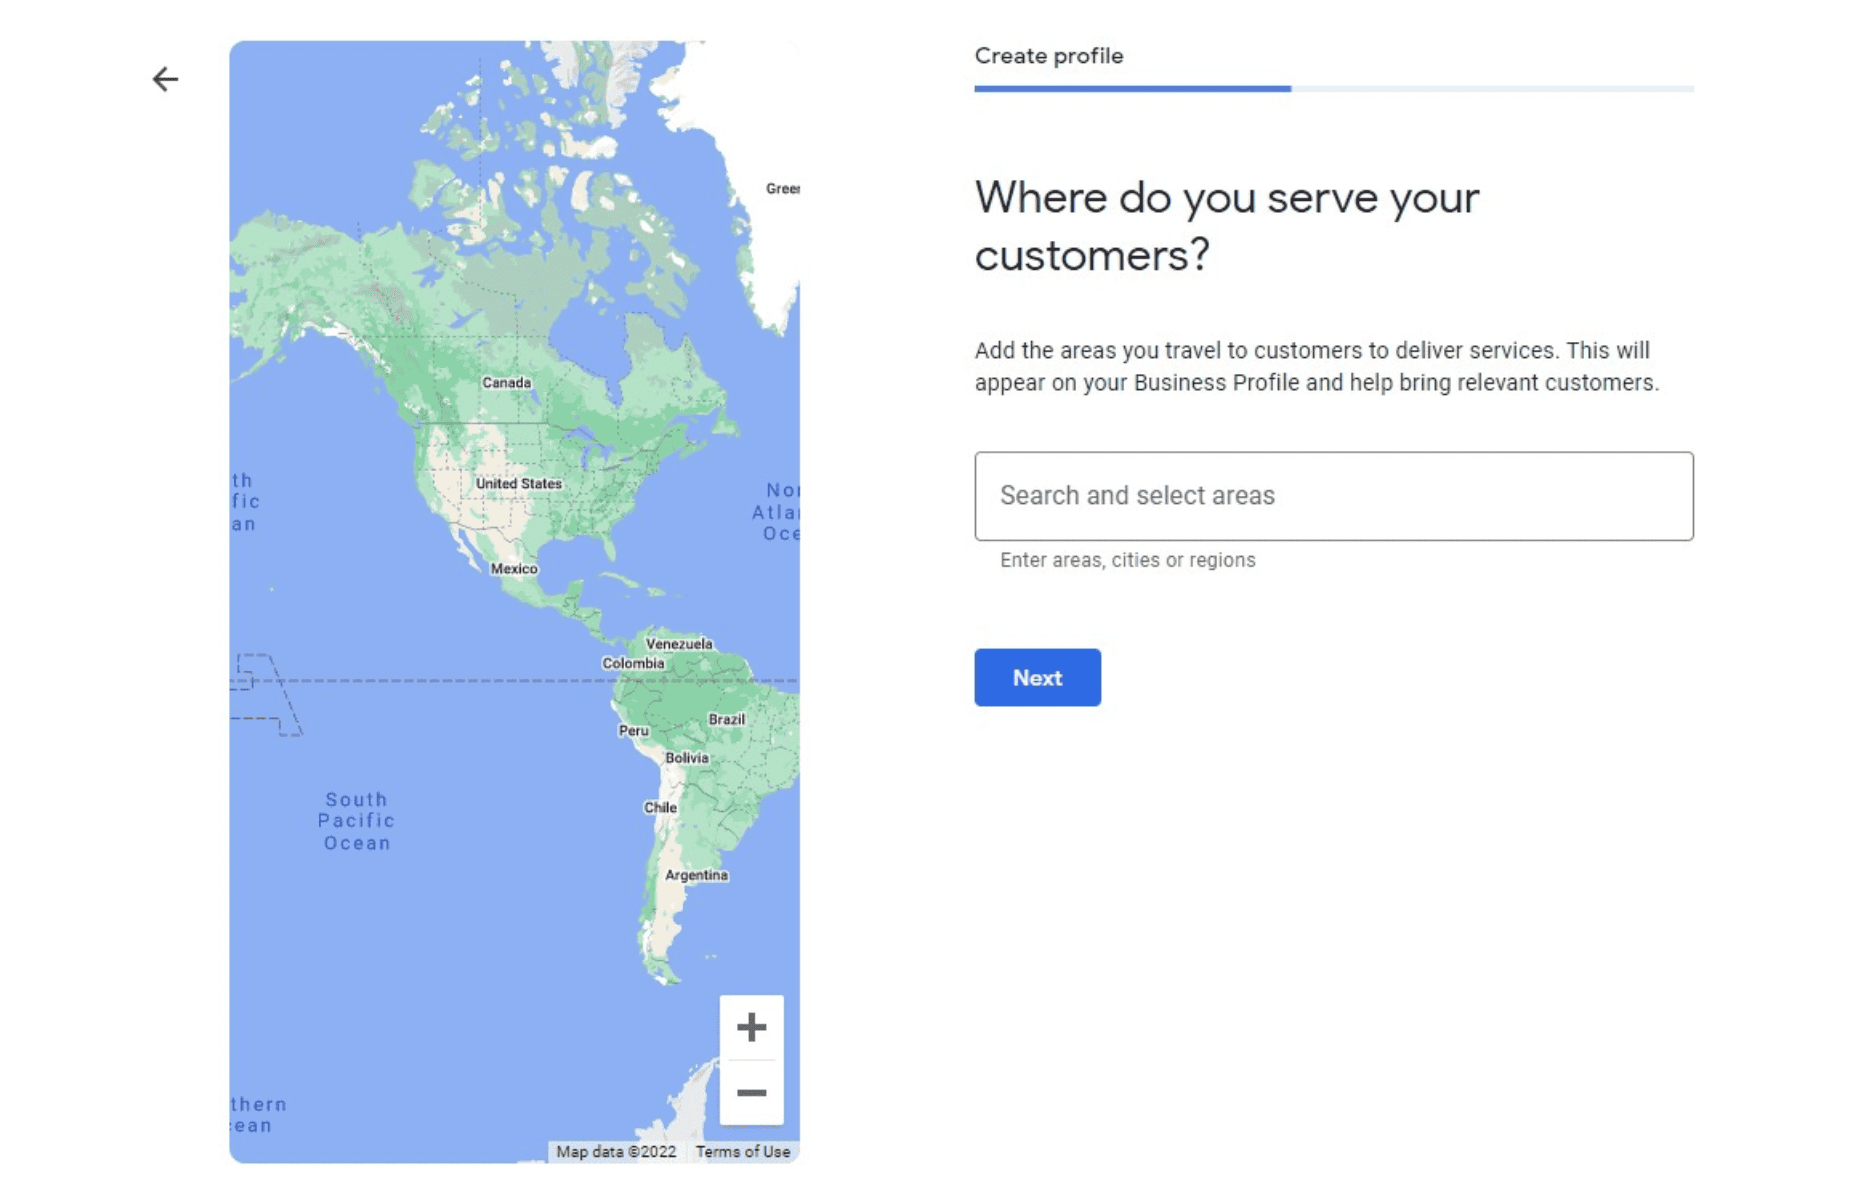
You can list all your target markets here. It’s best to be as specific as possible for better targeting. Then you can move on to the next step.
Tips for your business name and category
The name you enter into your Google Business Profile has to be the official name of your business. It must reflect the wording of your real-world business name exactly. The hack is adapting your business or brand name so it’s optimized for Google. Here are a few dos and don’ts when choosing a name:
- Add a keyword to niche down but avoid keyword stuffing at all costs.
- Avoid unnecessary words.
- Make sure the name is unique.
For example, “Nick Realty — Tampa Real Estate Agent” includes keywords a Google user would search for, like your location and the service you provide.
If you already set up a profile and want to change the name later, you can. Furthermore, if someone is falsely using your business’s name in your location, you can file a Business Redressal Complaint form with Google. Provide necessary details to prove it’s your business’s name and you can get it back.
As for the categories, here’s what you need to know:
- There are over 4,000 Google Business Profile categories. You can select up to 10 categories but only 1 primary category.
- Be as specific as you can with your categories — niche down as much as possible.
- Only use your primary and one secondary category to describe your core business. This will help target a wider category area.
- Don’t mention your services and amenities. Instead, describe your business with your categories. For example, if you provide a gym in your hotel, don’t add “gym” in the categories.
You can always add and edit one of your categories, but Google may ask you to verify your business again after that. Therefore, decide on your categories before finalizing them.
3. Add contact information
At this point, you’ll have to enter the business’s contact information. That includes your primary phone number and website URL.
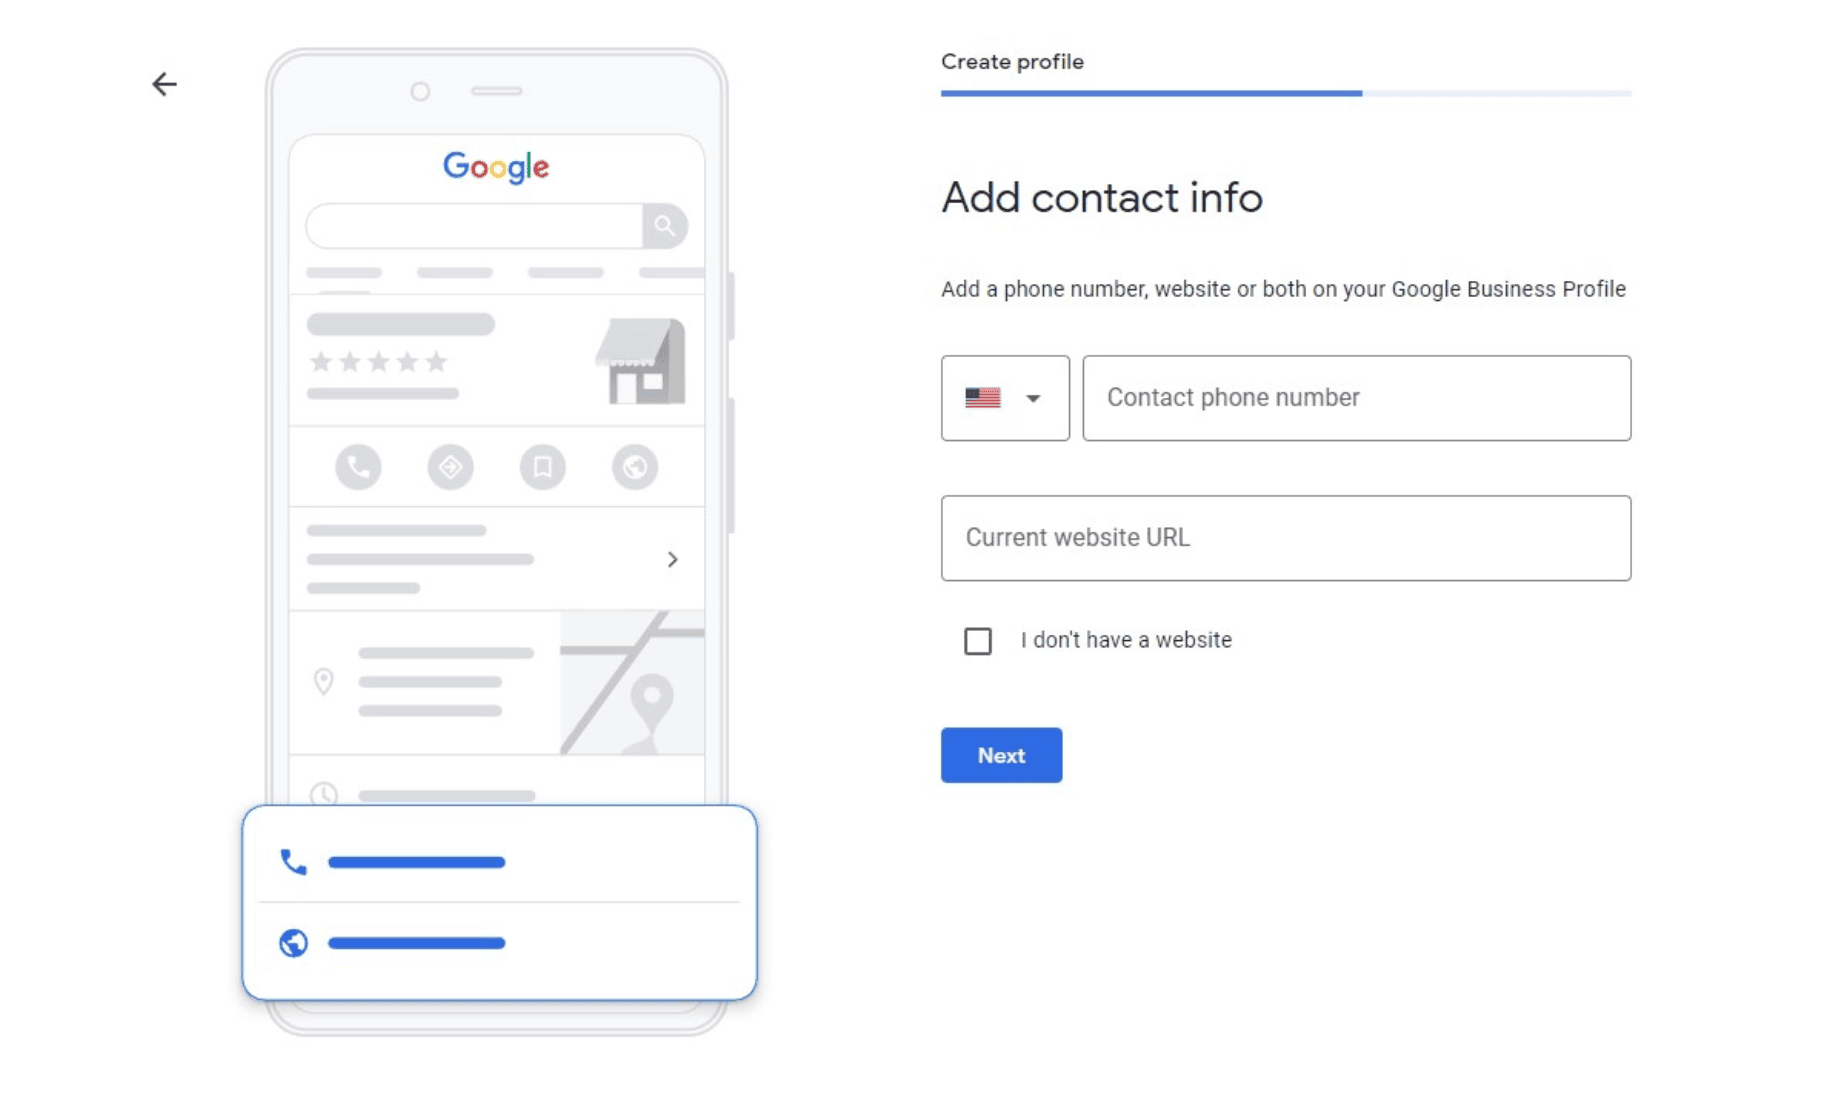
If you don’t have a website, tick the I don’t have a website box and click Next.
You can then choose whether you want regular recommendations and updates from Google.
4. Verify your mailing address
After that, you can enter your mailing address.
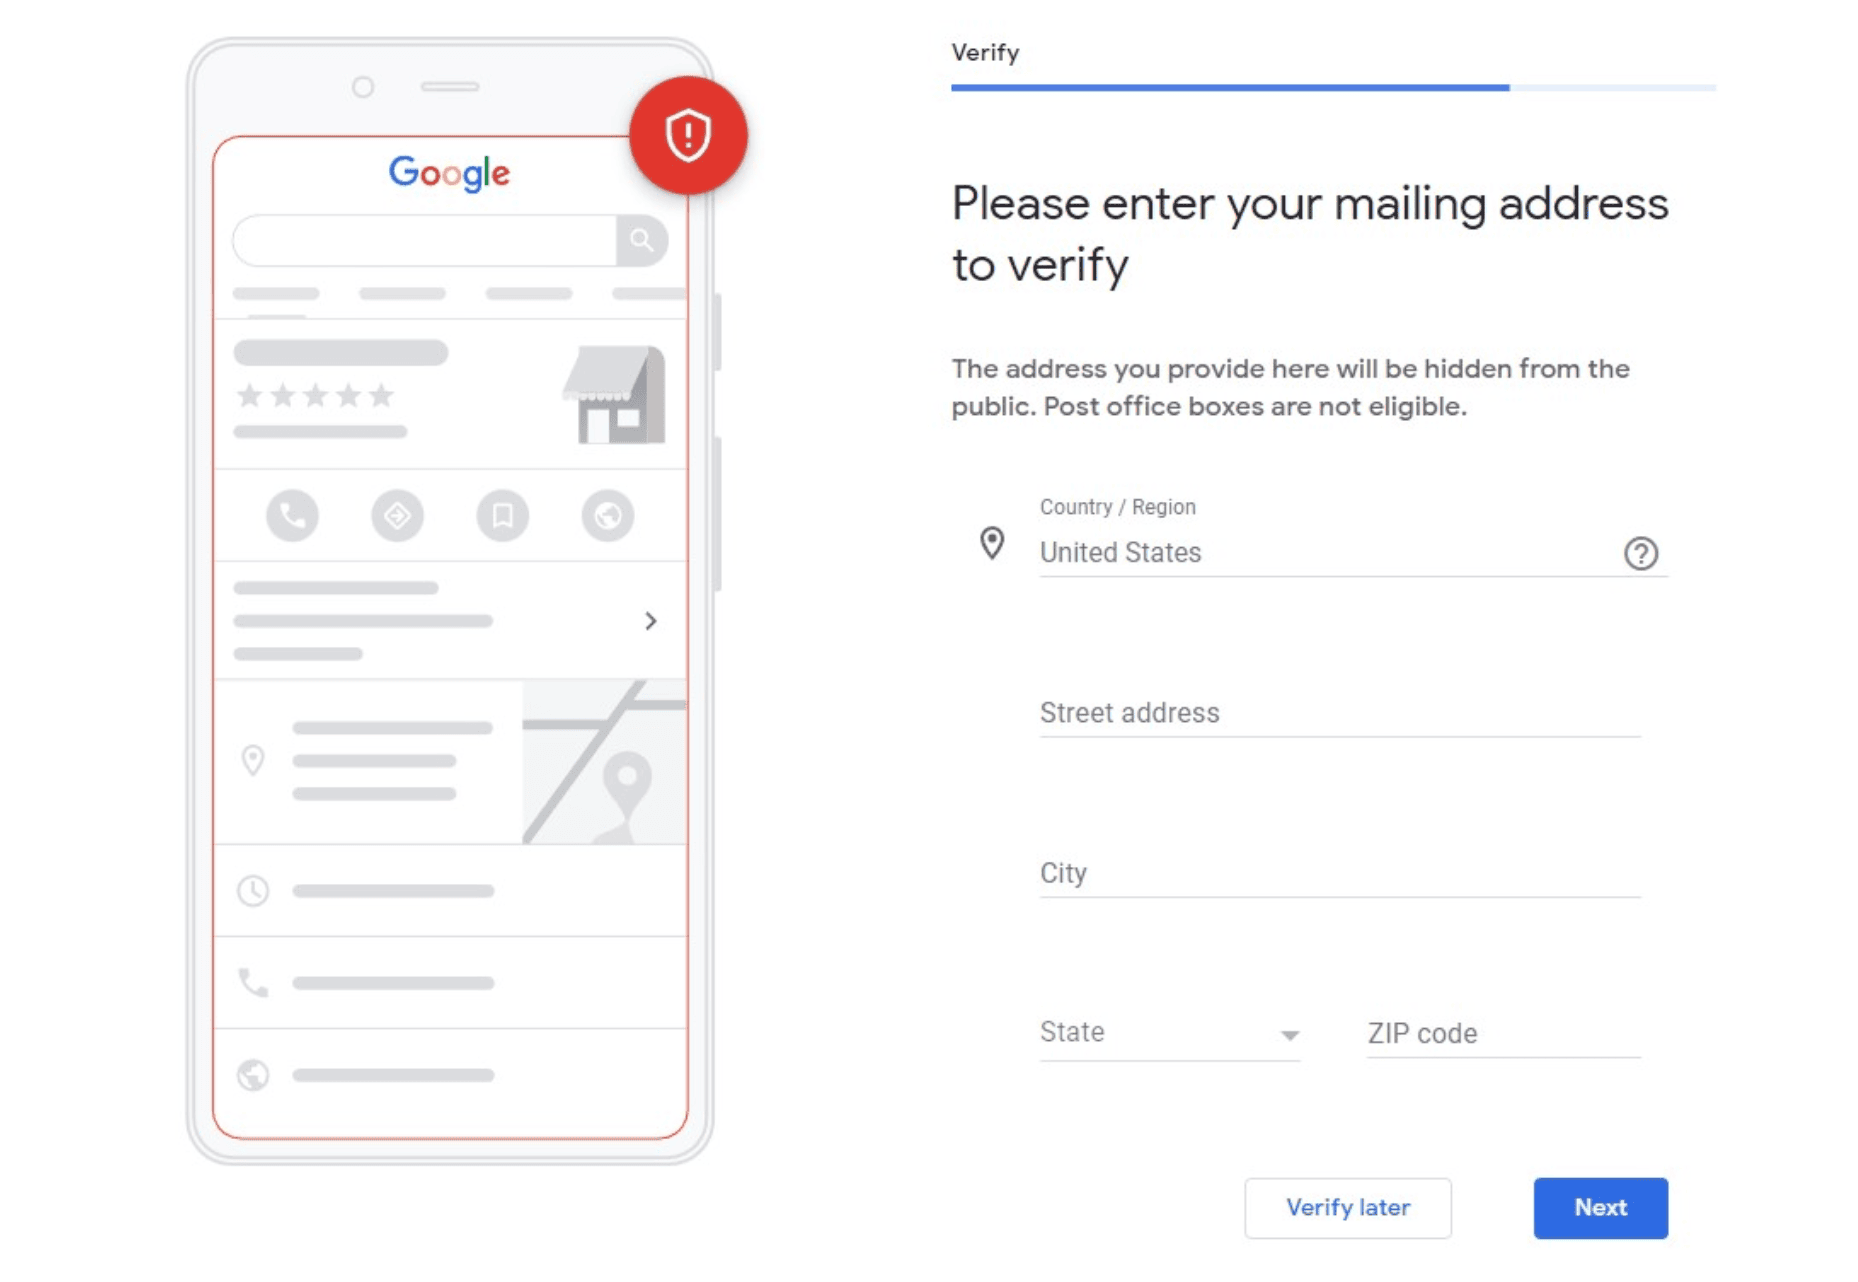
It’s important to add a mailing address to complete your business profile. However, you can choose to verify this information later.
You’ll have to eventually because, as a physical business, you’ll have to be able to receive a postcard by mail to verify your location. Other businesses need to be verified through their email address by entering a five-digit code that they’ll receive.
In any case, the next window takes you to profile customization.
5. Customize your profile
Once you’re done with the verification, you can start customizing your Google Business Profile.
You can start by deciding whether customers can message your business.
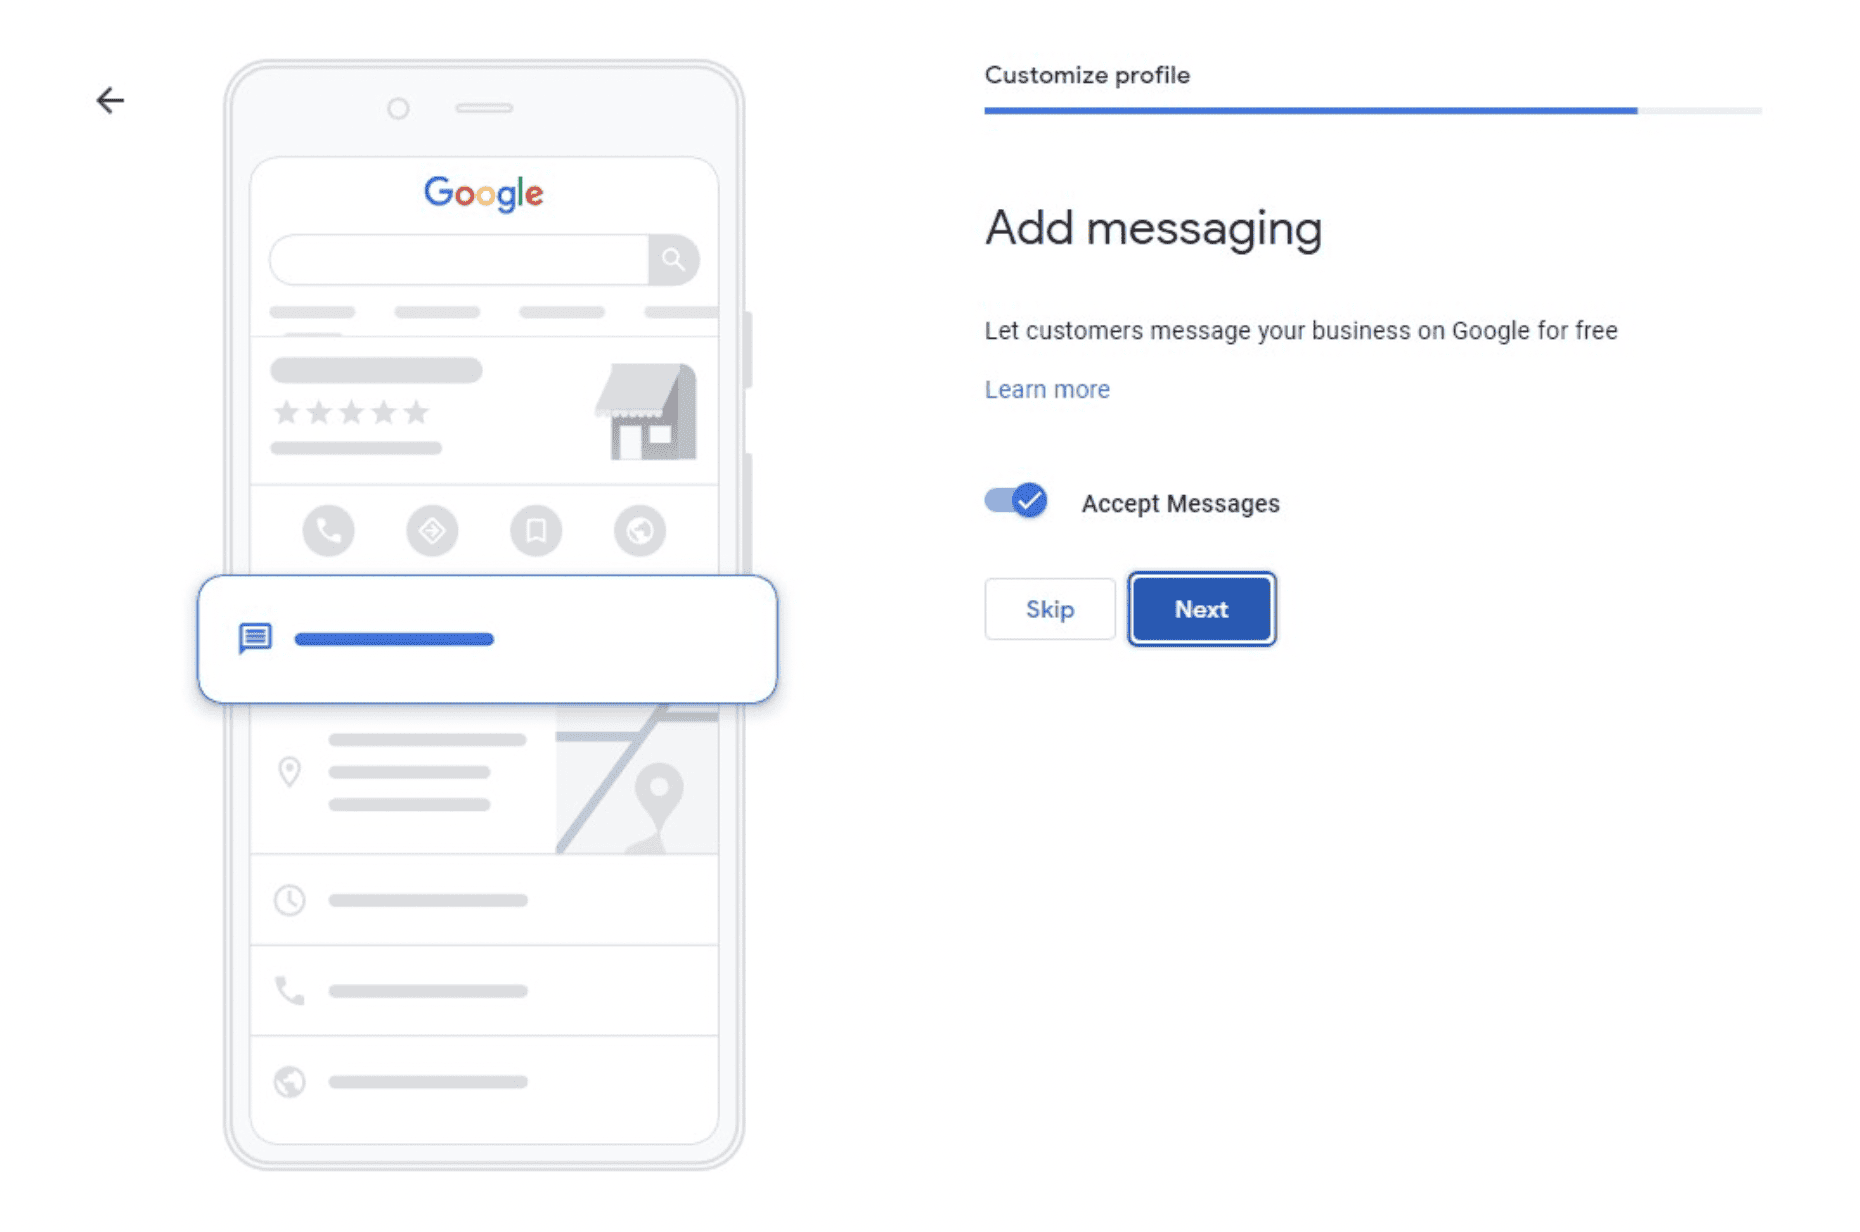
You can move the slider back if you don’t want your business to receive messages. You can also skip this step for now.
6. Write a complete description
After that, you can add a business description to let your customers know what you sell, deliver, or offer.
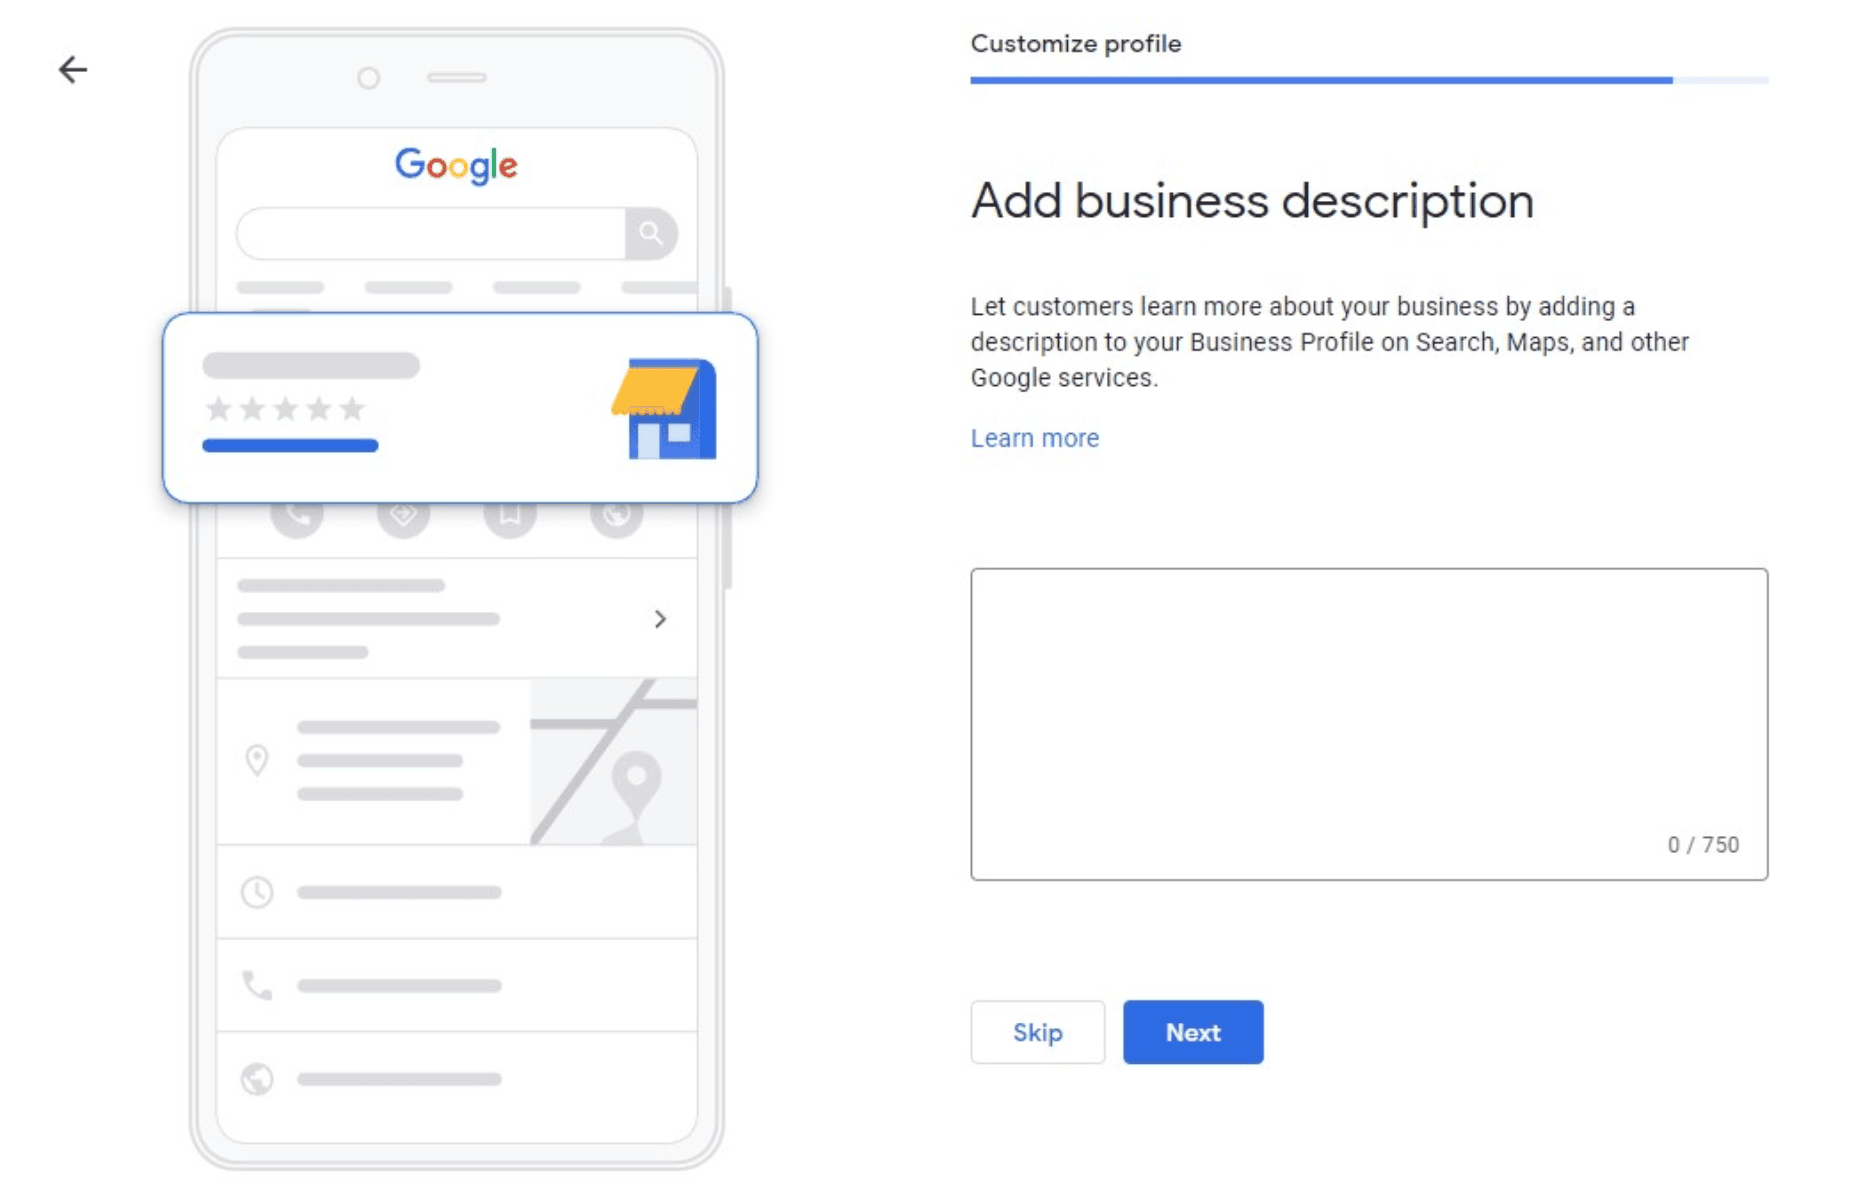
This business description automatically will be added on Maps, Search, and other Google services.
Keep in mind that the business description can be only 750 characters long.
You can skip this step and do it later.
How to write a Google Business Profile description
Your GBP description is the first place users look for additional information on your business. That’s why it’s considered a local SEO ranking factor.
Therefore, keep the following things in mind to write an optimized description.
- Include USPs – You should stand out by mentioning one or several unique selling points (USPs) that your business provides. Since there’s a good chance you have several competitors, this gives the customer a reason to choose your business.
- Add the primary business category – While you do add the business category in a separate window, it’s still best to add it again in the description to reiterate it.
- Mention your service area – It’s best to add the locations you target and the area where you provide services and products. This gives customers an added confirmation of your location, so you get relevant leads.
- Mention high-value services/products – It’s wise to mention what services and products you provide exactly. Google Business categories can be vague. If you offer a niche product or service, mentioning the exact product/service will increase relevance.
- Include history – Adding your business’s founding date, highlighting achievements, or including other forms of social proofing will help build trust and credibility.
- Use high-value keywords – Focus on utilizing 1-3 high-value keywords that you want to rank for. If you have a niche business, make sure they’re long tail keywords.
Other than that, here are a few don’ts to keep in mind:
- Don’t add any links or URLs.
- Avoid offers and sales pitches.
- Make sure there’s no misleading information.
- Don’t spam or resort to keyword stuffing.
- Don’t make unnecessary statements and minimize fluff.
- Never use all caps.
Most importantly, follow Google’s guidelines.
7. Add photos of your business
At this point, you can start to add photos of your business and services. These can be photos of your physical store or office. It can also be photos of some of your products or services in action.
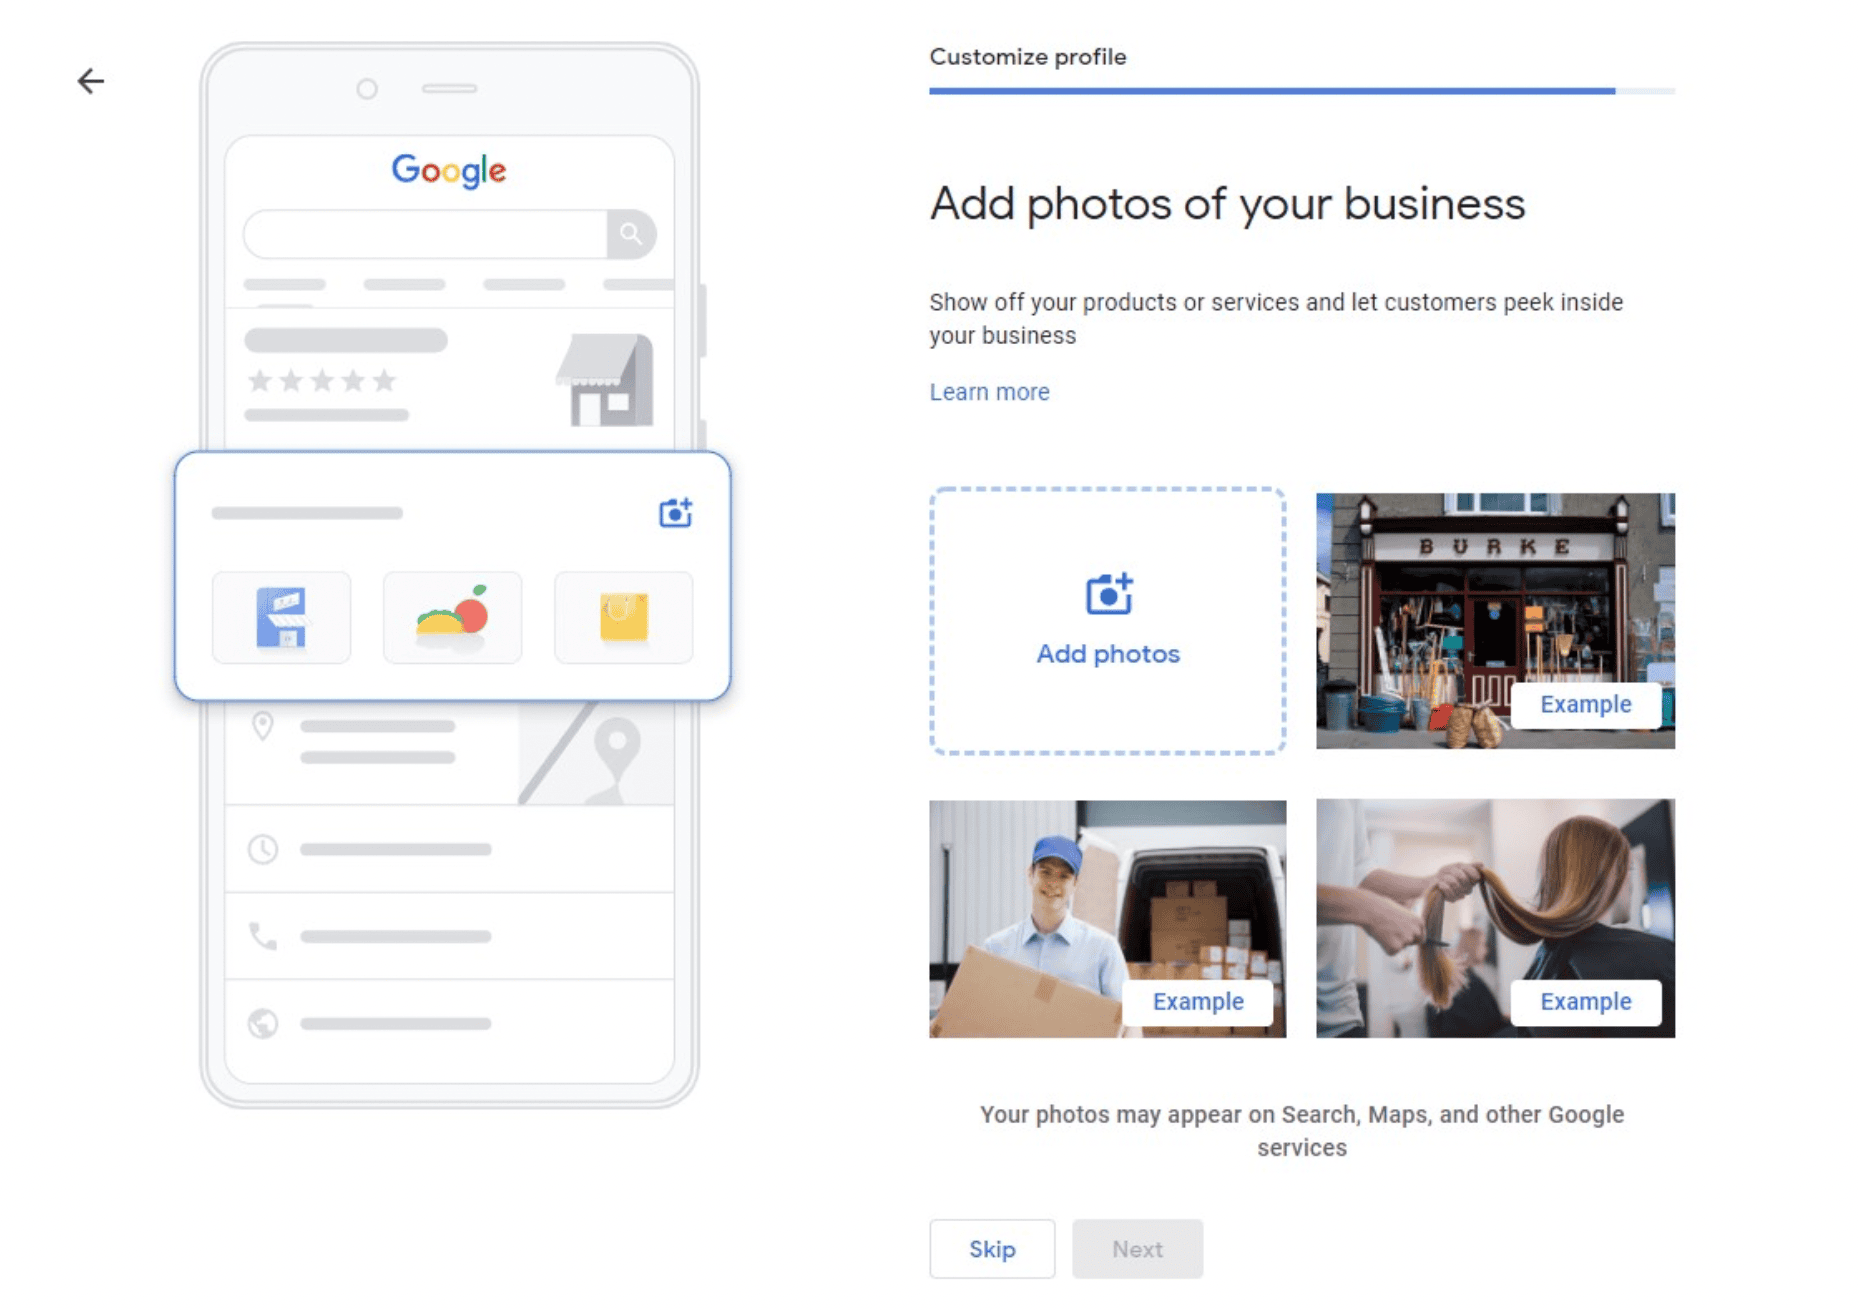
The photos will display on Maps, Search, and other Google services when someone searches for your business.
You can opt to skip this step for now.
After that, you can choose to claim $500 in advertising credits for running Google Ads.
What kind of photos you should add
Google recommends using business-specific photos to showcase your products, services, or place of business. Here are the types of business-specific photos you can add:
- Exterior photos – These help customers recognize your business as they approach. It’s best to add at least three exterior photos from multiple angles at different times of day.
- Interior photos – These allow customers to get an understanding of the ambiance you provide. Try adding at least three interior photos that capture the atmosphere of your business from a customer’s standpoint.
- Product photos – If you sell products, add photos of at least three of your products ranging from most popular.
- Photos at work – As a service business, you should include at least three photos of your services in action. You can also include photos of any special services you offer.
- Food and drink photos – As a restaurant, adding properly lit photos of your food and drinks will help customers get a gist of your food quality and variety.
- Common areas – At least one photo of a common area in your place of business attracts traveling customers.
- Rooms – As a hotel, adding at least three photos of your rooms will help the customer in deciding their stays. Make sure you show different types of rooms and keep it authentic.
- Team photos – These showcase a personal side of your business. That’s why it’s best to keep these less formal and allow the photos to highlight your employee personalities.
Furthermore, avoid using any stock photos, screenshots, or GIFs. Try to follow Google’s photo guidelines to make sure you get the most out of your business photos.
8. Add your products or services
Keep in mind that you’ll need to verify your business first to continue customizing your business profile.
When that’s done, open your Business Profile Manager and click on Products in the left tab.
Here, you can start adding your products and services, along with their names, photos, descriptions, and prices.
You can also add a category, product category, and a CTA button.
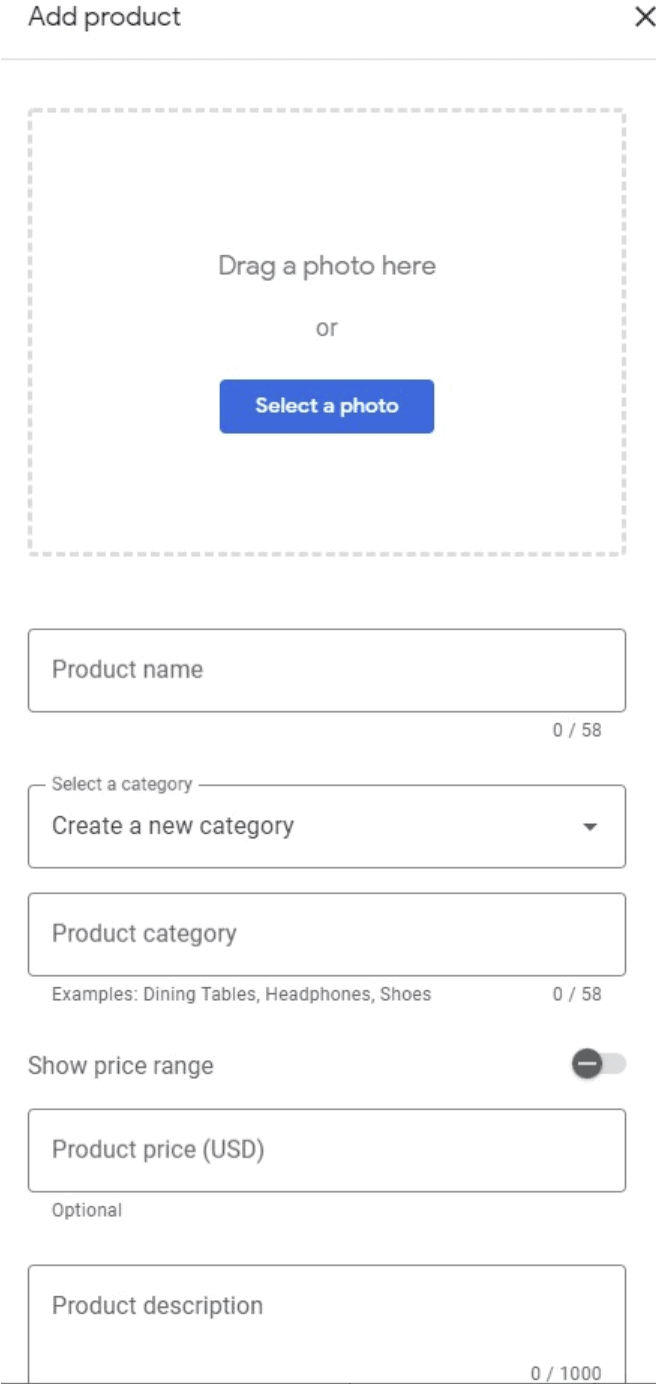
It’s best to provide as many details as you can. Furthermore, this is your chance to target certain keywords you may want to rank for.
9. Start posting
At this point, you can start creating posts to keep customers updated. These posts can be announcements, news, or deals that you’re offering.
The posts show up on Google Maps and Search when someone searches for your business or a relevant product or service.
You can feature a special offer in your posts and set specific dates for promotions. You can also add coupon codes, terms and conditions, and links to redeem the codes.
How to write a Google Business Profile post
When you click on Posts in the menu, you’ll have to follow these four steps:
- Select the post type – There are four post types you can choose from.
- What’s New: These include announcements and any general information regarding your business.
- Events: This is to mention any online or live events with a start and end date.
- Offers: If you want to run promotions, discounts, or provide limited-time coupons, choose this type.
- Products: You can use this post type to feature one or more products.
- Add text – Start crafting your post by adding text. There is a 1500-character limit. However, users can see only the first 7 or 8 words before they need to read more. It’s best to maintain around 250 characters.
- Add visuals – Photos and videos help make your post more organic. These visuals should seem professional and be extremely high quality.
- Add a call to action – Google has a list of CTA buttons you can choose from. The standards include Buy Now, Learn More, and Order Online. Link it to your landing page or a site you trust.
- Include a date range – If you’re mentioning an event or listing an offer, specify the start and end dates.
- Publish your post – After previewing your post, make any necessary edits, refine your post, and publish it.
Make sure you check up on analytics to see how well your posts are doing.
10. Respond to reviews
It’s important to respond to reviews since they help establish trust in your business. The more diverse your ratings and reviews, the better.
Reviews also help improve your overall Google ranking.
Try to respond to bad reviews to help fix your customers’ issues. Also make an effort to respond to good reviews, thanking them for their business.
It’s important to respond in a professional manner but in your brand voice. According to Google, businesses that regularly respond to reviews appear 1.7 times more trustworthy to customers.
Step 2: Get citations for your Google Business Profile listing
Local citations are online mentions of your business on different sites. These can be mentions by name, phone number, or address.
For the most part, citations show up on local business directories, social platforms, and some apps and websites.
Citations are your way to ensure that your customers find accurate information about your company. On the other hand, they help ensure search engines show a proper representation of your business.
You should make it a habit to regularly monitor your citations online. Start with the major platforms like Yelp, Facebook, and Infogroup. Furthermore, here are a few places you can create and maintain citations.
Major directories
You can start by getting citations for your GBP listing on some important local business data platforms and directories.
Here are a few to get you started:
- Facebook Pages
- Yelp
- LinkedIn Company Directory
- Instagram for Business
- Hotfrog
- MapQuest
- YellowBook.com
- USdirectory.com
- Better Business Bureau
- Uber
- US-Info
- EZlocal
- Manta
- Nextdoor
- Thumbtack
You can find more directories here. Try to create citations on as many directories and platforms as you can. Make sure the listings are accurate and there are no duplicate listings.
Primary data aggregators
Primary data aggregators are large databases that provide most of the information search engines and online directories have.
Large databases like these in the U.S. include:
- Neustar Localeze
- Data Axle
- Factual
- Foursquare
Acxiom used to be a primary data aggregator, but it no longer identifies as one.
Industry and location-specific platforms
Considering what your industry and business are, you can also get citations on some high-profile review sites and directories.
For example, construction businesses can get listed on Home Advisor and Porch. Physicians can get listed on Health Grades and WebMD. Real estate businesses can get listed on Zillow.
A lot of these directories are free but there are paid ones too. For example, Health Grades is free while getting listed on WebMD will cost you.
You should do a small survey to check the overall traffic on a directory, depending on your location and industry. If you believe the listing will send enough traffic to your business, you can pay for it.
Unstructured citations
The options above are all structured citations — formal directories and data platforms.
However, there are also unstructured citations on websites whose purpose isn’t to act as a directory. These can be mentions in blog posts, on social media platforms, and in the news.
For example, if you own a burger restaurant and a food blog mentions you in their “Top 10 Places for Burgers,” it’s a citation.
The best kind of unstructured citations are ones that also link back to your Google Business Profile or website.
You can build these citations by submitting content on blogs and local newspapers. You can also develop social media campaigns that create word of mouth and sponsor local events.
Use these citations to upgrade and enhance your Google Business Profile and website.
If you want them quickly, you can usually hire an agency to do it for you for a few hundred dollars upfront for the initial build, then monthly for ongoing management.
Step 3: Get reviews
Reviews are one of the most important factors in driving local SEO performance.
Not only do search engines look at these as a direct ranking factor, but they also indirectly impact your rankings by having an influence on whether or not the user clicks on your listing.
Aside from hiring a review management service to help, here are three steps to get more reviews.
1. Know the process and train your team on it
This is important because when you give good service and someone actually asks you how they can help, telling them how to give a review is a perfect response.
When they ask how, you want to be able to give an extremely brief response.
Here’s the process:
- Open up Google Maps
- Search for your business
- Click on it to pull up your Google Business Profile
- Scroll down to the reviews section in your profile
- Click “write a review”
…and here’s how you can explain it to customers:
“Just search for us on Google or Google Maps! When you find the listing with our logo, scroll down to the reviews and tap or click ‘write a review’!”
Having your whole team understand this can help you get more reviews on your Google Business Profile if you’re a local business.
Knowing the process yourself also helps with the next steps in the process.
2. Create your review link
Getting reviews by asking digitally is great because the reviews are given digitally.
Here’s how to make the review link for your Google Business Profile account.
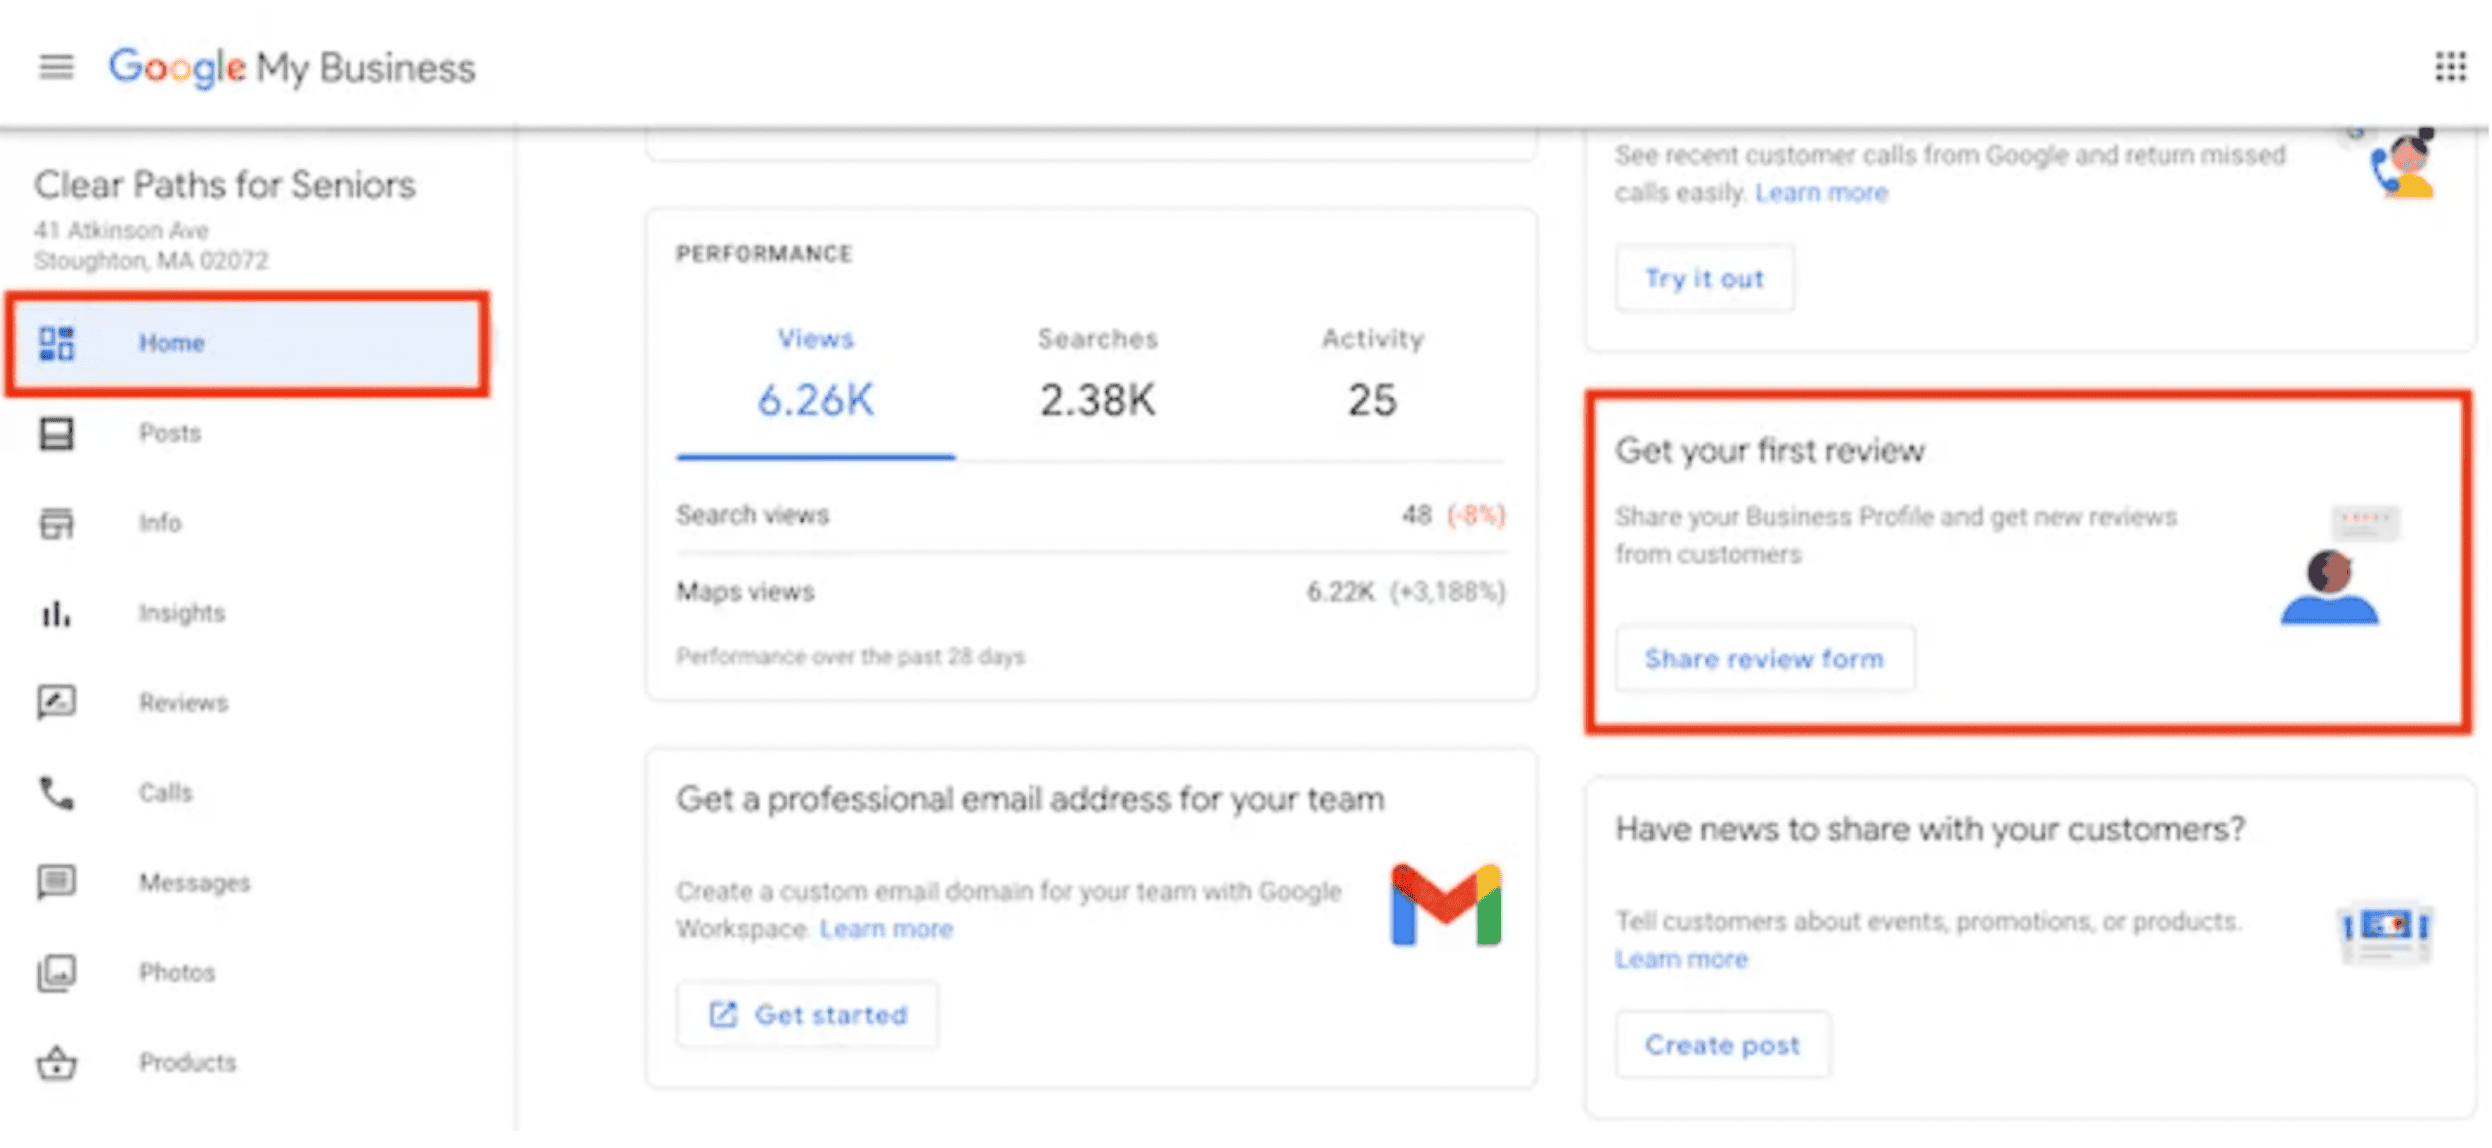
Go to your Google Business Profile account, click the Home tab, and click the “Get your first review” (or “Get more reviews”) card.
The link is quite long, so if you want to shorten it, Google recommends these tools:
Whatever the case, this link will send people who click on it directly where they need to go to leave a review for your business.
3. Reach out to previous customers
To get reviews, all you need to do is ask. It’s that simple.
If you’re a service business, reach out to old customers via a personal email or phone call and tell them that you’re working on SEO for your business and heard that reviews on Google can help, and ask if they could leave one.
Don’t sugarcoat it or beat around the bush. Happy customers are happy to leave a review.
If you need some inspiration, check out these examples.
Step 4: Set up and optimize your website for local SEO performance
When it comes to your website, three things matter:
- Speed
- User experience
- Structure
We wrote about this in our eBook, “How to Rank in Google for Any Keyword in 3 Steps.”
Here’s that section. Contact us for a free copy if you’d like to read the rest!
1. Make your website insanely fast
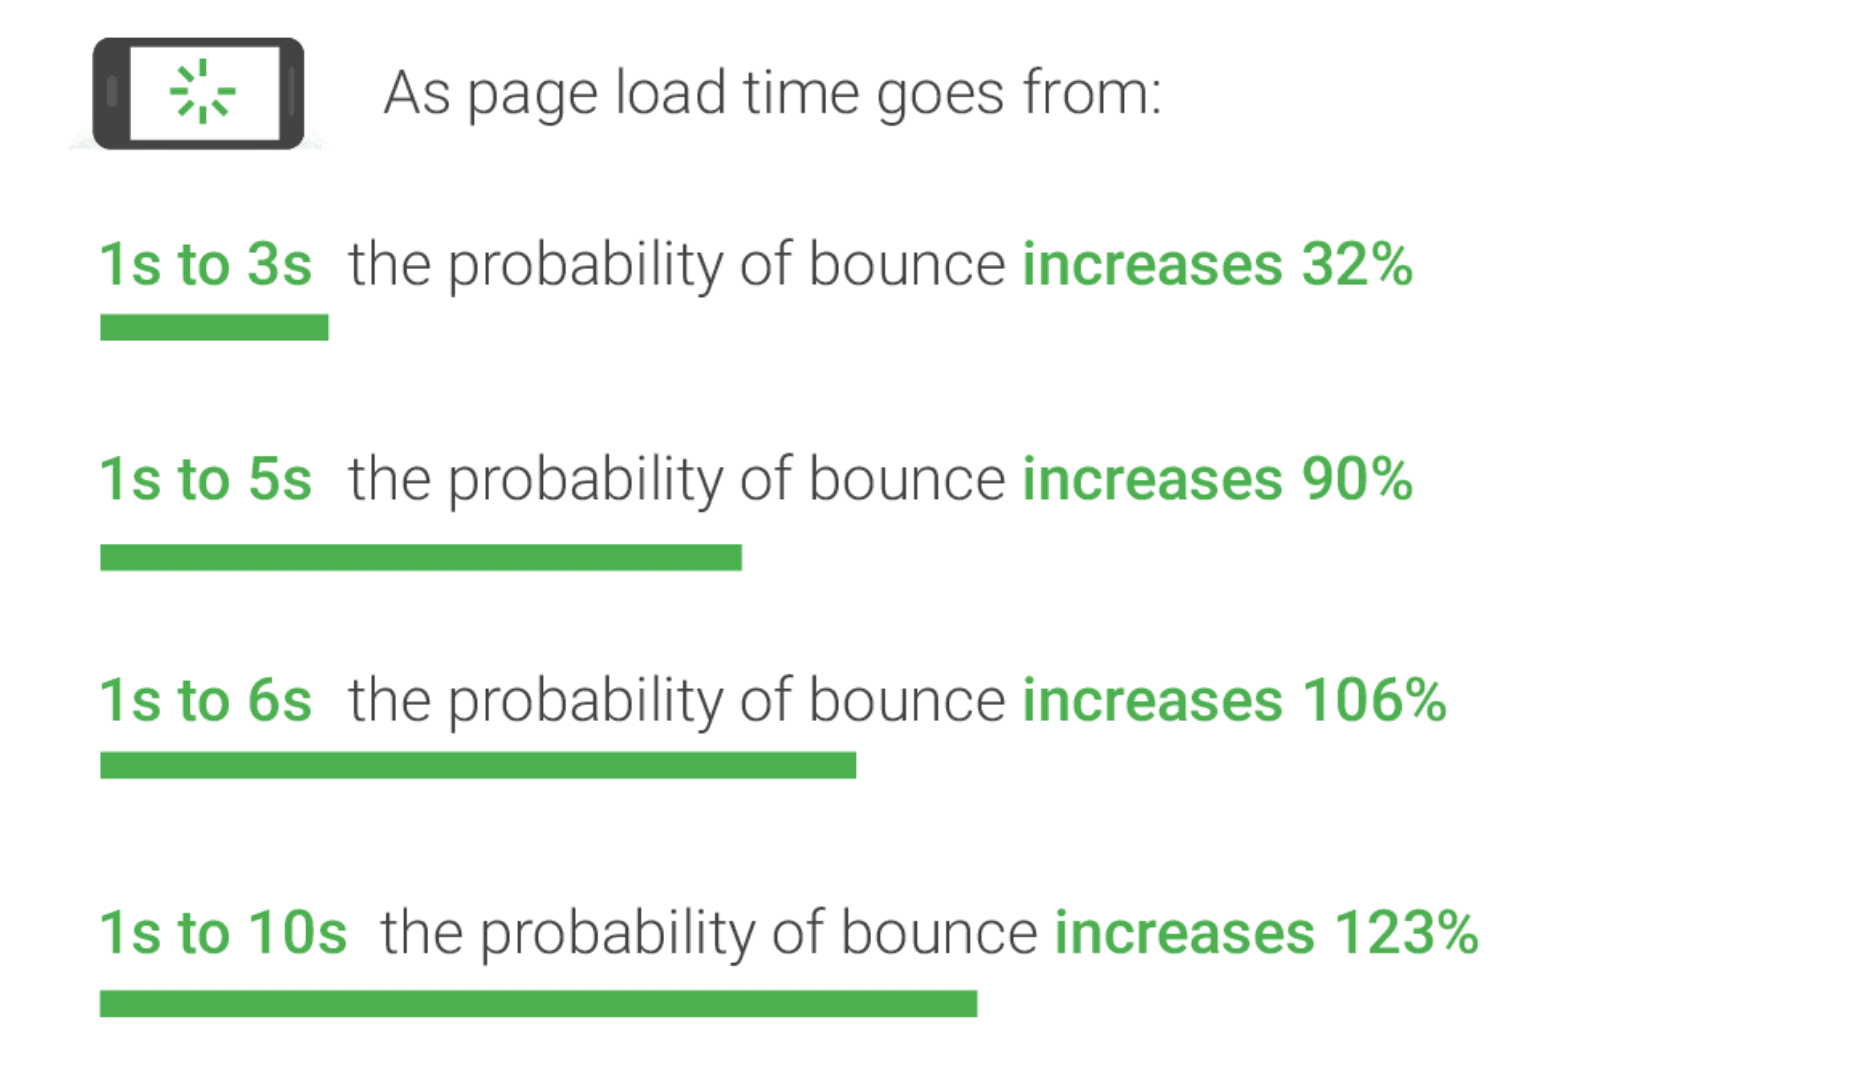
Speed should be an ongoing primary focus of any website that takes SEO seriously. Google has recently given faster websites more weight in the rankings. This is part of their focus on core web vitals as a user experience factor.It makes sense. In one of their studies, they also found that page speed has a massive impact on bounce rate.
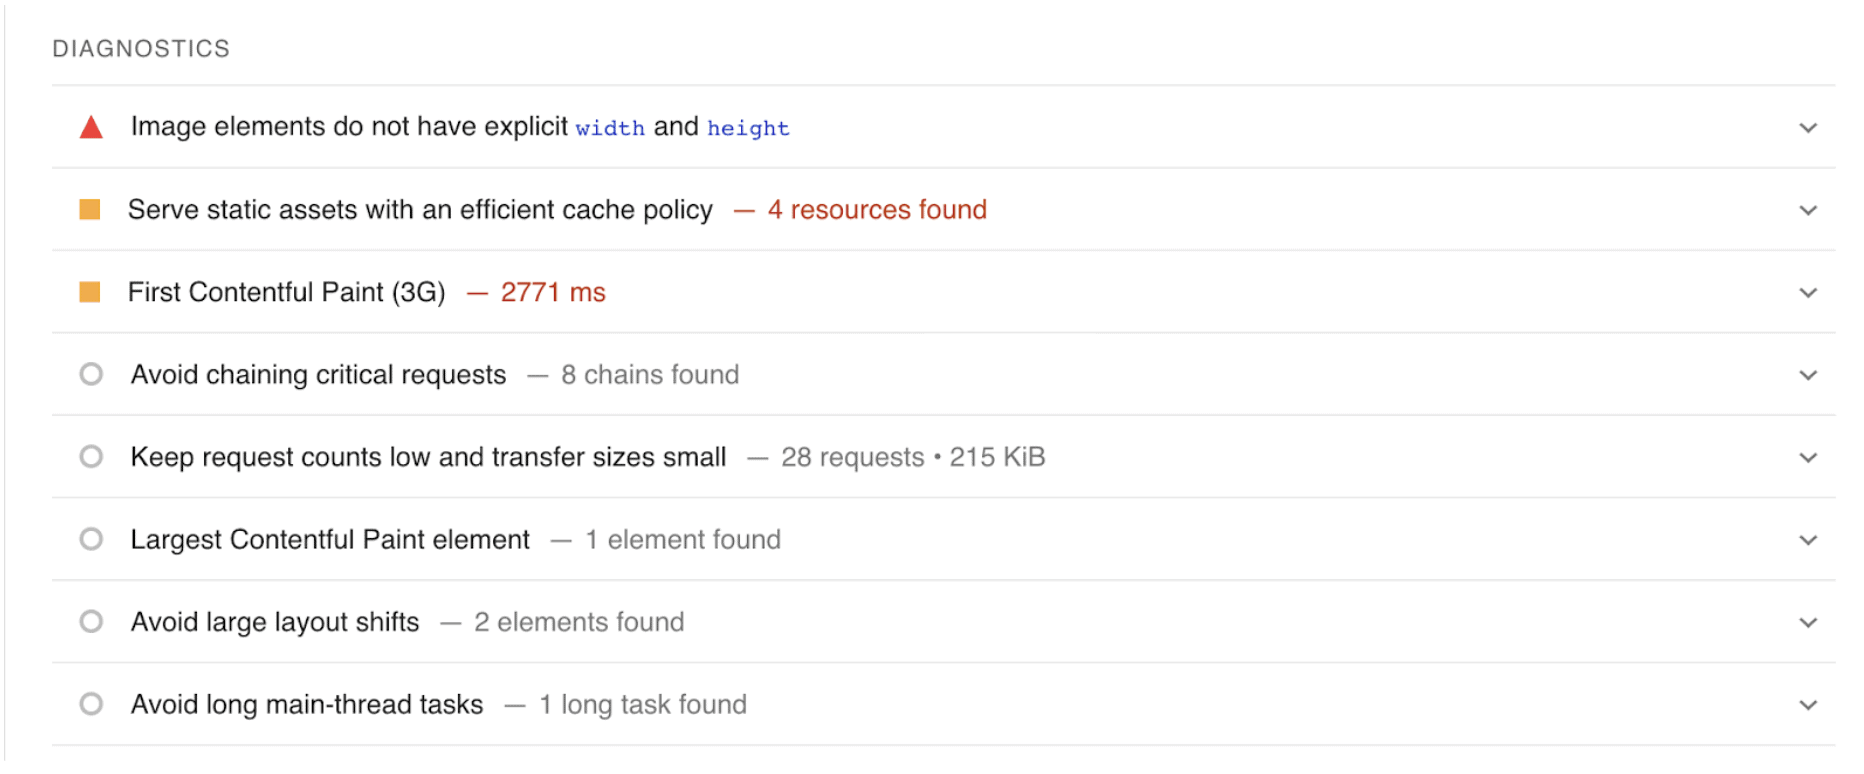
To make your site faster, put your website into Google’s PageSpeed Insight tool and have a developer go through and fix the issues in the diagnostics section.
This will speed up your site.
2. Make things beautiful, readable, and simple
If you use Google, you know how frustrating it can be to click on a link and spend forever looking for something.
Even worse if you end up not finding it.
By making your website visually appealing, easy to read, and simple to navigate, you help avoid users becoming frustrated by these things.
There are many ways to apply these concepts, such as:
- Colors: Basically, don’t use too many. The Handbook of Computer-Human Interaction recommends using no more than five colors in your design, but you can use a range of three to seven.
- Font: The font you choose should be easy to read, so nothing too artsy and keep script fonts to a minimum. Also keep text color minimal, and be sure it contrasts with the background color of your page. A good rule of thumb is to use a maximum of three different fonts and sizes.
- Graphics: Make sure you’re only adding graphics that add value to your users. This includes just to make it look better, but keep your design and brand in mind.
- Spacing: Make sure text, buttons, and images are spaced in a way that makes it easy to read.
- Limit the options: According to Hick’s Law, increasing the number and complexity of choices will increase the time it takes for a person to make a decision. In website design, this can cause the user to become frustrated and bounce. So limit the options on the page to what’s important, and limit your call to action to one.
Take a look at HubSpot’s homepage as an example of good design.

If you focus on your users, you’ll build what Google is looking for as a byproduct. So when you build your page, follow the above as guidelines and ask yourself, “What would I want if I searched for this keyword in Google?”
If you’re having trouble making changes to your page, you can install HotJar to get some screen recordings of people using your site to see what might be causing them to leave or not convert.
3. Write a search-friendly title, meta description, and URL
The way you use these impacts your SEO because Google uses them as direct ranking factors, but they also impact click-through rate, which determines how many people click on your listing in Google’s search results.
For the title, put your target keyword in the beginning of your title and follow it up with a descriptive headline that attracts a click.
You can do this by looking at page titles that are already in the search results, and adding something that showcases some extra value to the user.
This law firm accomplished this perfectly by adding “Available 24/7” to show users it will be easy to contact them anytime right in the title.

When you write meta descriptions, write something that will encourage a click. Google doesn’t use meta descriptions directly, and sometimes chooses their own, but this is a good way to convince searchers to click your result instead of your competitors’.
Most meta descriptions should be under 160 characters. Other than that, stick to these tips:
- Stick to your brand voice and tone, but also keep it conversational.
- Include your primary keyword if you can do so naturally. This will make it show in bold to the user to grab more attention.
- Summarize the content as you might in a social media post.
- Include a call to action, such as “Contact us here!”
- Write in active voice.
- Make sure your descriptions match your content. Don’t trick the user.
- Make sure every page on your site has a unique meta description.
If you can’t think of anything, default to a question and answer format. Ask a question where the searcher’s answer is “yes,” and follow up with your short pitch. This LA law firm does it well.

Finally, when it comes to the URL, here are your guidelines:
- Include your primary keyword.
- Keep it super short. Top ranking URLs usually have fewer than 50 characters in total.
- Don’t use any numbers or dates. This leaves room for changes later down the road without the need for 301 redirects.
That’s it! Both of the examples above follow all of these rules.
If you want a closer look into the finer details of on-page SEO, such as how to use H tags correctly, and use images and internal linking, check out this guide from Backlinko.
Step 5: Get local backlinks
Local backlinks are how Google knows they can trust you because they know that your online local community trusts you.
That’s why these signals are used to determine what shows up at the top of a Google search.
You can get these by executing the three link building strategies below, or hiring a link building agency to help.
1. Local guest posting
We’ve published an article about guest posting outreach before, but here’s a summary of what you do:
- Find websites in your area that publish blog-style content.
- Reach out and pitch some content ideas.
- Write the content for them with a link in it to your website.
For local businesses, it’s important to target this effort to your local area.
We frequently do this by going after other businesses where our clients can offer some perceived value based on their area of subject matter expertise.
For example, we have this client, Willis Lawn Services. They’re experts in all things lawn care and landscaping.
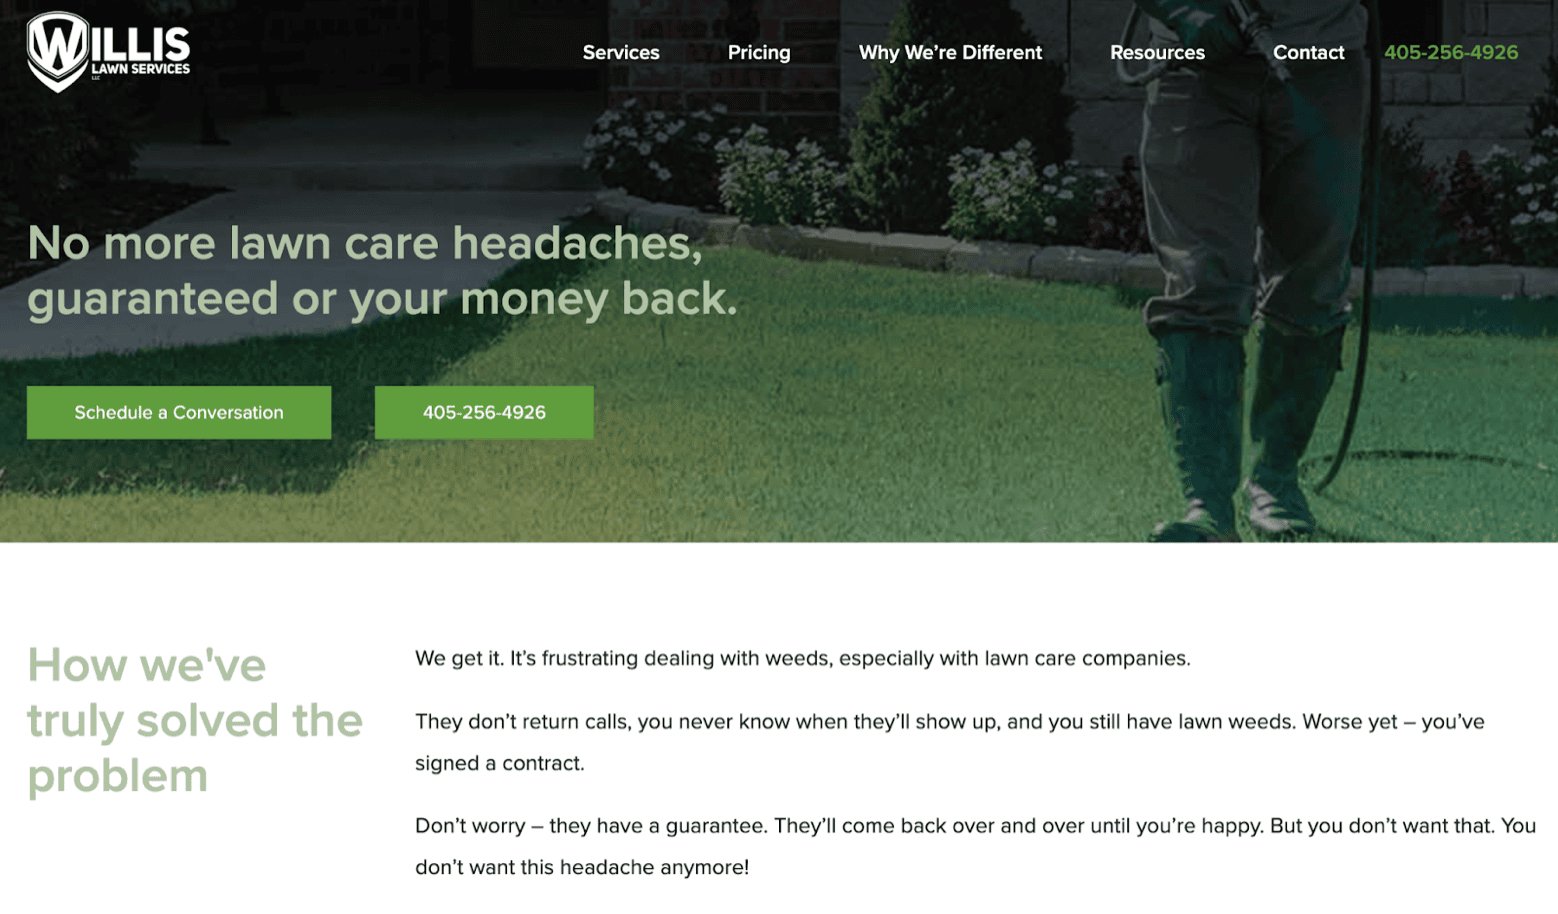
Real estate websites, however, publish helpful content like this to attract home sellers.
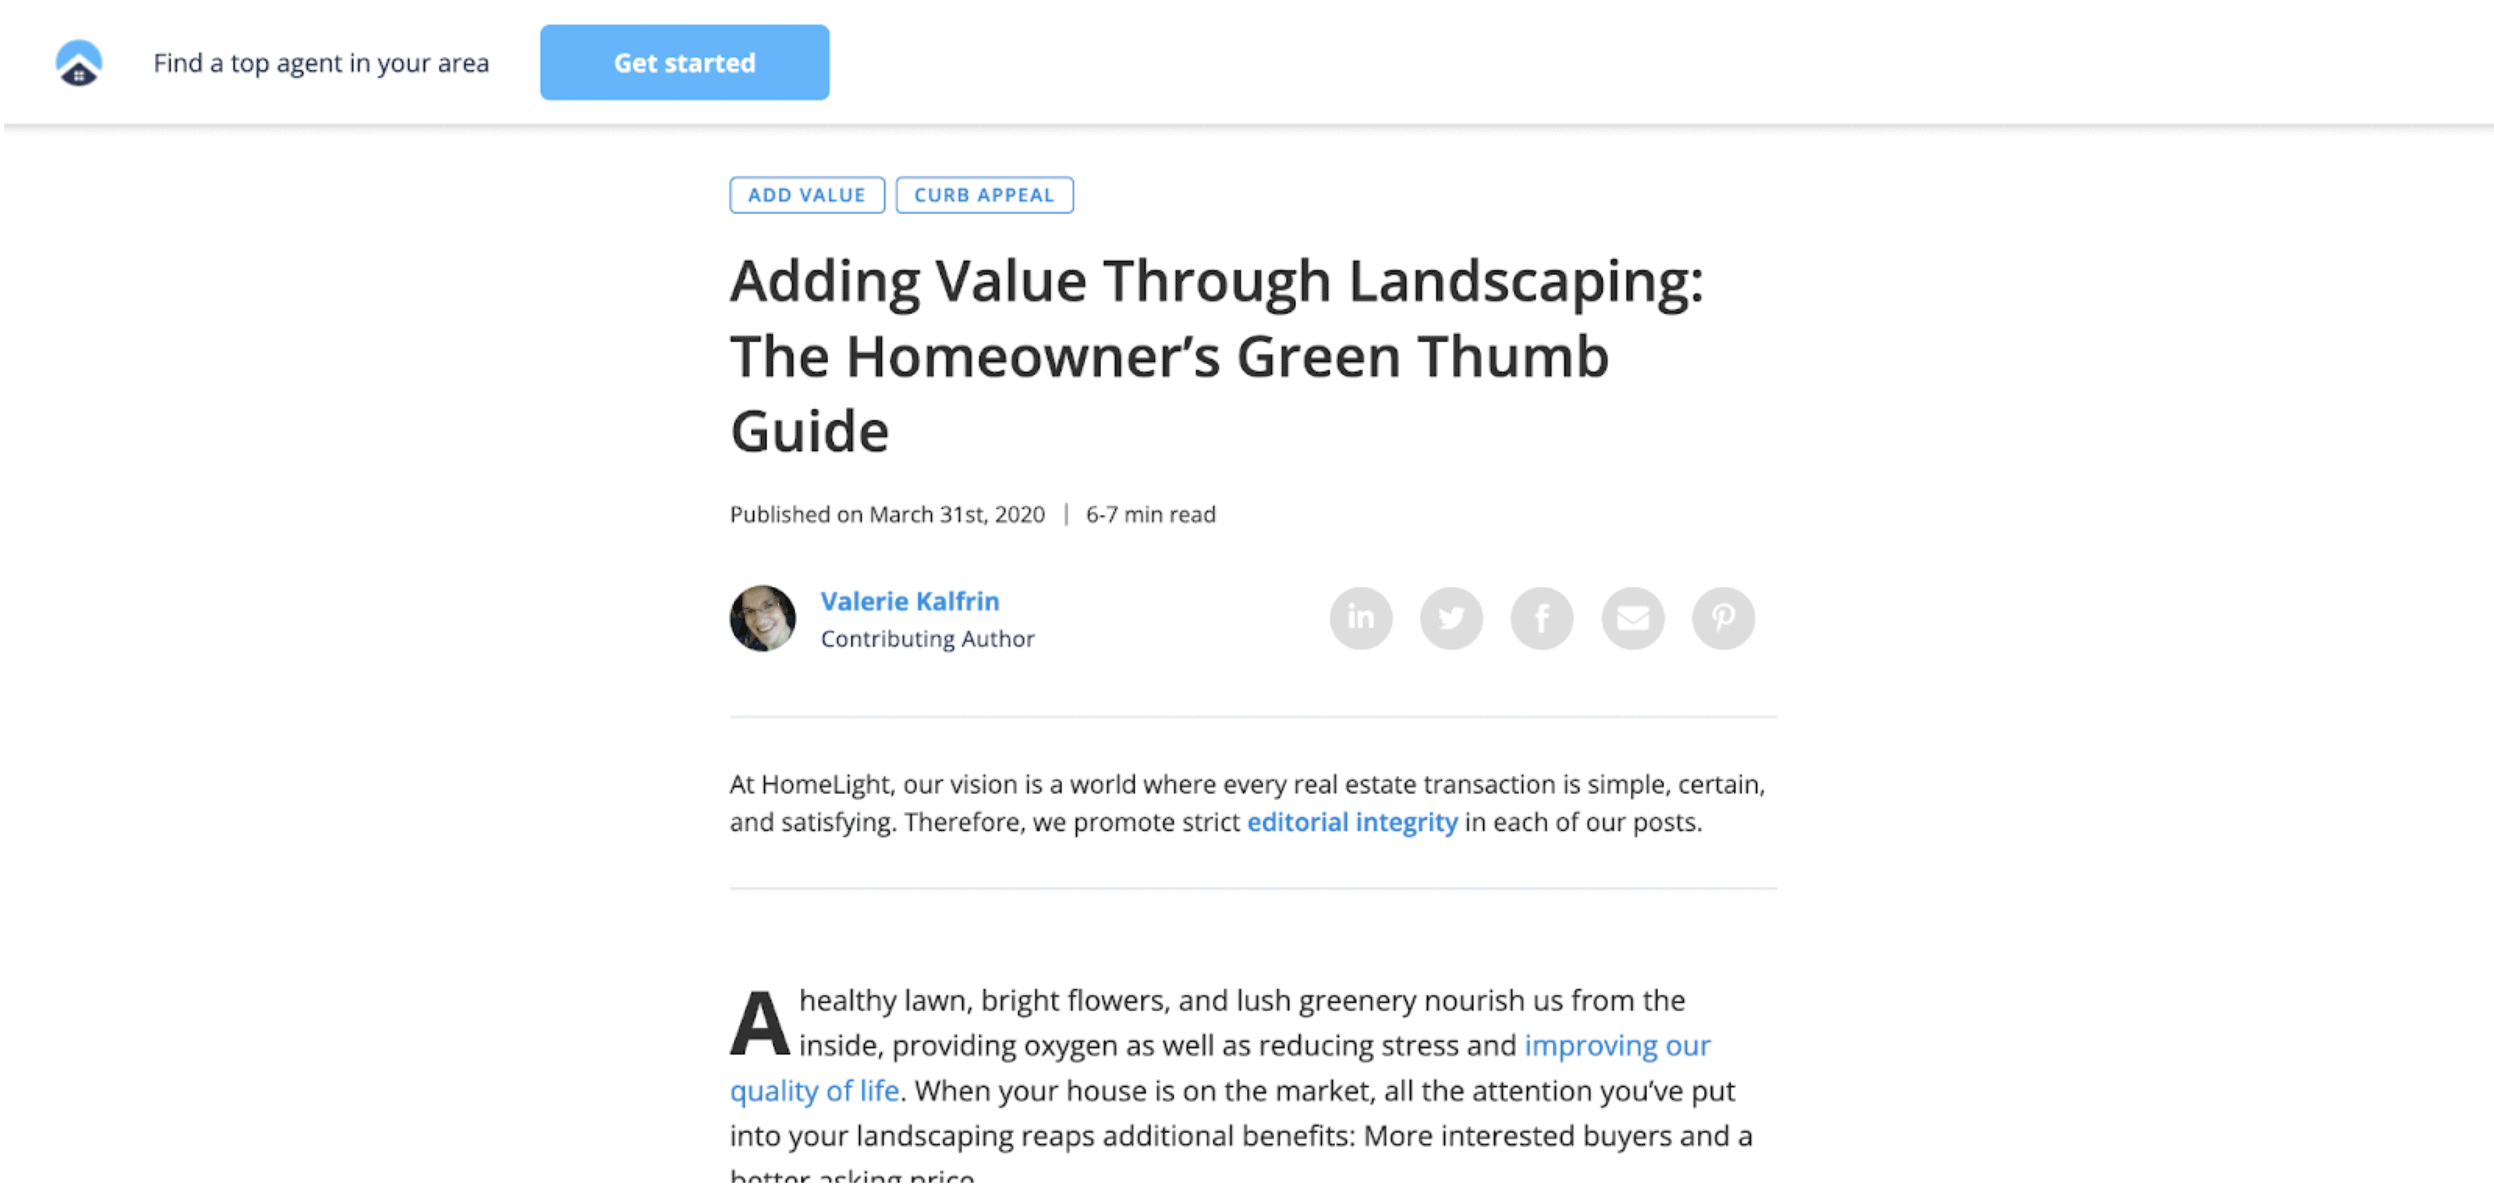
Because Willis Lawn Services knows landscaping, it makes sense for us to pitch local real estate agents about similar topics as guest posts.
There’s no perfect formula for this. Just look for ways you can add value to other businesses in your area on the internet and write a good pitch.
2. Local lists
This strategy is pretty straightforward.
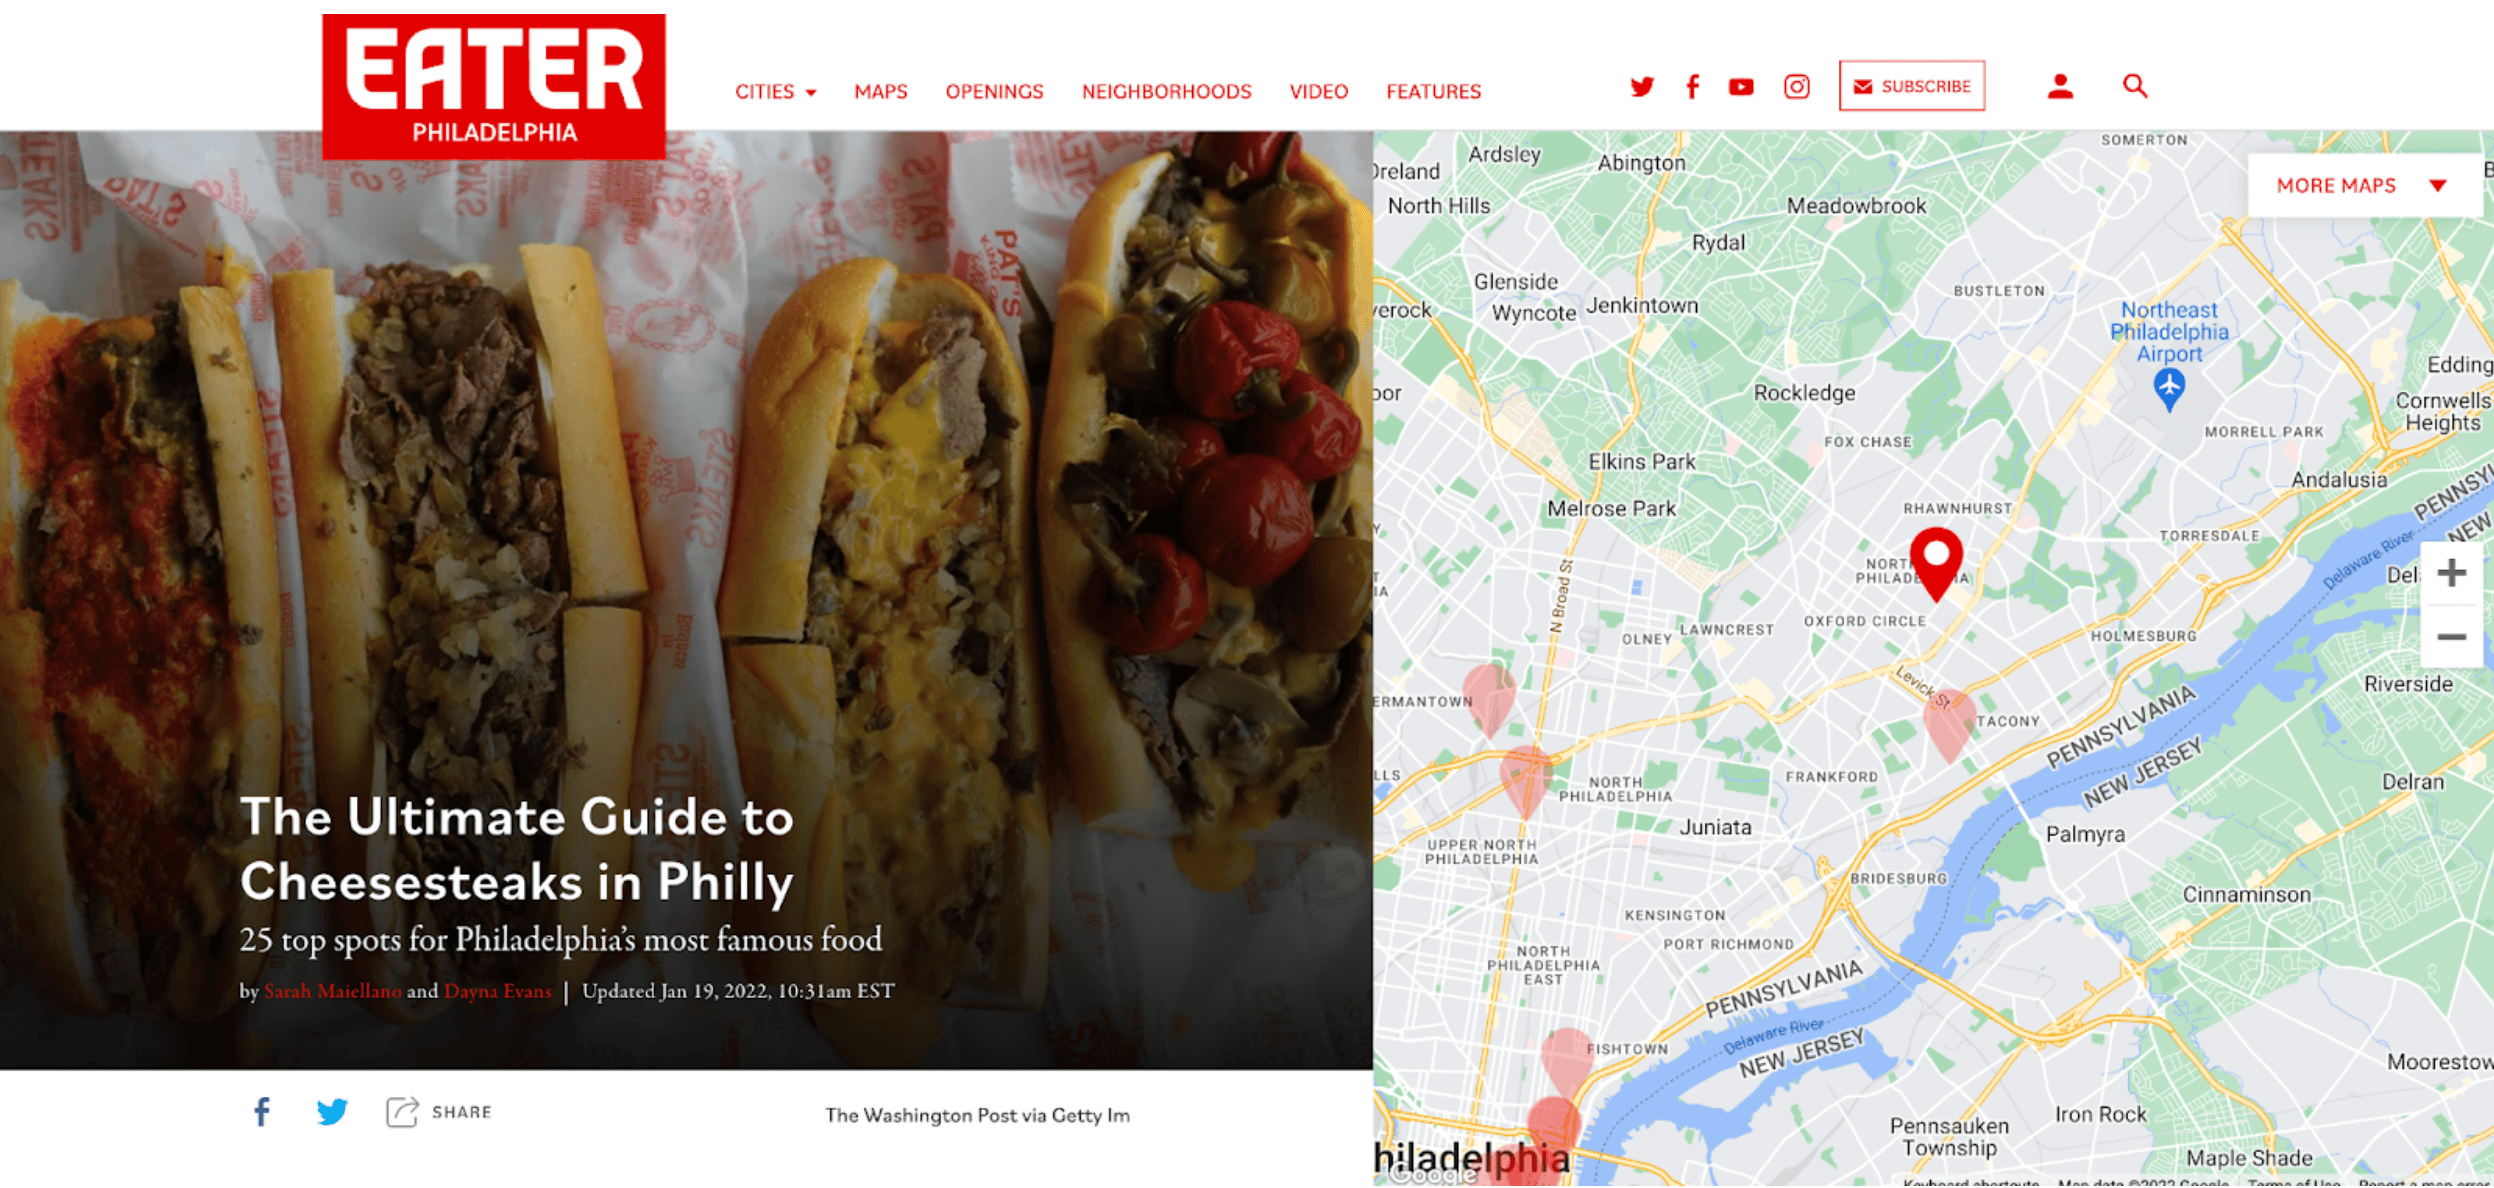
Look for “places to,” “best,” or “things to do” lists that fit your business type online and reach out to them asking to be added to it.For example, if you’re a restaurant in Philadelphia that serves Philly cheesesteaks, you’d just type “best Philly cheesesteaks in Philadelphia” in Google and go through the options, then reach out to the ones that look like they offer their readers variety, like this.
You don’t just have to use your main offering, either. If your restaurant also has awesome ice cream, look for “best ice cream” lists, too!
3. Local digital PR
Localized digital PR is how you get backlinks and TV placements, like this one that we got for Console & Associates with the local car accident statistics campaign we ran for them.

There are a number of ways you can run a successful digital PR campaign, but we do it by creating digital assets that go along with existing stories or trends that local media is looking for where, like with guest posting, our client can offer a unique and authoritative perspective.
Digital PR campaigns are very similar to infographic link building campaigns in that your goal is to create a sharable visual asset that the media can make use of.
Sure, for Console & Associates we created the whole map to be used, but the media only used the pictures of it.
They just need a story to show their viewers/readers that goes along with the other stuff they’re talking about already.
Coming up with the specific story angle takes the most work, but here are some things you can try:
- Look at what your local publications are talking about. What stories are they publishing, and what are they talking about on a continuous basis? Check your local media regularly to see what’s working for them.
- What’s unique about your local community? Could you create a cool map or visualize some data in a way that would appeal to the local media? Choose something that’s locally relevant.
- Choose something topical. If there’s an election coming up, for example, they may not be as interested in your restaurant’s grand opening with free food.
Once you have your story, publish a graphic with about 1,000 words of content about it on your website. This is important because the media will need a page on your site to link to for reference.Once the content is up, make your pitch! Here’s a video about how to do that from Moz’s digital PR guide.


